
Linux is an operating system (OS) that powers computers, much like Windows or MacOS. However, unlike those platforms, it's free and open source. If you haven't heard of Linux, you might have heard of one of its popular distributions (versions) like Ubuntu or Linux Mint. The open source nature of Linux has led to many different flavors with different advantages.
Using Linux has long been a challenge for creatives. Adobe doesn't release their industry-standard apps for Linux, and using them requires kludgy workarounds.
All of this is why Darktable is a breath of fresh air. It's a RAW processor and photo manager for Linux. It's a capable replacement for Adobe Lightroom for Linux users. In this tutorial, I'll help you get started with Darktable.
What is Darktable?
Darktable combines several photo tools under one umbrella. It is a RAW image processor, as well as a photo management tool. There are also some handy tools under the hood in the form of tethering, mapping your images using GPS, and more.


Darktable is divided into modules, much like Adobe Lightroom. The two key modules are Lighttable, which is the photo organization and management tool, and Darkroom, the image correction tool.
Darktable is a non-destructive image editor. It accesses your images "read-only" and doesn't change the original image file. You can preview the edits and changes that you're making in real time, but the adjustments aren't applied to a finished file until you export a copy.
Darktable also outputs an "XMP" sidecar file for each image that stores the edit info. This makes your data more portable and futureproof.
Watch & Learn
Check out the video below to learn more about Darktable and what it can do. Read on to find out more about how to use Darktable.
Install & Get Started
If you're ready to get started with Darktable, great! Let's look at how to install it on Linux.
Most Linux distributions have what's called a package manager that makes it easy to search for, install, and update your applications. If you are familiar with your Linux distribution's package manager, start by searching for Darktable to check for a one-click installation.


If you can't find Darktable on your package manager, the official Darktable installation page has detailed information for several different Linux distributions. Once you've finished the installation, let's move on to trying the app.
Darktable is also available on Mac. Though it can, in theory, run on Windows it's not yet officially supported. Check out the Darktable installation instruction sections for those OS for more details on those builds.
Import Images
When you open Darktable for the first time, you'll be greeted with a blank workspace inside of the app. We need to show Darktable where our images are located in order to get started.
To add images to Darktable. find the Import window on the left side of the application. You can import a single image by clicking on Image or Folder to grab an entire folder full of images. Once you've selected your folder, press Open at the bottom of the window.


One note: Darktable doesn't include the option to rename or organize images in the application. I recommend Digikam or Rapid Photo Downloader for Linux for that task if needed.


Images in Darktable are organized into Film Rolls that are basically virtual folders; each one corresponds to an import in the app. You can switch film rolls in the Collect Images panel on the left side of Darktable. Think of this as a way to navigate your image collections.

Now that we've added images to Darktable, let's start working with them in Lighttable mode.
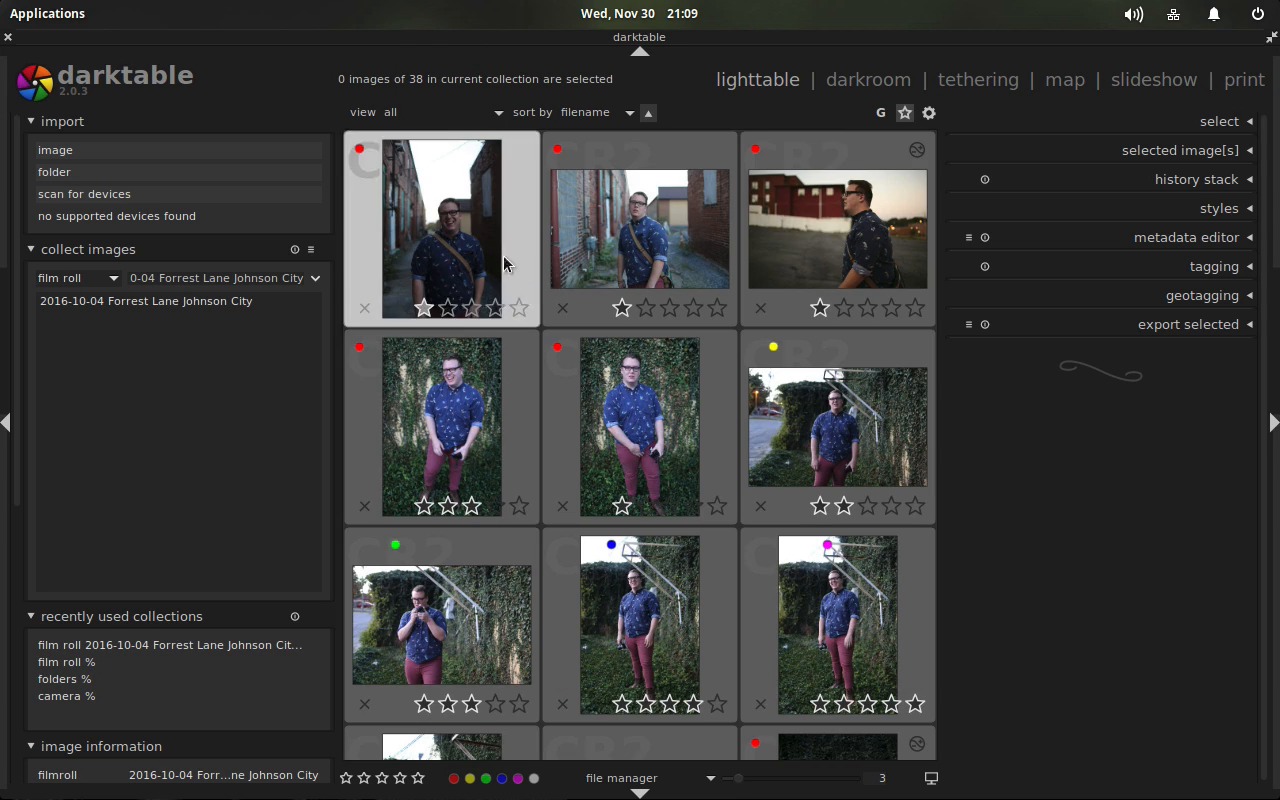
Lighttable View
The Lighttable view is for managing your images. Make sure that you're working in Lighttable view by clicking on "lighttable" in the upper right area of Darktable, or by pressing the letter "L" on your keyboard.
Here are common tasks to perform in Lighttable mode:
Navigate Your Images
A great use for Darktable is as a way to survey and review your images, and the Lighttable view is the perfect way to do that.
Right away, you'll see the images you've selected front and center. You can change your selected images from the "Select images" panel on the left (remember the tip above, each import comes in as a film roll and you can switch between them on this panel).
You can change the thumbnail size by clicking and dragging the slider below the images. You can also change the sort order by clicking on the "Sort by..." dropdown above the images.


When you double click on an image, you'll be transported to Darkroom view to work with the image. You can zoom in and work with the image up close and personal. More on that in a minute.
Tag with Stars & Color Labels
When we're working with an image set, it helps to add useful data to an image. You might want to mark your favorite images with a high star rating, or a color tag for something memorable.
Select an image and try out one of the keyboard shortcuts below to add some meaning to your images:
- Number keys 1-5: add the corresponding star rating to an image
-
F1-F5 keys: add a color label
Unlike Lightroom, Darktable allows for multiple color labels to be added to an image.


Once you have those added to an image, try playing with the filtering and sorting options in Lighttable view. Above the image area is a View dropdown for filtering your images based on rating. There's also a Sort By option that allows for sorting on criteria like rating, capture time, and color label.
Keyword Your Images
Keywording images is one of the most important tasks for managing an image library. Add a keyword to an image and you can browse images based on keyword later on.
To add a keyword, find the Tagging panel on the right side of the app. There is a large rectangular box, and a smaller input window below it. Type your keywords, separated by commas, and press enter to add them to an image. You could also multi-select images and add keywords to multiple images at the same time.


When you want to explore your images based upon keyword, find the Collect Images panel on the left side. Change the dropdown box to tag. You'll see all of the tags in your Darktable collections. Double click on one of those tags to find all images that match.


Darkroom View
Darkroom view allows for RAW image processing and correction. To switch to Darkroom view, select an image in Lighttable view and double click on it or on the Darkroom panel in the upper right area of the app.


The panels for Darkroom view are on the right side. Click on the open circle to access the "Basic Group" adjustments.
Click on the panel title to expand it and work with the sliders to adjust your image. Here are the key panels for adjusting your image:
- Exposure: adjust the overall lighting of an image.
- Shadows & Highlights: control precisely the brightest and darkest parts of an image.
- White Balance: adjust the white point of an image, warming or cooling the overall color tones.
- Contrast Brightness Saturation: this single panel has three key controls for adjusting each control, respectively.
- Crop and Rotate: adjust the composition of an image in post-production.


The best way to learn these sliders is to spend time experimenting with your own images. The sliders that I list above are plenty to correct your RAW images, but there are additional other groups to try out; click on the circles just under the histogram to try them out. When you're finished, let's export a finished image.
Export a Finished Image
Although adjustments and corrections are made in the Darkroom view, finished images are exported from LIghttable view. Select an image and find the export selected panel on the right side of Lighttable view.


Make sure and set a folder to export your image to, as well as a quality using the quality slider. Finally, finish export to save your completed image.
Recap & Keep Learning
It's exciting to see an ambitious project like Darktable continue to grow and evolve. Darktable is an actively supported project that's getting better with time.
There are other features worth exploring outside of Darkroom and Lighttable views. Try clicking on the Tethering view to test out capturing images with your camera connected to your computer, or Slideshow mode as a simple way to display images.
Here are some additional resources if you're interested in Darktable or apps like it:
- If this article sparked your interest in Linux, check out the "What is Linux?" site to learn more.
- Darktable's User Manual is a great piece of documentation and dives into features that were outside the scope of an intro tutorial.
- Ready to break away from your current software? Tuts+ instructor Chamira Young has a list of alternative RAW processors to try out.
- The official Darktable website also has a news page that logs the latest development on the app. Keep your eye on this page if you're interested in Darktable!
I'm especially interested in hearing from the Tuts+ readers that are daily Linux users. How are you processing your images?


