macOS might not be known as an enterprise server platform. But you can still share files and Time Machine backups using Apple’s macOS Server application.
Installing Server
1. Purchase the most recent version of macOS Server from the Mac App Store. Versions are particular to each operating system, so if you have an earlier version of macOS Server, it won’t work with Sierra. You’ll need to purchase the most recent version, which is version 5.2.

2. Open Server from the Applications folder.

3. You’ll be greeted by a startup window. Click the “Continue” button.

4. Next, click “Agree” to accept Server’s licensing agreement. Note that “Use Apple services to determine this server’s Internet reachability” will be checked by default. This will toggle your server’s ability to ping Apple’s servers to check on it’s own service availability. We can leave this checked, since it will make determining uptime easier in the future, if necessary.

5. Enter your administrator password and click “Allow” to finalize the installation.

6. Server will run its setup scripts, which takes up to a minute.

Setting Up macOS Server
1. Once Server has finished its first-time setup functionality, it will open to the main Server screen.

2. In the center of this window you’ll see some info about your server.

3. The server’s default name is “Alexs-iMac.” This is a dumb name.

To apply a more unique moniker, I’ll click the “Edit Host Name…” button. This will also prompt me to do a little first-run server setup.

4. The popup window will explain what a host name is. A host name is the name your computer will use on your local network, like its own username. Click the “Next” button.

5. From the next popup, choose “Local Network” and click “Next.”

6. At long last, we can give our server a better name. Click in the “Computer Name” text box and type in an excellent name.

Note that you can only use the characters a-z, 0-9, the space, and the hyphen symbol (-) for your computer name.
Personally, I like to use “w8r,” since it’s kind of a hax0r-restaurant-themed pun on “server.” I’m fun at parties.
7. Your host name, seen below the “Computer Name” box, will automatically change to match your new computer name. The host name is a little more restrictive, so any spaces in your computer name will be converted to hyphens in your host name. When you’re done, click “Finish.”

8. That wasn’t so hard after all!

Sharing Files With Server
Now let’s make it useful with services. Services are all the things that your server is capable of doing, from sharing calendars and hosting email to backing up multiple Macs on a centralized Time Machine backup. We’ll make our server useful by setting up the File Sharing service.
1. Click on File Sharing in the Server window’s sidebar under “Services.”

2. Click the big “Off” toggle in the upper-right of the window.

3. The toggle will turn green and say “On.” The “Status” icon will also turn green, and you should see the server under the “Shared” section of Finder.

4. To make specific folders accessible to connected users, click on the “plus” button under Shared Folders and select a folder from the popup Finder window.

Connecting To Your Server
Now that our server is online, any Mac on the same local network can connect to it.
1. Choose “Connect to Server…” from Finder’s “Go” menu, or press “Command + K” with Finder active.

2. Type in your server’s host name (which ends in “.local”) using the prefix “afp://” and click “Connect.” For example, I’ve typed in afp://w8r.local, as seen below.

3. All our shares are guest accessible right now, so there’s no need to sign in. Click the radio button next to “Guest,” then click “Connect.”

4. Choose the folder you want to access, then click “OK.”

5. A Finder window will open showing your newly mounted folder. You’ll also see your connected server under the “Shared” sidebar.

Advanced Usage: Setting Up Time Machine
Now, you might say that you could accomplish the same file sharing trick in System Preferences, and indeed you could. Some of the functionality in macOS Server is already available in the base OS. But some things, like backing up multiple Macs to a centralized Time Machine disk, are not.
1. Click on “Time Machine” in the sidebar, under “Services.”

2. Click the “Off” toggle in the upper-right of the window.

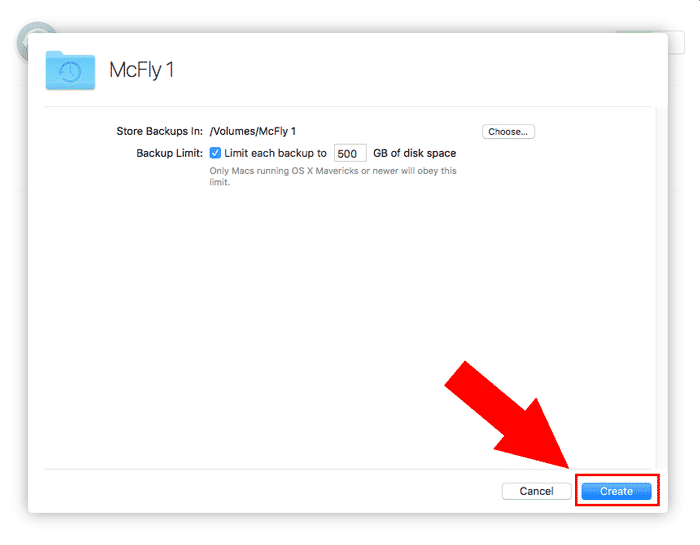
3. In the pop-up window, click “Choose..” to select the location you want to use as a backup disk.

4. You also have the option to limit users to a specific amount of disk space. If you want to enable that, tick the checkbox next to “Backup Limit” and type a number in the text box. The default setting is 500 GB.

5. Click “Create” when you’re done to create the Time Machine location.
6. Success! This disk will now be a selectable Time Machine backup for any users on your network.

You might also like: