How to set a different default gateway for your iOS devices
Getting connected to your network shouldn't be a difficult thing. Apple makes certain of this by making its hardware and software work in tandem so that things "will just work" as long as you remain within the Apple ecosphere. In Apple's goal to keep things simple, some less oft-used settings get weeded out and in so doing, forces end users to keep their network and computer configurations within that simplified scope.
Sometimes, however, you may need to branch out from "simple and easy" and delve into configuration settings beyond what Apple deems as "needed". Here we show you how to change your default gateway (the main router out of which you get to the internet) on iOS devices.
Elaborating on changing the default gateway
Why bother doing this?
There are a few reasons to change your default gateway). In a business setting, using a preferred ISP for internet access or gaining secure access to a separate internal network may be required. Another reason that can be useful for home users is to connect to a gateway that has a singular yet permanent connection to an outbound virtual private network (VPN) server. We will detail this last aspect.
How does this help with a VPN service?
Depending on your VPN service, you may be allowed only a limited number of connections to their service. Let's say that your VPN service provider allows you to have only one device connected at a time to their service. If you have two devices, only one device can be securely connected to the VPN service whilst the other cannot connect to the service at all. If you create a gateway with a singular and permanent connection to the VPN service, you can route other network devices through that gateway while only using one connection to the VPN service.
Secondly, you may not want all of your devices on your network passing data through your VPN service provider. Companies like Netflix actively block VPN server IPs and VPNs tend to slow down your bandwidth speeds and increase latency for things like online gaming. You may want to only have your personal devices going through your VPN service rather than having guest devices use up that encrypted bandwidth. Having two internet gateways, one for traffic you want encrypted and one for traffic you do not need encryption, makes sense.
What's the problem that needs to be solved?
Assuming you are using an Apple Airport Base Station (or a similarly simplified router), you unfortunately cannot set different gateways for your network devices at the DHCP server. You also cannot create a dedicated shared VPN connection to a VPN service with these routers.
Secondly, if your interest is in having only some of your network devices passing through to your VPN service provider, then a secondary gateway would be required regardless.
Master your iPhone in minutes
iMore offers spot-on advice and guidance from our team of experts, with decades of Apple device experience to lean on. Learn more with iMore!
Note: There are routers and home built solutions that can set different gateways to different network clients that render this how-to moot but if you don't have one of those available, this solution does the same job.
Without further ado — let's get to it!
Create a DHCP reservation for the devices you want changed
The dynamic host configuration protocol (DHCP) server acts as a manager for your network by ensuring that devices avoid mistakenly getting the same IP address. Although we will be setting gateways on our individual devices manually, we need to "reserve" the device's IP address with the DHCP server so that no new device that comes on the network gets the same IP address as your manually set device thus resulting in a conflict. Here's how to set this up.
Find the MAC address of an iPhone or iPad
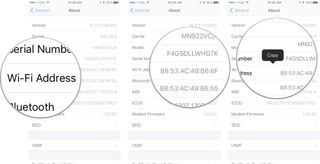
Before you begin, you'll need the MAC address of any device you want to add to the DHCP server. The MAC address is the unique identifier of that device's network card.
- Launch Settings from the Home screen.
- Tap on General.
- Tap on About.

- Touch and hold on Wi-Fi address.
- Tap on Copy.
Reserve the MAC Address for your device
Next we put the MAC address into the Airport Base Station DHCP service.
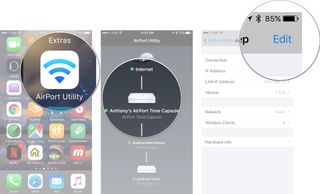
- Launch the Airport Utility.
- Tap the Airport Base Station that is connected to the internet.
- Tap Edit.
- Tap Advanced.
- Tap DHCP and NAT.
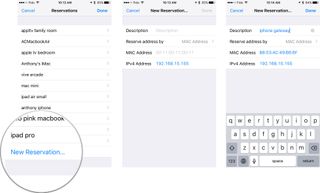
- Tap Reservations.
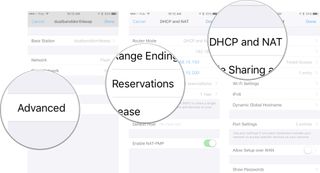
- Tap New Reservation.
- Type in a Description of the device you are adding.
- Tap the whitespace next to MAC Address and paste the MAC address you copied earlier.
- Copy the IPv4 Address as we will need this later.
- Tap Done.
- Tap Done a second time.
- Tap Done a third time.
- Tap Done a fourth time.
- Tap Done a final time.
- Tap Update to reboot the router.
Set your new gateway
You must now manually set the new gateway on each device you plan on using.
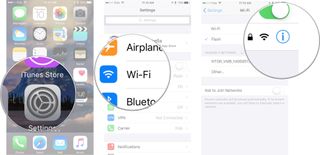
- Launch Settings.
- Tap Wi-Fi.
- Tap the Information icon for your connected Wi-Fi network.
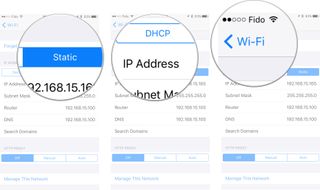
- Tap the Static tab.
- For IP Address set the IP to the IPv4 IP you copied when you created a DHCP reservation above in step 10.
- Enter a Subnet Mask of 255.255.255.0. (N.B. depending on the complexity of your network this may need to be changed)
- Under Router, enter your new dedicated gateway IP.
- Enter the DNS for your network. (N.B. If you're in need of a DNS entry other than your main router gateway, you can use Google's DNS server by entering the IP of 8.8.8.8.
- Tap Wi-Fi.
- Done!
Final thoughts
Do you have any non traditional setups for your network? How do you make it work for you? Let us know in the comments!
Most Popular


