
If you’re used to dealing with file access permissions in the Finder, trying to do so in Terminal may come as a bit of a shock. Because setting and changing permissions is such a common task at the command line, it’s all done with cryptic commands and with octal arithmetic. The aim of this short article is to make permissions more accessible to all, particularly those who avoid using Terminal.
The model is simple: in standard POSIX permissions, each file and folder/directory has three sets of permissions:
- The user, or creator, who actually owns the file/folder;
- The group, normally one which has the user as a member;
- Everyone else.
For each set of permission, those identities can in turn read, write, and execute in any combination, giving eight different settings in all. These are shown in the Finder’s Get Info dialog, at the foot.
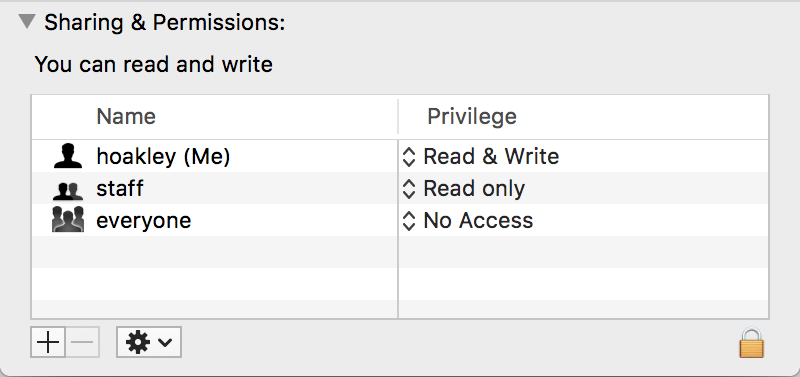
In this case, the file is owned by the user hoakley, who has Read & Write access to it; the user hoakley is a member of the group named staff, whose users only have Read access to it; all other users are denied access, so that they won’t be able to read or write this item.
The Finder’s interface is easy to use, but can also become clumsy, and can’t be accessed, say, by a shell script. There are many occasions when it is much easier to change a bunch of permissions in one fell swoop. The Finder helps you do this by letting you set the permissions of a folder, and then apply those same permissions to all enclosed items (from the cogwheel menu of the Permissions section of the Get Info dialog). But there is no more power or flexibility than that.
Before changing permissions in Terminal, it’s wise to check what they are now. Do this using the -le option to the ls command, for example
ls -le testLetter2y.tex
giving
-rw-r-----@ 1 hoakley staff 1086 6 Jan 07:00 testLetter2y.tex
Permissions are shown at the left, and consist of dashes to mark those turned off, and letters to show those turned on. We can group them thus:
- | rw- | r-- | --- | @
The first solitary place can be marked with a d to denote a directory/folder. As this is a file, it is left blank.
The next triplet shows permissions for the user/owner, in the order read, write, execute. So here, the owner has read and write permissions.
The second triplet shows those for the group, which here are read only.
The third triplet shows those for everyone, which here are for no access.
The last character here shows that the file has extended attributes; it could instead be a + to indicate that there are access control lists (ACLs), but is most commonly blank.
On a few files, you will see the x for execute replaced by s, S, t, or T. Those additionally specify settings for setuid/setgid and the ‘sticky’ bit, which are more specialised and shouldn’t be encountered in your Home folder, for example.
The most important and frequently-used command for setting and changing permissions is chmod, which can and does work with rwx notation. However, in many circumstances it is best used with a different notation, employing octal numbers.
One way to express each permissions triplet is to turn it into binary and octal. Let’s set a bit for each of the permissions instead of using a letter. If the read bit is binary 100 (decimal 4), the write bit is binary 010 (decimal 2), and the execute bit is binary 001 (decimal 1), we can add them together to encode them in a single number:
000 is ---
100 is r--
110 is rw-
111 is rwx
and so on. This gives us a series of numbers from 0 to (4 + 2 + 1 =) 7 for each of the triplets. These can therefore be taken as octal digits, which have the same range.
This gives us, for example
--- 000 = 0

r-- 100 = 4

rw- 110 = 6

rwx 111 = 7
So instead of using rw-r----- notation, we can just use the series of octal digits 640, which is much easier to handle in bulk, and much quicker to type. Now you can put together the chmod command to set a file’s permissions to rw-r-----. That is 640 using octal digits, so the command becomes
chmod 640 testLetter2y.tex
As an exercise, create a test file, and set its permissions using a chmod command, viewing the result using ls -le, and in Finder’s Get Info. Change the permissions again to something different (ensuring that you, the owner, keep read and write access), and repeat until you’re happy working in the three different systems.
