Pelican Guide - Moving From WordPress and Initial Setup
When I moved this site off of WordPress, I wanted three things:
- A blogging platform I understood
- Speed
- Convenience
I decided to go with a static blogging platform that generates simple HTML files and does not have a database back-end. Out of the many freely available options I chose Pelican. Pelican checked all of the right boxes and a couple that I didn’t consider. It’s based on Python, which I feel comfortable working in and it receives regular and meaningful updates.
The documentation for creating a new Pelican site is great. In contrast, there is almost no good documentation for migrating a WordPress site to Pelican. While Pelican provides built in tools, they did not work for me. Every effort failed to generate a cohesive site.
Hopefully this article can help someone else. It will also serve as a reference for me in the future.
Warning
If you care about SEO or any kind of web-guy acronyms don’t listen to me. I don’t care about SEO. My titles rarely describe the topic. I don’t use keywords. The extent of my efforts is generating a sitemap and that’s really done to make life easier for readers.
Moving a site will break all of the biz-dev opportunities benefiting from the synergy of platform leverage… yada, yada.
Why Not SqaureSpace
SquareSpace is great. I have a SquareSpace account for non-blog work. It may be the best quick prototyping system around. But it does not offer code syntax highlighting or FTP access. I post a lot of code samples. I wanted code highlighting to be built in. I also have a lot of automation built on FTP access to my server. I really tried to move to SquareSpace but it was not in the cards this time.
Getting Ready for a Move
Starting a new site on Pelican is dead simple. Install Pelican and the process a folder of posts with it.
Moving an existing site is quite complex, especially coming from WordPress where everything is stored in a database.
Screenshots
Take some screenshots of your site. Once the WordPress site was gone the screenshots were a quick reference for me to remember what I liked and what I wanted to change about the old site.
I also took some screenshots of my plugin page and other customized pages.
Custom Code
I used several JS imports on my WordPress site to tweak things and add tracking. I captured all of these to notes before shutting down.
I also grabbed my robots.txt file and all of my theme folders to have as a future reference. I customized my theme’s CSS quite a bit. While I keep regular backups, I actually verified that the newest versions had everything I needed.
If you have an htaccess file, grab a copy of that too. I also had custom 404 pages that I wanted to translate to the new site.
Save The Data
I exported my entire WordPress database to several file formats. I left the database up on my host but these exports were a piece of mind. I used the native WordPress export but I also exported from Sequel Pro. I just never trust a single mechanism to work perfectly.
I am also a Feed a Fever user. Fever data is stored along side the WordPress data. Fever does not require WordPress but it does require Apache, PHP and MySQL which all come as a result of WordPress. I still have not completed the migration of my Fever install.
URL Structures
Take a really good look at how your URL’s are structured, while they are live. I actually had pages with different structures. Remember, changing the URL structure means that incoming links will break, Google will cry, and puppies will die. There’s a way to mitigate this, but not without knowing the current design.
Get the URL of your current feeds. The new feed URLs are likely to be different. Redirects will be necessary. The feeds will be gone after killing WordPress.
I also copied down the URL’s for my category and static pages.
Summary
Here’s a quick summary of what to do before migrating:
- Screenshots of pages
- Download the entire WordPress theme folder
- Get copies of robots and htaccess files
- Get copies of any custom pages like 404, About, etc.
- Copy any custom JS scripts that have been added to WordPress
- Write down examples of URL’s for pages, articles, tags, etc.
- Write down all of the feed URL’s that are being served.
- Export the WordPress database in a couple of different formats using Sequel Pro
- Backup the WordPress content in a native WordPress format
The Big Move
Time to make the move, but the data needs to be extracted and massaged first. This is the curse of moving data. It’s never an easy fit into a new system.
Extracting Data
I extracted data to plain XML from my WordPress database using Sequel Pro. I’ve already written about that. This entire process depends on having the WordPress resources in a well structured XML file.
I also extracted the old comments. I still plan to add those to the old posts but that has not happened yet. All of the comments were stored in a single table in my WordPress DB called “wp_comments”. I just exported this as generic XML too.
Massaging Data
I planned to change my URL structure because otherwise this project would be way too easy.1 My links went from this structure:

to this structure:

The ending slash was replaced by a “.html”. I had two ways to avoid breaking internal links. One is to change all of the internal links in my content and the other is to write an .htaccess redirect for links ending with a slash. I did both.
I used BBEdit’s Find and Replace with grep matching to change internal links. It took about 30 minutes to go through my 1500+ posts. I didn’t use “Replace All” because I do not trust computers. 30 minutes is a small amount of time in comparison to the time spent fixing broken links after the fact.
Categories were a bit tougher but still pretty easy using grep with regex matching in BBEdit. My categories were changed from this:

to this:

I also decided to use the default Pygments code syntax highlighting option in Pelican. That meant I needed to slightly change the way I have been formatting code on WordPress.
I needed to change this HTML:
:::html
<pre><code lang="someLanguage" escape="true" width="600"> ... </code></pre>
to this:
:::text
'\t:::someLanguage
\tsome code'
\n
I have yet to finish this conversion. But that highlights one of the great things about Pelican. Since the entire site is regenerated every 5 minutes, any changes I make will get rolled into the entire site. I just upload new copies of the Markdown files and Pelican regenerates all of the HTML.
BBEdit was an indispensable tool. Really, it’s totally worth having, even if it’s not your primary editor.
At the end of the process, I had over 1500 individual Markdown files, one for each post. Every post contained a new set of Markdown headers:
:::text
title: Verge Sources [Link]
name: verge-sources-link
date: 2012-07-30 16:32:57
guid: http://www.macdrifter.com/?p=3727
postID: 3727
link: http://www.niemanlab.org/2012/07/the-verge-is-giving-extra-credit-and-links-to-primary-sources/
tags: Link, Web
Notice the Markdown headers I chose to add. These are important for migrating to Pelican. The “date:” field is critical for rendering the new posts in the correct chronological order. Pelican will respect the meta data when generating the file structure and Pelican site. The “tags” field is transformed into the Pelican article tags and the “title” field is used by Pelican as the article title. The other meta data is there for integrity checks and future projects.
Summary
At this point the WordPress database export should have been transformed into a collection of Markdown files in a single directory. These will become the food for Pelican. Nothing else is needed to create a basic Pelican blog.
Install Pelican
A key design decision for me was to have the entire Pelican workflow on my web server. Nothing is performed locally on my Mac except for writing. I think this is the best possible option.
Setup a static site
My web host provides an option to configure a static web application. There were two flavors to choose from. One option includes CGI and PHP the other does not. I needed the option to configure an .htaccess file so I chose the CGI configuration.
Easy_Install
Actually getting Pelican installed and running on my host was easy.
I connected to my web host over SSH using Coda. The only consideration for me was making sure I installed in the correct Python version. My hosting environment has several Python versions running. My python env variable is set to version 2.7, but since I use a shared host, I didn’t want to concern myself with the PATH getting updated or modified and breaking the site.
To install Pelican and the optional dependencies I ran this sequence:
:::bash
sudo easy_install-2.7 markdown
sudo easy_install-2.7 pelican
sudo easy_install-2.7 pygments
pelican-quickstart
I also didn’t concern myself with the quickstart questions too much. The main purpose of the quickstart appears to be to setup the configuration file. I edited that by hand after the installation anyway.
Configuration
Pelican reads a configuration file every time it regenerates the site. This file provides the directives for how the site will be constructed, what the URL’s should look like, what templates to use, etc.
I chose to write my own and to keep it in a separate directory at my hosts root. There isn’t really anything tricky in it. Everything is documented.
:::python
#!/usr/bin/env python
# -*- coding: utf-8 -*- #

AUTHOR = u"Gabe"
SITENAME = u"Macdrifter"
SITEURL = 'http://www.macdrifter.com'
FEED_MAX_ITEMS = 5

DISQUS_SITENAME = "macdrifter"
DISQUS_SHORTNAME = "macdrifter"
TIMEZONE = 'America/New_York'

DEFAULT_LANG='en'

# Blogroll
LINKS =  (
    ('Archives', 'archives.html'),
         )

# Social widget
SOCIAL = (
          ('twitter', 'http://twitter.com/macdrifter'),
         )

DEFAULT_PAGINATION = 10

DISPLAY_PAGES_ON_MENU = "True"
DEFAULT_CATEGORY = ('Articles')
MD_EXTENSIONS = ['codehilite','extra']
MARKUP = ('rst', 'md')
ARTICLE_EXCLUDES = ('pages',)
#from pelican.plugins import related_posts
PLUGINS = ['pelican.plugins.related_posts',]
DIRECT_TEMPLATES = ('index', 'tags', 'categories', 'archives')
TAG_CLOUD_STEPS = 4
TAG_CLOUD_MAX_ITEMS = 50
STATIC_PATHS = ['images', 'js', 'css', 'macdrifter-logo-art']
OUTPUT_PATH = '/home/macdrifter/webapps/pelican/'
ARTICLE_PERMALINK_STRUCTURE = '/%Y/%m/'
#CATEGORY_FEED_RSS = 'feeds/%s.rss.xml'
CATEGORY_FEED = 'feeds/%s.atom.xml'
FEED = 'feeds/all.atom.xml'
TAG_FEED = 'feeds/%s.atom.xml'
FILES_TO_COPY = (('extra/.htaccess', '.htaccess'), ('extra/robots.txt', 'robots.txt'),)
COPYRIGHT = 'Copyright Vagabond Industries LLC, 2012'
LOGOTEXT = 'Macdrifter'
LOGOIMAGE = '/theme/macdrifter-logo-art/macdrifter-logo_280px.png'
GOOGLE_ANALYTICS = 'UA-XXXXXXXXX-1'
Directory Structure
My Python sources are setup in a few root level directories on my host. I wanted to keep things separate because it feels logical to me. I know where everything is stored. I’ll describe the details of the theme files in a later post.
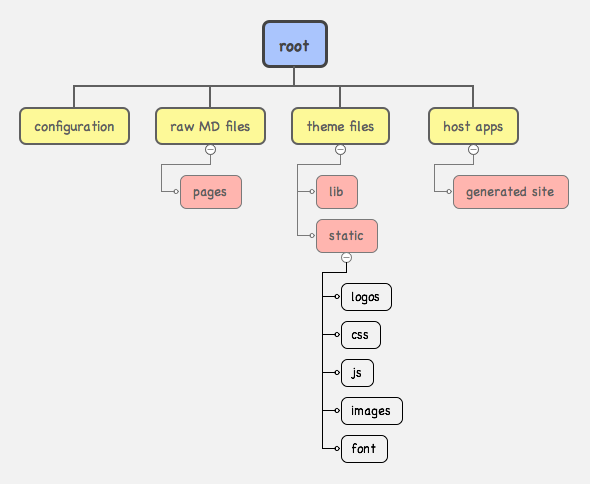
My pelican.conf.py file is stored in the configuration directory along with some some other helper scripts. The host apps directory contains all of the generated html files that you are viewing right now.
The actual structure is almost irrelevant since everything is either defined in the configuration file or by the Pelican generate command parameters below.
Generate the Site
Now we’re ready to build all of the HTML from the Markdown files. I decided to do this as a cron job running every five minutes. This allows me to upload a file and have it automatically processed and posted. Having a few minutes to change my mind or fix a typo is actually a benefit, so I don’t mind waiting. It takes about 20 seconds to generate my entire site from scratch every time.
I have cron run the following shell script:
:::bash
#!/bin/bash
date >> /home/macdrifter/macdrifter_cron.log 2>&1
~/bin/pelican /home/macdrifter/pelican_raw/ -s /home/macdrifter/pelican_config/pelican.conf.py -t /home/macdrifter/pelican_themes/Macdrifter >> /home/macdrifter/macdrifter_cron.log 2>&1
This script writes a timestamp to a log file on my server. Next, it runs Pelican and passes in some arguments.
:::bash
-s /home/macdrifter/pelican_config/pelican.conf.py
tells Pelican to use a specific configuration file.
:::bash
-t /home/macdrifter/pelican_themes/Macdrifter
tells Pelican to use a specific theme. Skipping this line will use the default Pelican theme, which is quite attractive. I wanted something to call my own.
The output of the command is written to the log file as well. If it exists without errors or warnings, the log will just contain the timestamp. All other messages are written to the log file.
That’s it. The site is live but we’re not done. Let’s do a complete job.
Sitemaps
I wanted to help with search engine indexing so search results are as accurate as possible. To do this, I wrote another shell script triggered by cron a couple times a day.
:::bash
#!/bin/bash
date >> /home/macdrifter/macdrifter_cron.log 2>&1
python /home/macdrifter/pelican_config/sitemap_gen.py --config=/home/macdrifter/pelican_config/config.xml >> /home/macdrifter/macdrifter_cron.log 2>&1
This script uses a gift from Google called sitemap_gen.py and a configuration file.
Here’s my configuration file. Read the Google instructions for more information.
:::xml
<site
  base_url="http://www.macdrifter.com/"
  store_into="/home/macdrifter/webapps/pelican/sitemap.xml.gz"
  verbose="1">
  <directory  path="/home/macdrifter/webapps/pelican"    url="http://www.macdrifter.com/" />
    <filter  action="drop"  type="regexp"    pattern="/\.[^/]*" />
    <filter action="drop" type="regexp" pattern="index.*\.html" />
    <filter action="drop" type="regexp" pattern=".*\.keychain" />
    <filter action="drop" type="regexp" pattern=".*\.plist" />
</site>
The sitemap helps more with Google since the script pings them with the updates. DuckDuckGo does not listen for sitemap posts, but it will use them when it crawls the site.
I’m just about done. The move broke a lot of things and there was some house cleaning to do.
Configure the Host
htaccess
I tried my best to make old URLs still work after changing the structure of the site. The best way to do that is with 301 redirects defined in the htaccess file of the web server.2 In the example below I handle a couple of problems.
:::text
Options +FollowSymLinks
RewriteEngine on
RedirectMatch 301 (/category/)(.*?) /tag/$2.html
RedirectMatch 301 (.*\d{4}/\d{2}/.*?)/ $1.html
RedirectMatch 301 (/wp-content/uploads/)(.*) /uploads/$2
Redirect 301 /feed/ /feeds/all.atom.xml
ErrorDocument 404 /pages/404-page-not-found.html
ErrorDocument 500 /pages/error-500.html
Options ExecCGI Includes IncludesNOEXEC SymLinksIfOwnerMatch -Indexes
The first redirect handles the old WordPress category pages. I switched to tags in Pelican and wanted to handle any links floating around that might point to my categories. Not everything will be caught but I’m trying my best.
As I mentioned earlier, my article and index URL’s changed from ending with a forward slash to ending with a “.html”. The second 301 redirect handles that.
I also moved my WP content pages for things like images. They are still in the same directory structure (i.e. /uploads/year/month/) but they moved up a level. The third redirect handles that situation.
The final redirect handles the old feed. When a feed reader looks at the old WordPress feed at “macdrifter.com/feed/” it gets the file at “www.macdrifter.com/feeds/all.atom.xml". I never supported category feeds and I continue to not support them.
It’s also worth creating custom error pages and using the htaccess file to redirect.
robots.txt
I needed to update my robots.txt file to prevent search engines from indexing my themes and embedded content like images. It’s just not worth my bandwidth to provide that information so why make it available. I also don’t really want the tag pages showing up in search results because I find it annoying as a user to see the same content listed in separate results on the same page.
:::text
User-agent: *
Disallow: /theme/
Disallow: /tag/
Disallow: /uploads/
Conclusion
Moving a WordPress site to Pelican was more work than I initially estimated. A lot of the work was trying to figure out how I wanted my workflow to proceed. Once I decided to move everything server-side, a lot of the effort was dealing with automation. By far, the biggest effort was massaging the old WordPress data and figuring out how to do the htaccess file correctly.