iOS 5 introduced a centralized Notification Center to handle all of iOS's little alerts—"Bleep! You have a new tweet!" "Blurp! Time to play Words with Friends!" "Blort! Remember to pick up the dry cleaning!" Notification Center's introduction in 2011 was a long time coming, and a welcome improvement to iOS's previous modal-only pop-up alerts. Despite Notification Center's long gestation, however, it lacked what many consider a critical feature—"do not disturb."
Earlier this year, it was revealed that Apple was adding Do Not Disturb to Notification Center—but in OS X Mountain Lion. The feature lets users drag down on the notification list, revealing a switch. When clicked, all the banners and other alerts simply stop appearing until the next day. The notifications do, however, still pile up in Notification Center.
We hoped that Apple would migrate the feature back to iOS, and add one important tweak: scheduling. We were delighted when Apple unveiled iOS 6 during its Worldwide Developers Conference in June, promising Do Not Disturb would finally—yes, finally—be coming to iOS 6.
Why I need Do Not Disturb
Notification Center was a big improvement over iOS's previous alerts. With careful management of notifications, I can keep on top of appointments, stay relatively up to date with my friends via social media, and not miss a turn in Draw Something.
But my girlfriend rises early for a long commute to her office in the morning, and usually goes to bed well before us "respectable" geeks. And with friends and colleagues all over the globe, I get notifications at all hours of the night. When I'm in bed, my phone will light up and buzz all night while it is charging. But even if I'm not, the iPad that generally sits on the bedside table will fill the room with a bright, eerie glow. I sleep like a log, so it doesn't bother me in the slightest; my girlfriend, though, is a different matter.
I could go in and turn Notifications on and off everyday, or some other inconvenient workaround, but I'd invariably end up forgetting to turn them off or back on. Do Not Disturb will keep these nocturnal intrusions at bay on a schedule I set, so they'll never disturb my girlfriend's uneasy slumber.
Your reasons for using Do Not Disturb may differ—maybe you are a light sleeper yourself, or maybe you just need to limit work-related or other distractions. For those who rely on iOS's notifications to keep abreast of appointments, to-dos, important e-mails, or even just Ticket to Ride Pocket challenges—but still occasionally need to sleep, spend time with family, or just take a technology break—Do Not Disturb is for you. Here's how to take advantage of its features.
How it works
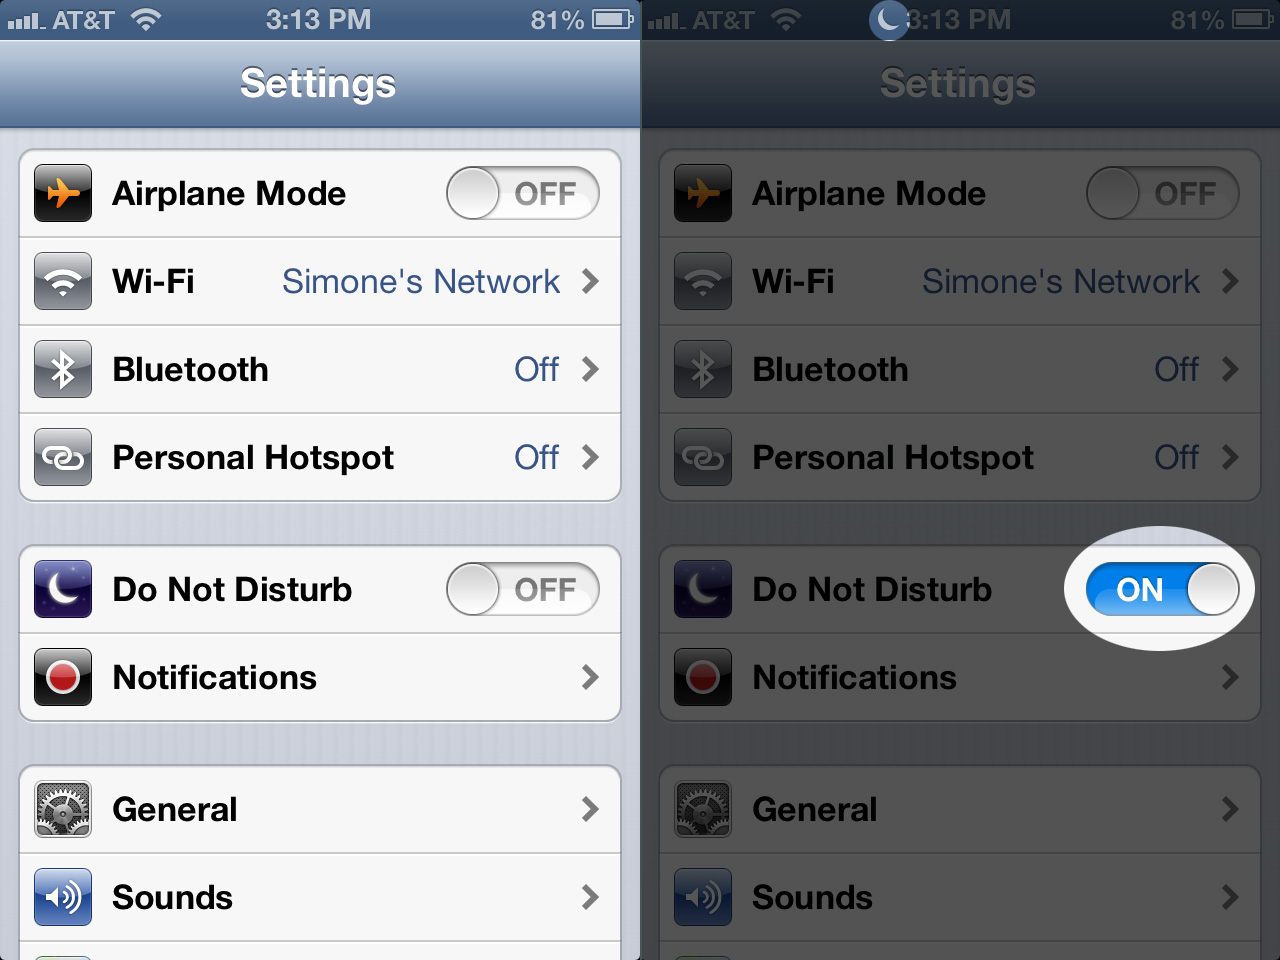
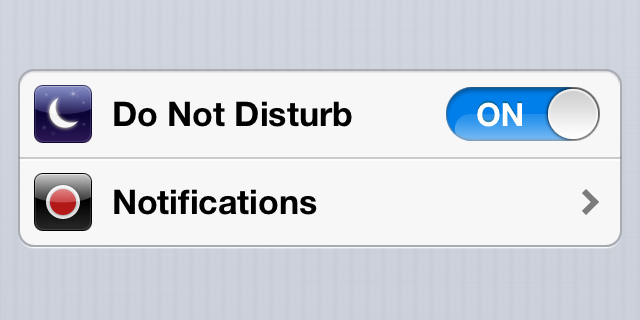
Launch the Settings app on your iOS device and you'll see the Do Not Disturb setting right above Notifications. Tap the switch to "on," and you'll no longer see banner alerts, hear sounds or buzzes, or see your iPhone screen light up from across the room while it is locked. You won't even hear a ring if someone calls. Notifications, messages, and missed calls will still be collected by your device, but your iPhone (or iPad, or iPod touch) will remain dark and silent, as if nothing was happening at all.
A small crescent moon icon will appear in the status bar right next to the time, letting you know that Do Not Disturb is activated. If you want to turn it off, just head back to Settings, and switch the setting back to "off." Your device will return to its usual flashing, buzzing, beeping self.
Right on schedule
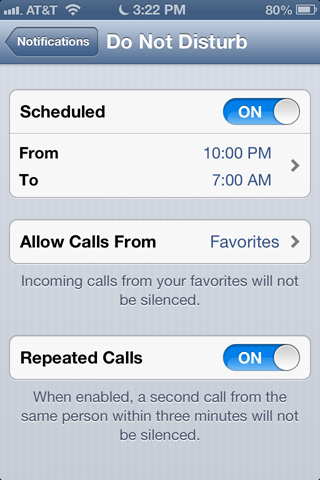
Instead of having to manually engage Do Not Disturb, though, Apple has included a scheduling feature. In Settings > Notifications > Do Not Disturb, you can set a "quiet period" that will automatically go into effect every day. For instance, I have the schedule set from 11pm to 7am on my iPhone, when I am usually asleep. I have it set to engage much earlier on my iPad, to keep it from lighting up like a disco while my girlfriend is sleeping, and I'm in the other room engaged in a heated Twitter debate. Notifications, ringtones, and other alerts come back on automatically when 7am rolls around.
On OS X, Do Not Disturb will automatically shut itself off the next day, so you don't have to remember to switch notifications back on. On iOS, it works a little differently if you turn it on manually. If you have no schedule set, you have to manually turn Do Not Disturb off. If you do have a schedule set, however, Do Not Disturb will shut off automatically at your regularly scheduled time. If you have a regular schedule, you can use the manual switch to turn Do Not Disturb off before your usual time if you so choose, and it will still shut itself off at the scheduled time. For me, that means I could manually turn it on at 8pm if I wish (despite my 11pm to 7am schedule), and it will turn itself off at 7am.
Finally, if you want Do Not Disturb to activate for an extended period, manually turn it on, and then turn off your set schedule. Notifications won't bother you while you're sipping tropical cocktails on the sandy beaches of Turks and Caicos, or on safari in the jungles of Africa.
Never miss an important call
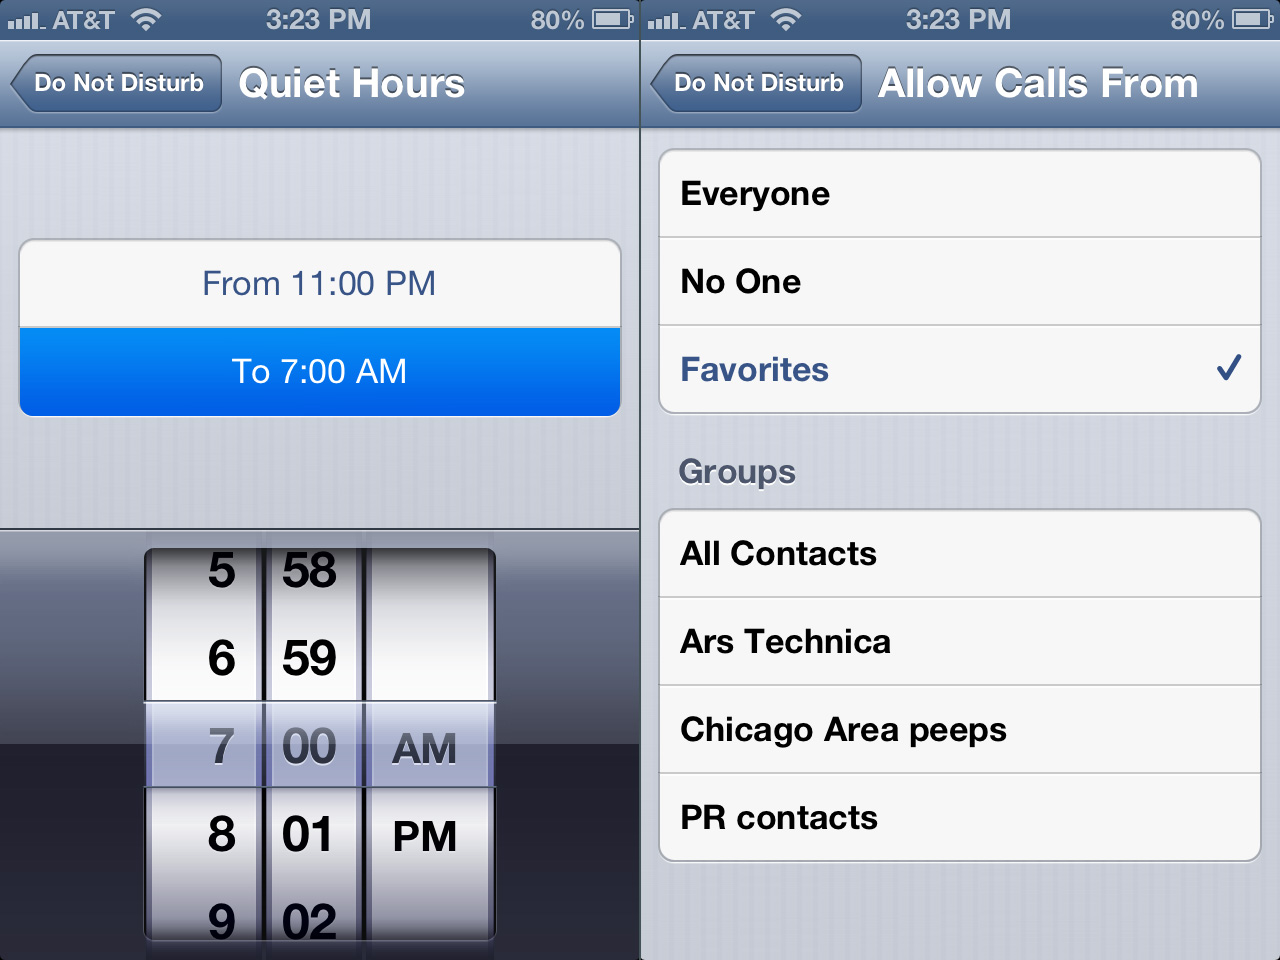
While Do Not Disturb will silence incoming phone calls, you can still configure Do Not Disturb to let certain calls through. By default, Do Not Disturb will ring your iPhone whenever calls come from anyone in your "Favorites" list in contacts. You can alternately choose any group you have set up in Contacts, such as "Work," "Friends," or " Important Clients." You can also select "Everyone" to let all calls ring through, or "No One" if you don't want to talk to anyone for any reason (like when napping, playing Borderlands 2, or finally watching season 4 of Breaking Bad).
iOS 6 also has an optional "Repeated Calls" setting that will let a second call from any caller ring through if it is within three minutes of the first call. This may be a useful stop-gap on the off-chance you get an emergency call from an unexpected number. (For instance, a friend recently lost their phone while at a conference in New York and needed me to use Find My iPhone to help track it down; they called from someone else's phone.) This setting is on by default, but you can turn it off if your ex just can't let it go and keeps hitting redial.
What's missing?
Do Not Disturb on iOS is still missing an important usability feature: access from Notification Center itself. If you want to turn it on, you'll have to go into the Settings app to do so. We think there should be an easier way—one already implemented in Mountain Lion—and that's from Notification Center itself. You can already check the weather, send a tweet, and update your Facebook status; there's no good reason we can think of not to include the "pull down to reveal" switch from OS X.
Other improvements we think would be useful include finer grained scheduling, offering optional times for weekends, or even setting a different schedule for every day of the week. Additionally, it would be useful to have Do Not Disturb work on a timer you could set for a certain amount of time, like two hours for a movie. And, as important as calls from certain individuals may be, many people increasingly communicate via SMS or iMessage; it would be nice if messages from a select group of individuals could also be "whitelisted" just as calls can be.
reader comments
67