

GeekTool is an amazing free app that is a bit like Dashboard for the super nerdy. It allows you to place functional widgets, called "Geeklets," right on top of your desktop, so you can always see them. Implementation can be a little tricky though so this tutorial will walk you through five different ways to use Geeklets to enhance your desktop experience.


What we're building today
Getting Started with GeekTool
GeekTool is hands down one of the most useful Mac desktop enhancements that you'll ever come across. Unfortunately though, the barrier to entry here is pretty high. Whereas Dashboard widgets require merely a drag and drop to implement, Geeklets often require writing custom code.
GeekTool is just friendly enough that both hardcore coders and complete newbies can get something out of it.
If this sounds way too complicated, don't worry, it's only moderately complicated. In fact, GeekTool is just friendly enough that both hardcore coders and complete newbies can get something out of it.
To begin, download GeekTool from the Mac App Store. It used to be served up as a Preference Pane, but they've changed the format slightly to get it into the App Store.
Here's the main window:


The Primary GeekTool Window
This is a deceptively simple interface that hides a ton of possibilities. As you can see in the main window on the left, there are three types of Geeklets: File, Image and Shell.
Most of the fun stuff that you can pull off comes from the shell type. If you're familiar with Terminal, then you'll likely be able to pull of some cool stuff right from the start. If not, I'll walk you through some simple scripts below.
Initiating a Geeklet
To create a new Geeklet, simply drag one of the three icons (File, Image or Shell) onto your desktop. This will bring up a blank rectangle with a white outline and a long dark window containing the various options for that Geeklet.

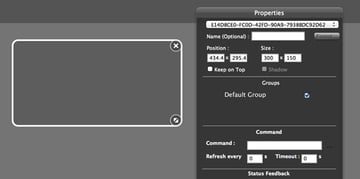
A new empty Geeklet
There are a ton of options in here, but rather than going through them one by one like a boring textbook, we'll just address each setting as it arises below. In the mean time, let's skip straight to the good stuff and get you going with some cool Geeklets.
1. The Date
The first thing we're going to do is put the date on our desktop. Sounds easy enough right? To do so, we're going to have to write a script. Don't freak out, it's really simple, I promise.
To perform its magic, GeekTool accepts shell scripts. The most common place that you see these performed is in Terminal. To see how this works, crack open Terminal, type the word "date" and hit return.


A new empty Geeklet
The output should look something like what I received in the image above, which tells me the current day of the week as well as the month, day of the month, time, timezone, and year.
Congratulations! You just wrote a shell script. Pretty easy right? Now let's jump over to GeekTool and enter the same line of code into the Command field in a Shell Geeklet.

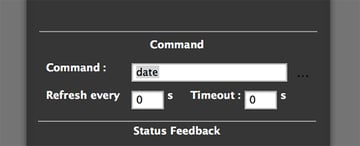
Type "date" into the Command field.
Now when we look at our Geeklet on the desktop, it contains some text. This is the exact same output that we saw in Terminal before.


A new empty Geeklet
This is not quite what I want though. The format that I'm looking for looks like this: Monday, Oct. 1. So how do we pull that off?
Manipulating the Date
It turns out there are a whole range of ways to manipulate the output that we're getting from the script. To do this, we add a new snippet after the word "date".


Different Date Commands in Terminal
See how that works? Here's a larger list that should come in handy.
- date '+%A' - Monday
- date '+%a' - Mon
- date '+%B' - October
- date '+%b' - Oct
- date '+%m' - 10 (month number)
- date '+%D' - 10/01/12
- date '+%d' - 01 (day of month with zero)
- date '+%e' - 1 (day of month without zero)
- date '+%Y' - 2012 (year with four digits)
- date '+%y' - 12 (year with two digits)
Putting It All Together
Now that we can see how to get all the pieces that we need, we can easily toss them all together into a single script. Copy and paste the following code into the Command field.
1 |
date '+%A, %b. %d' |
As you can see, I used the long form weekday format followed by a comma, a space, the short form month, a period, a space and finally the day of the month. Once you insert this code, your result should automatically update.
In the Properties window, click on the button near the bottom that says "Click here to set font & color" and customize the text to your liking. I'm keeping things pretty simple so I went with white, 13pt Lucida Grande.
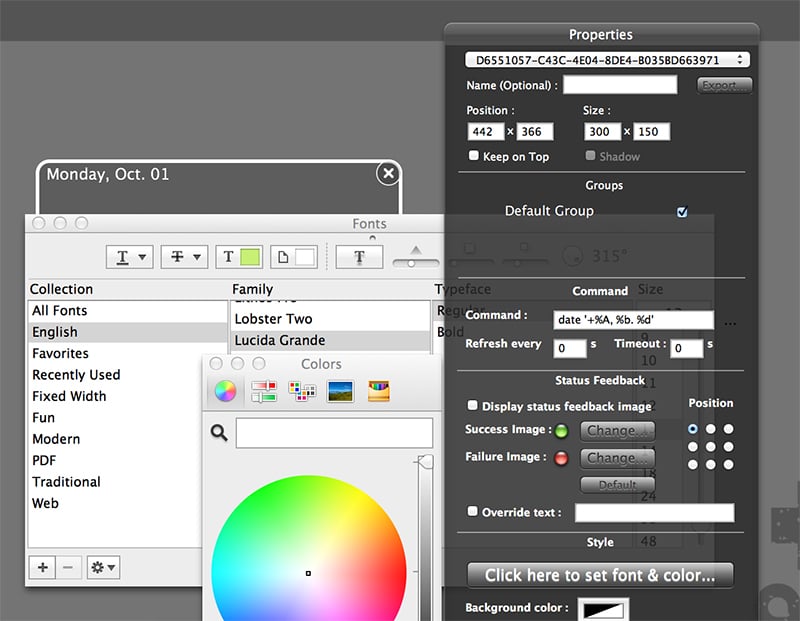


Use simple controls to set the typeface, color and size of the text.
Tip: The default color for a Geeklet's text is black, so if your desktop is black, you won't see anything. It's good to test things out on a lighter color background.
Finishing Up
To finish up our date Geeklet up, resize the containment box so that it's just a little larger than the text. This will make it easier to select different Geeklets as we add more. Finally, set a refresh rate. Without this, the date will never update. You can choose whatever value that you wish, just understand that the faster the refresh, the more work your computer is doing to keep up.


Resize the container and set a refresh rate.
2. The Time
With all of that great knowledge that we gleaned from the previous step, adding the time to our desktop should be a cinch. In fact, we use the same exact process as before, only this time we'll need to pick from the pool of date snippets that relate to the time:
- date '+%T' - 14:03:05
- date '+%X' - 02:03:05 PM
- date '+%Z' - MST (Time Zone)
- date '+%p' - PM
- date '+%l' - 2 (hour, 12 hour clock, no zero)
- date '+%k' - 2 (hour, 24 hour clock, no zero)
- date '+%I' - 02 (hour, 12 hour clock, with zero)
- date '+%H' - 02 (hour, 24 hour clock, no zero)
- date '+%M' - 03 (minute)
- date '+%S' - 05 (second)
All I really want for this is the hour and minute. I'll use the twelve hour clock with no zeros and no AM/PM. I'm not usually in such a poor mental state that I can't figure out if it's morning, afternoon or evening.
With this in mind, drag out a new Shell Geeklet and toss in the following code:
1 |
date +"%l:%M" |
This should give you a basic time stamp. Now set it to 48pt type and position it under the previous Geeklet. You'll have to set the refresh rate to be fairly fast on this one so the time stays accurate. I set it to ten seconds but if you really need to the second accuracy, you'll have to refresh every second.


Make the time larger and set in under the date.
Click on your desktop or hide GeekTool and you'll see the result of these two scripts. So far so good, let's move onto the weather!


Make the time larger and set in under the date.
3. The Weather
This is where things get complicated. Grabbing information from the web involves complex grep commands and a thorough knowledge of the required syntax. Unfortunately, if you want weather on your desktop, this is what it takes.
There are tons of GeekTool users out there who have already built almost anything that you could want.
A complete grep rundown is outside of the scope of this article though, so let's just take the easy way out! There are tons of GeekTool users out there who have already built almost anything that you could want. It's important to know how to install third party Geeklets, so that's the process we'll go through this time around.
There are a million weather Geeklets out there, go download this one by ObiJuan2080 to get started. After you download the file, throw it into a "Geeklets" folder inside of your "Documents" folder so you don't lose it, then give it a double click.


Double-click the Geeklet to install it
As it launches, you should see a little window pop up that shows you the code that you're about to run and asks your permission to proceed. Click the "YES" button.


Click "YES" to run the Geeklet
This should cause a new Geeklet to pop up your desktop, likely with the same text styling that we used in the previous step. The only thing that you need to do to the command is find the chunk of code that says "p=10009" and replace that number with your U.S. zip code.


The weather Geeklet in action
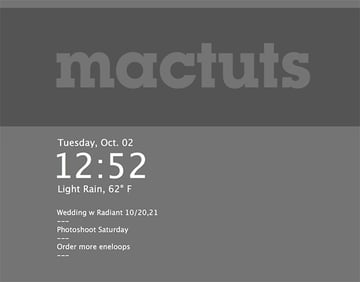
To finish off this step, resize the weather so the text matches the date and place it under the time. Your little group should look something like this:


Our progress so far
4. Reminders
When faced with a difficult task in the last step, we cheated a little bit. Installing third party Geeklets is a big part of the GeekTool experience though, so I'll allow it. This time though, we're on our own.
I want something fully custom: Mountain Lion Reminders on my desktop. Now, I know that getting at system data points like this is super easy using AppleScript, so we'll actually grab the data with that and then use the output for our Geeklet.
Warning: this is some pretty advanced stuff! You may want to brush up on AppleScript first.
The Reminders Dictionary
The first thing that we need to do is learn how to talk to Reminders using AppleScript. To do this, open Script Editor, go to File>Open Dictionary and locate the Reminders dictionary.


The Reminders AppleScript Dictionary
Browsing through here, I get the gist of the basic syntax. There are "lists" which contain "Reminders" that might or might not be "completed" and are identified by their "name". This verbiage is actually all I need to know to get going on a script.
Writing the Script
With the information that I just learned in mind, I set up two repeat blocks. The first goes through and grabs every reminder in the list "Reminders" (change this name if you have a different list in mind) that is not checked off and completed.
The second repeat block adds some formatting to the previous list so the output looks a little nicer. Then we return the formatted list.
[applescript]
set theList to {}
set theOutput to ""
--osascript /Users/MacBookPrime/Documents/Geeklets/TestScript.scpt
tell application "Reminders"
repeat with i from 1 to (count of every reminder of list "Reminders")
if reminder i of list "Reminders" is not completed then
set theList to theList & name of reminder i of list "Reminders"
end if
end repeat
repeat with i from 1 to (count of every item of theList)
set theOutput to (theOutput & item i of theList as string) & linefeed & "---" & linefeed
end repeat
return theOutput
end tell
[/applescript]
If we run this script inside of Script Editor, we can see it working. The "Result" tab should show you the non-completed items in your default todo list. Not bad!
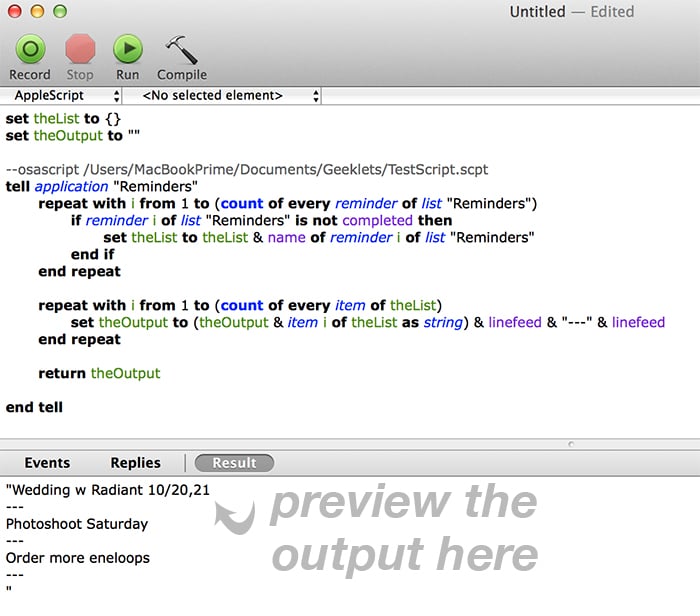


Hit the Play button and watch the Result tab to see if the script worked.
Implementing the Script as a Geeklet
Once you're finished coding, save out this script in your Geeklets folder. Now go back to GeekTool and drag out a new shell Geeklet. In the Command field, type "osascript" followed by a space and the path to wherever you place the script. Here's what my command looks like:
1 |
osascript /Users/MacBookPrime/Documents/Geeklets/ReminderScript.scpt |
Keep in mind that this is only an example, you'll have to customize it to reflect your own file path. Don't forget to replace my Home folder's name with your own. Also be sure to set a refresh rate on this Geeklet so that it updates as you change the contents of your Reminders list.
After you're finished with that, you'll have a nice list of Reminders sitting on your desktop. Format it and toss it under the other Geeklets.

Looking good! Just a few finishing touches and we'll be done.
5. Images & Text
At this point, we could be finished. We've got a nice stack of useful Geeklets going, there's no need to overdo it. However, I'm sure that somewhere along the way, you'll wonder about placing text and images into a Geeklet, so we should wrap this up by adding some finishing touches to our setup.
Text with Echo
The first thing that I'd like to do is add in a header at the top of our list of reminders to give them some context. We don't want this header to do much, it just needs to be a simple line of text that says "Reminders" in bold letters.
To pull this off, we can use the "echo" command, which prints out a line of text. Pull out another Shell Geeklet and add the following code:
1 |
echo "Reminders" |
This should give you the desired line of text to work with, format it up with a bold typeface that's a little larger than the list items and toss it above the Reminders.


Use the echo command for plain text
Image Geeklets
If you want to add an image to your desktop, just drag out an "Image" Geeklet instead of a Shell Geeklet. These are super easy to work with. All you have to do is enter a URL or hit the "Set local path" button and point to the image that you want to display.


Image Geeklets display an image on your desktop
As you can see, I grabbed the icon for the Reminders app to further reinforce the idea that the list of items on my desktop comes from that app.


Our finished set of Geeklets
Tip: To grab the Reminders icon, hit Command-I on the app in Finder, then select the icon and hit Command-C. Then open Preview, hit Command-N and save as a PNG. You'll probably want to resize the image as well.
What's On Your Desktop?
The five methods outlined above should be enough to get off to a strong start with GeekTool. You now know how to write your own commands, install third party Geeklets, convert an AppleScript to a Geeklet and embed text or images on your desktop. You're a regular GeekTool Pro!
If you use GeekTool regularly, snap a screenshot of your desktop and leave a link below with a description of your Geeklets so we can check it out.


