As we began this grand adventure, I devoted the second installment to those things you spied on the Finder desktop after you’d started your Mac. One of those items was the Dock—the bar at the bottom of your Mac’s screen where you launch applications, access currently running applications, and tuck away items that you want quick access to. This week I’d like to delve a bit deeper into what you can do with the Dock.
By way of refresher, the left side of the Dock is devoted to applications—programs that Apple placed there, applications you’ve dragged there, and programs you’ve launched. The right side of the Dock (the area that appears after the divider) is for folders, files, minimized windows, and the Trash.
The items in the Dock are aliases of the original items, meaning that when you click the Safari icon to launch the browser, for example, you’re really clicking an icon that represents Safari rather than the true-blue Safari application itself. Because it’s an alias you can safely remove it from the Dock by dragging it to the desktop without fear of deleting the original. Note, however, that you can’t drag the icon of an active application to the desktop in the hope that you’ll remove its icon from the Dock. You must first quit the application; once you do, you can remove it.
Hover your pointer over a Dock item, and you’ll see its name appear. Click and hold on a Dock item, and you’ll find options appropriate for it. For example, if you click and hold on the System Preferences icon, a list containing all your system preferences will appear, making it easier to go directly to the preference you wish to access. Click and hold on the iTunes icon once you’ve launched that program, and you get options for playing music in your iTunes library. Hold down the Option key while clicking and holding on an active application in the Dock, and you have the ability to force-quit the application.
Dock preferences
Now, let’s put one of these tricks to good use. Click and hold on the System Preferences Dock item, and choose Dock from the resulting list. The Dock system preference appears. It’s within this preference that you can make changes to the Dock’s behavior.
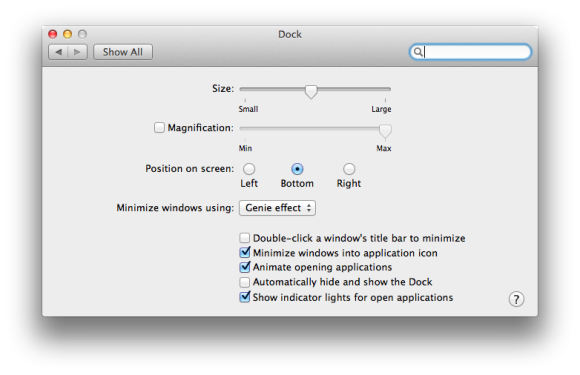
The first option is Size. Move the slider to the left to decrease the size of the Dock. Move it to the right to increase the Dock’s size (up to the point where it can’t exceed the width of your Mac’s display).
Next comes Magnification. Turn this on and move your pointer along the Dock. As you do, you’ll notice that the icons near the pointer enlarge. You can choose the degree to which they’ll enlarge with the Magnification slider.
This is a cool effect, but what good is it? In the Dock’s default configuration, which displays 18 icons, magnification doesn’t help much, since you can see everything in the Dock. However, once you add another dozen items or so, you’ll find that the icons within the Dock shrink in order to accommodate your new icons. If you add even more icons, distinguishing one icon from another becomes downright difficult, particularly on a small display. In these cases, magnification is your friend: Switch it on, and locating the item you’re after will become much easier.
Although the Dock appears at the bottom of the Mac’s screen by default, it needn’t. In the ‘Position on screen’ area of the preference, click the Left option to make the Dock hug the left side of the screen (and lose its 3D countenance). Choose Right instead, and you get the same look on the right side of the display. Click Bottom, and the Dock returns to its original appearance and location.
When you minimize windows they can disappear into the Dock with one of two effects (there’s a secret third effect, but not one we’re yet ready to look at). The default setting is Genie, and the other is Scale. You can try them for yourself by clicking the yellow minimize button of the Dock preference’s window. The Genie effect causes the window to compress at the bottom and appear to be sucked down into the Dock. The Scale effect maintains the window’s current proportions and simply reduces its size as it moves to the Dock. If you’d like a better look at what’s happening, hold down the Shift key and then click the yellow button; this action causes the window to minimize in slow motion. To cause your window to reappear, just click its icon in the Dock (you can do this in slo-mo too, if you like).
The options below are largely self-explanatory.
Double-click a window’s title bar to minimize: Enable this option, and you can avoid that yellow minimize button. Just double-click the title bar of any window to minimize it.
Minimize windows into application icon: If you want your Dock to be the tiniest bit tidier, enable this option. Now, when you minimize a window, it doesn’t appear in the right side of the Dock. Rather, it swoops down into the application associated with it. Click that application icon in the Dock, and the window reappears.
Animate opening applications: By default, when you start an application, its icon hops up and down a few times indicating that the application really is launching and you should be patient. Turn this option off, and the only hint you’ll have that the application is going about its business is the small gray “light” that appears under the icon.
Automatically hide and show the Dock: Helpful as the Dock is, it can get in the way, particularly when you’re working in windows that take up nearly the entirety of your screen. You can tell the Dock to scram by switching on this option. When you do, it will disappear into the bottom or side of your Mac’s display (depending on how you’ve configured the ‘Position on screen’ setting). To view the Dock, just move your pointer to the space it once occupied. It will reappear, ready to serve.
Show indicator lights for open applications: I just mentioned those small gray “lights” that appear under active applications. Subtle as they are, you may find them distracting. If so, you can turn them off with this option.
As much fun as it undoubtedly is to muck around in the Dock preference, you can access a few of its most important options directly from the Apple menu. After you click the Apple menu and select Dock, you’ll find a submenu that contains Turn Hiding On, Turn Magnification On, Position on Left, Position on Bottom, Position on Right, and Dock Preferences. Choose the item most appropriate for your needs.
One has views on the matter
We’ve got application icons down cold. Now let’s talk about other items you can place in the Dock. We’ll start with the generic-looking About Downloads item that appears just to the left of the Trash. What is that thing?
Broadly, it’s a hint at how folders are represented in the Dock. Click and hold on that document, and you see a couple of items—About Downloads and Open in Finder—spout up from the Dock. If you’ve downloaded a few other items, they will appear here too.

What you’re looking at is one of the Dock’s folder views. This one is called Fan view. In Fan view you can see the icons for up to eight documents. When a ninth document is added, the icon at the top reads 1 More in Finder. Add another document, and that changes to 2 More in Finder. If you click that 2 More in Finder button, the folder opens to reveal its contents. Also, when an item is added to this folder, its icon appears in the Dock when the fan is collapsed, thus helping you to recall the last thing you downloaded.
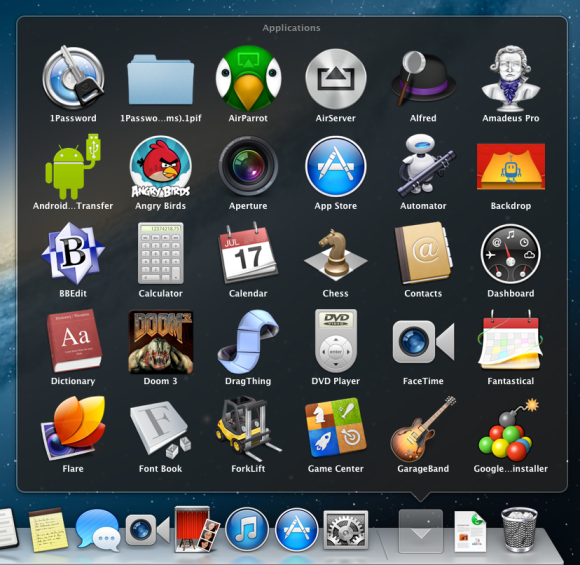
As you can imagine, this view isn’t terribly helpful if you have two dozen (or more) items in a folder. Fortunately, the Mac OS is fairly intuitive about the views it presents. For example, navigate to the Applications folder at the root level of your hard drive, and drag it to the right side of the Dock; you’ll still see the first icon in the folder, but if you click on that icon you don’t see Fan view. Instead, you’re looking at Grid view, where your applications are arranged in a rectangular window. This is a scrollable window, so if you don’t see all your applications, just scroll down to expose them. To launch an application, click it. To open this folder, scroll to the bottom of the grid and click Open in Finder. To collapse the window, either click outside of it or click the downward-pointing arrow that appears under the window.
I’m sympathetic to the cries of “Chris, as much as I love the eye candy, this doesn’t seem like the most efficient way to browse through a folder packed with files.” You’re right, it’s not. Thankfully, you have options.
Hold down the Control key and click one of these folders. Ah ha! Here’s where the magic happens. You can now choose exactly how you’d like to display this folder’s contents.
Skipping the sort options for a moment, you can choose a Folder or Stack display. The Stack display is the one that shows an item’s icon with some clutter behind, indicating that more files are in the folder. Exactly which icon displays depends on how you’ve configured the folder’s sorting options (which we’ll get to shortly). The Folder view simply shows a folder icon. If it’s one of Apple’s “special” folders—System, Library, Users, Applications, Desktop, Documents, Downloads, Movies, Music, Pictures, Public, or Utilities—the folder will bear an identifying icon.
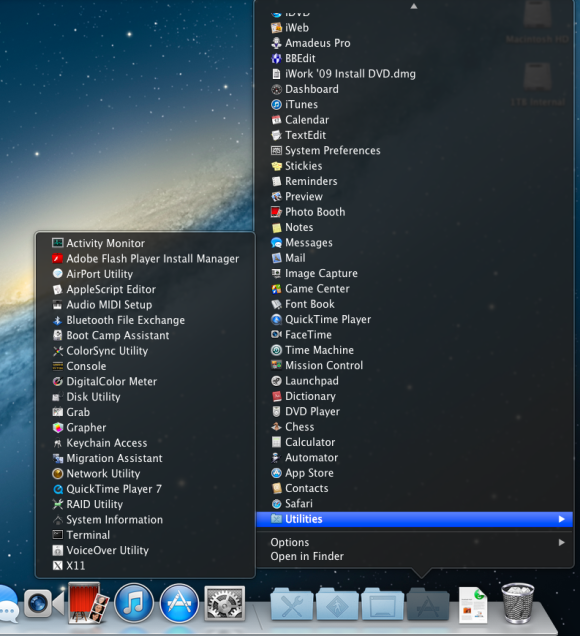
In the menu’s View Content As area below, you can choose one of four options: Fan, Grid, List, or Automatic. You understand what Fan and Grid views are. List view is the way we old-time Mac users used to view files from the Dock: Choose this view, click a folder, and a scrollable list of items appears. Any item with a right-pointing triangle next to it bears subfolders—folders inside that folder. Select one of those items, and a submenu appears, which shows you the contents of that folder. See a triangle there too? Yep, you’ve found another folder. Select it, and you’ll see the contents of that folder. This is called a hierarchical menu, one that allows you to dig down through many layers using this folders-with-triangles scheme. To launch an item in this view, just select it and click.
The Automatic option is almost always chosen by default, but that default will select either Fan or Grid view, not List view. Personally, as a longtime Mac user, one of the first things I do is change these views. I always choose to display items as folders and in List view. I find the Fan view impractical as it doesn’t display enough items, and Grid view seems a waste of space. For quicker navigation, give me a list every time.
Now, back to the Sort By area. Regardless of which view you select, you can choose the way in which the items in a folder are displayed. Your choices are Name, Date Added, Date Modified, Date Created, and Kind. The default Downloads folder, for example, is sorted by Date Added, which makes sense as you likely want quick access to the last thing you downloaded. For my Applications folder, however, I want items in alphabetical order, so I choose Name. How you elect to sort your folders is, of course, entirely up to you.
Getting trashed
Before we leave the Dock, I have to note that something smells a little funny over there on the far right side. And that would be the Trash. Let’s go dumpster diving!
The Trash is good for a couple of things. As its name implies, it’s where you drag files that you no longer want. If you do that to an empty Trash, you hear a paper-crinkling sound effect and the icon shows paper within the trash can. To dump the Trash, choose Finder > Empty Trash. The contents of the Trash will be removed from a directory the Mac OS maintains that lists all the files on your computer. Although the items’ directory listings may be gone, the files themselves aren’t—they’re still on your Mac. However, with their directory listing missing, the Mac OS now grants permission for the storage area currently reserved for these files to be available for storing other files, basically allowing the Mac to overwrite that portion of the storage medium when it wants to.
If you find this arrangement worrisome—you want your trashed files to be gone for good and all—you can instead choose File > Secure Empty Trash. Invoke this command, and the Mac will not only remove the files’ directory listings but also overwrite the space they occupied with nonsense data, which is secure enough for the vast majority of people. (If you’re an International Man of Mystery, naturally you’ll want to take sterner measures.) Note that when you choose this option, the Mac takes longer to empty the Trash.
If you’ve thought better of trashing one item or another, you can easily recover the item provided that you haven’t emptied the Trash. Just double-click the Trash icon to open the Trash folder, and then drag out the files that you want to keep.
The Trash serves an additional purpose, one that’s left over from the old days of Macintosh computing. If you want to remove a hunk of external media from your Mac—say, a mounted CD, a USB key drive, a classic iPod, or an external hard drive connected via USB, FireWire, or Thunderbolt—you drag that item’s icon to the Trash to eject or unmount it.
When you start to drag one of these things, the Trash icon changes to an Eject icon, making it easier to understand that you’re not throwing away the contents of whatever’s stored on the item but rather simply disengaging it from your Mac. When the item’s icon disappears, it’s safe to unplug the device.
Next week: Marching into System Preferences