If you’re new to the Mac but something of an iOS veteran, this lesson will be a snap. And it should be, because Apple modeled Mountain Lion’s Mail, Contacts & Calendars system preference on the setting of the same name found on today’s iPhone, iPod touch, and iPad.
If anything, the Mountain Lion version is actually easier to use because it isn’t crammed with additional settings specific to the Contacts, Calendar, and Reminders applications. Much as I love discussing the ins and outs of contacts, events, and reminders, our focus here will be on setting up email accounts on your Mac.
Adding a service
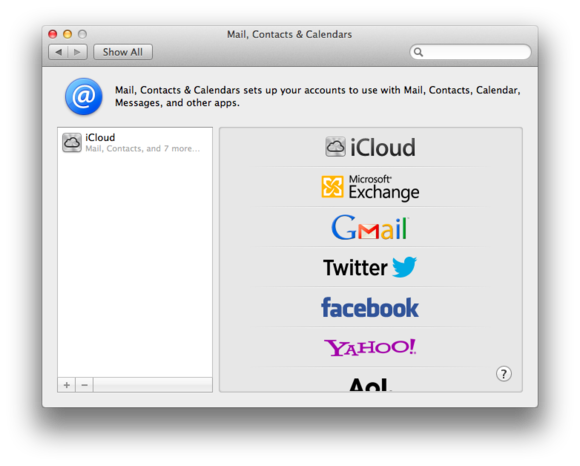
Launch System Preferences and, in the Internet & Wireless area, click Mail, Contacts & Calendars. If you took advantage of the offer to set up an iCloud account when you first configured your Mac, you’ll see an iCloud entry in the list of accounts on the left side of the resulting window. To the right of that list is a series of commonly used services, including (in the United States) iCloud, Microsoft Exchange, Gmail, Twitter, Facebook, Yahoo, AOL, Vimeo, and Flickr. At the very bottom of the list is an an Add Other Account… entry.
To use these services, you must first set up an account with them—something that you can’t do within this preference. If, for example, you wish to set up a Gmail account, launch a Web browser (Apple’s Safari is the default) and travel to https://www.gmail.com. Create your Gmail account here, making a note of your username and password.
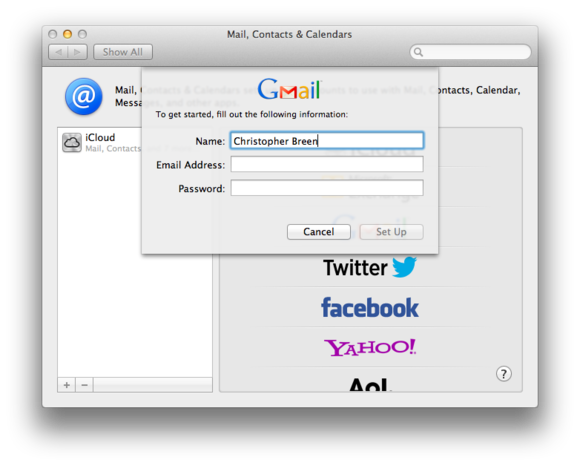
Now that you have an account, let’s set it up. Click the Gmail item in the Mail, Contacts & Calendars list. A sheet pops down with Name, Email Address, and Password fields. In all likelihood the Name field will be filled in already; if it isn’t, do so. Then, just enter your Gmail address (in the form yourusername@gmail.com), enter your password, and click Set Up.
As long as your Mac is connected to the Internet, it will create the correct settings so that you can use Gmail’s mail, calendars, reminders, messages, and notes features. You’ll know that its efforts have been successful if a sheet appears that lets you choose which of Gmail’s features to use. If you don’t wish to use all of the features—for example, you’d rather not sync your Gmail calendars and reminders with your Mac’s Calendar and Reminders applications (and I’ll talk about why you might not want to do this when I discuss those specific applications in a later column)—simply uncheck the ones you’d prefer to do without.
When you’re done, click Add Account. You’ll see a spinning gear icon next to the enabled features, which indicates that your Mac is syncing Gmail’s data with the appropriate applications on your computer. You will notice as well that your Gmail account now appears in the list of configured accounts. If you’d like to use a different name for your account, select it, click the Details button to the right, and in the sheet that appears, enter a new name in the Description field and click OK.
The advantages of autoconfiguration
So what exactly has happened here? If you’ve chosen to synchronize your email with Google, go ahead and launch the Mail application, which you’ll find in the Dock. You have my permission to gasp when you see that a Gmail account now appears in Mail’s list of accounts.
And that’s the beauty of the Mail, Contacts & Calendars system preference. In the old days, you not only had to know a load of arcane settings (details such as email server addresses and ports, which I’ll get to in a bit) but you also needed to configure multiple applications to put everything together. Now, in most cases, the Mac OS automatically takes care of those arcane settings and configures them in this single system preference. Adding even more accounts works much the same way: Click the plus button below the list of accounts, click a service, and fill in the appropriate fields.
Among the preconfigured services, a Microsoft Exchange account requires more steps than the others. In addition to knowing your username and password, you must also know the server address for your account. Since most Exchange accounts are created for business users, chances are good that the person who set you up with that account (someone working in the IT department, for example) can provide you with that information.
About the other services
While looking through the list of services, you’ll notice that some are completely unrelated to mail, contacts, and calendars. Facebook and Twitter are for social networking, of course, and Flickr and Vimeo help you share pictures and video, respectively. So what are they doing here?
Mostly it’s about tidiness. Sure, Apple could have added more preference panes to the System Preferences window and called them Social Networking and Media Sharing. But really, Mail, Contacts & Calendars is about the accounts you have—services you’ve registered with for which you need a username and password.
When you add Facebook and Twitter accounts, you have the ability to use those services within certain applications and the Notifications pane; likewise with Flickr and Vimeo. If you choose to share an image or video, adding Flickr and Vimeo makes the task easier since you can share that media directly from within a supported application.
Adding other accounts
For those of you who have screamed “But I have an account with Jo-Jo-E-Z-Does-It-Email.com! What am I supposed to do!?” as the drama of this lesson unfolded, calm yourself. Apple has done its level best to make configuring an email account simple, but it can’t know the settings for each and every email service provider across the globe.
And because it can’t, it provides the Add Other Account… entry, which gives you the opportunity to configure an account the old-fashioned way.
Specifically, when you click Add Other Account…, a sheet appears with options for adding accounts related to mail, messages, calendars, and contacts. (You’ll also see an option to add an OS X server account—a topic we’ll assiduously avoid for the time being.)
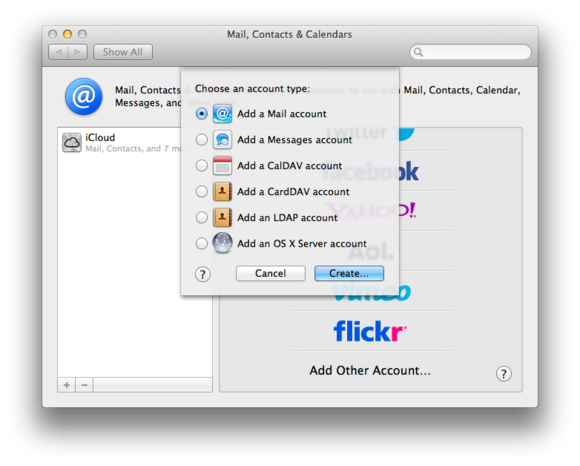
If you have an email account that you’d like to add, select Add a Mail account and click the Create button. Just as with a preconfigured service, a sheet then asks for your name, email address, and password. Fill these in and click Create.
If you’re lucky, OS X will be aware of this service and will configure the service’s settings for you. If fortune isn’t in your favor, you’ll see yet another dialog box informing you that Mail couldn’t discover the account settings. In that case, click the Continue button.
Mail will launch and produce an Add Account window. Within this window you must choose the account type (POP, IMAP, Exchange, or Exchange IMAP) and enter the incoming mail server address (I’ll discuss what these are shortly). Your username and password will be entered automatically. Click Continue, and Mail will make sure that the settings you’ve entered allow it to communicate with the service.

Click Continue once more. You’ll be asked to choose the kind of incoming-mail security scheme the service employs (password authentication, for example). Click Continue again, and you’re asked for the service’s outgoing-mail server address. Enter it and click Continue, and Mail will make sure that it can communicate with the outgoing-mail server. Once you see the confirmation, click Continue to be prompted for outgoing-mail security settings. Yep, click Continue again when those settings are confirmed, and you’ll see an Account Summary where you can eyeball all the settings you entered. Finally, select the Take Account Online option and click Create to create the account in Mail.
I apologize if I sound like your grandfather relating stories of how he tramped through waist-deep tar to attend school the next county over, but this is the way we used to do things: If you wanted to set up an email account, you had to know an Internet service provider’s server addresses and security settings. And, in some cases, you still do.
Fortunately, such information isn’t a big secret. ISPs post the details on their websites, usually in a support area. Good ones will tell you how to set up their service with specific email clients. (You’ll probably be using Apple’s Mail.) If you can’t find this information, give the ISP a call (you like waiting on hold, right?), tell the representative you’re using a Mac, and ask for this information:
- Do I have a POP or IMAP account?
- What’s the incoming server address? (It will be something like mail.jojoemail.com.)
- What’s the outgoing server address? (It could also be mail.jojoemail.com, but it’s more likely along the lines of smtp.jojoemail.com.)
- What security settings do I need? (Should SSL be turned on and what verification scheme should I use?)
- Do you use unusual incoming and outgoing server ports? If so, what are they?
By the way, if you have the option to choose between a POP or IMAP account, go with IMAP. Without getting too technical about it, an IMAP account allows all your email to synchronize among the devices you use. For example, if you view your email on your iPhone and delete a message, when you next fire up Mail on your Mac, that message won’t appear because you’ve dealt with it elsewhere. With a POP account, the message you deleted on your iPhone will likely appear on your Mac, where you’ll have to delete it once again. The IMAP scheme is the default standard for all the major services—Gmail, Yahoo, iCloud, and AOL.
Once you have this information, see if the support person will hold the line while you configure the account. This will save you from having to call back and wait another hour on hold should the settings not take. Once everything is working, make a note of your settings so that you can reconfigure the account if something goes wrong in the future or if you want to set up another device with this service.
Of course, there’s more. As I mentioned, this Add sheet presents options for dealing with messages, dates, and contacts. But those features go well beyond the basics that we want to cover at the moment. We’ll dive into them when we eventually get to the Messages, Contacts, and Calendar applications.
Next week: Networking basics