
Everything you need to know about Apple Airdrop

Image: Apple
One of the best aspects of the ubiquity of technology in our lives is the ability to share content with one another. We share our location to meet with friends, notes we've taken on our device, and photos from parties and family functions.
Unfortunately, this process is typically pretty clunky. You select the content you wish to share and email it or send it via text message. The receiving user then has to open the content and save it to his or her own device.
Apple users, however, have another option in using AirDrop, which allows users to transfer photos, videos, locations, voice memos, or notes from one device to another over the "air." Initially available with OS X Lion (10.7) for Mac to Mac transfers, AirDrop was later made available for mobile devices starting on iOS 7.
AirDrop is, perhaps, one of the most underused features in the Apple ecosystem, but it is a great resource for Apple users. Let's take a look at how to use it.
AirDrop on iOS
To use AirDrop with an iOS device, there are certain hardware specifications you'll need to have in order for it to work properly. According to the Apple website, only the following mobile devices can properly use AirDrop:
iPhone 5 or later
iPad (4th generation or later)
iPad mini
iPod touch (5th generation)
If you want to share content between mobile devices, both devices must be running iOS 7 or later and have both Wi-Fi and Bluetooth enabled. For devices running the latest version of iOS 8, you can access these settings by swiping up on the screen and tapping the icons.
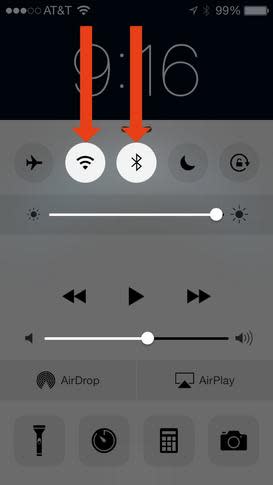
To enable AirDrop, you'll swipe up once again. As long as both Wi-Fi and Bluetooth are turned on, you should be able to tap the "AirDrop" icon towards the bottom of the screen. Once you tap it, you'll have to choose between making your device available to "Contacts Only" or "Everyone."

"Contacts Only" is just what it sounds like, only your contacts will know you're on AirDrop. "Everyone" means that any person with an Apple device in range can see your device. Apple lists the range of AirDrop as roughly 30 feet.
To make a drop, first select the content you want to share and tap the share button, which looks like a box with an arrow coming out of it. You'll see the standard modes of sharing in the menu to follow, but you should also see a section that says "Tap to Share with AirDrop" on the middle of the screen. There, you will see available devices you can drop to.
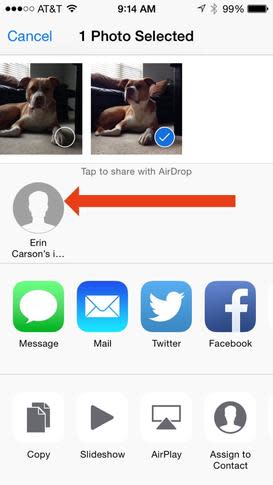
Tap on the person you wish to share with. That person will receive a notification that you wish to share content with them. If he or she accepts, the content will automatically save to his or her device.
AirDrop on Mac
Using AirDrop to transfer content with a Mac is a little more complex. You can use AirDrop to transfer from Mac to Mac, or between a Mac and an iOS device. If you want to transfer between two Macs, you need to have Wi-Fi turned on and you need to be running OS X Lion or later. According to Apple, here are the Macs that can support AirDrop between two Macs.
MacBook Pro (Late 2008 or newer)
MacBook Air (Late 2010 or newer)
MacBook (Late 2008 or newer)
iMac (Early 2009 or newer)
Mac Mini (Mid 2010 or newer)
Mac Pro (Early 2009 with AirPort Extreme card, or Mid 2010)
If you'd like to use AirDrop between a Mac and an iOS device, though, the specifications are a little different. For starters, both your Mac and iOS device must have both Wi-Fi and Bluetooth enabled. They don't need to be on a specific Wi-Fi network, though.
Apple's website lists the following specifications for using AirDrop between an iOS device and a Mac.
Your iOS device needs to include a lightning connector
Your iOS device needs iOS 7 or later installed
Your Mac needs to be a 2012 or later model with OS X Yosemite installed
To send a file via AirDrop from a Mac, begin by clicking the "Finder" icon. With the finder window open, you should see "AirDrop" listed as an option on the left hand side. Click "AirDrop" and your computer will begin searching for any devices that are using AirDrop.

Image: Apple
When the available devices are in view, simply drag and drop the file you want to send onto the name of the device you want to send it to. In this case, it's helpful to move the file onto your desktop beforehand.
Files sent to a device using your iCloud account (e.g. if you send a picture from your iPhone to your Macbook) will automatically be received. However, files sent to someone else will present a pop-up window asking the receiver to accept the transfer and save the file.
If you want to send something from an application you're currently using, the process is similar to sending through an iOS device. Look for the same share button, the box with the arrow coming out of it, and click that. Then, simply click on the name of the recipient you wish to send the file to.
The proper use of AirDrop is good knowledge to have if you work or play heavily in the Apple ecosystem. Hopefully these tips will help you avoid the back-and-forth that comes with emailing or texting content, and have you AirDropping in no time.
