
Excerpt from The Adobe Photoshop Lightroom CC Book for Digital Photographers
We can now create panoramic images (stitching multiple frames into one very wide, or very tall shot) right in Lightroom—no more trips over to Photoshop necessary. And, I gotta tell ya, I like the way Lightroom does it better than Photoshop anyway. It's quick and easy and it does a great job. Here's how to start stitching your own panos:
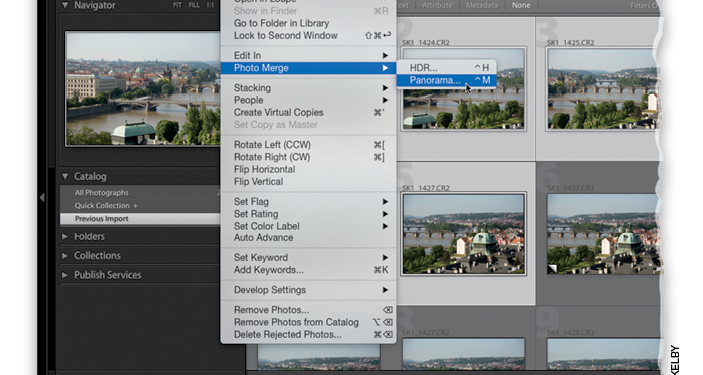
Step One:Â Start by selecting the images you want combined into a panorama (or pano, for short) in the Library module. Then, go under the Photo menu, under Photo Merge, and choose Panorama (as seen here) or just press Control-M (PC: Alt-M).

Step Two:Â This brings up the Panorama Merge Preview dialog, and you'll see that it's creating your pano preview. Also, the dialog itself won't look wide like this—it'll have a more standard Photoshop dialog dimensions—but since it's resizable, I figured I'd just drag it way out to the right to make it more like the shape of a horizontal pano. But, you can resize it to whatever size and dimensions you like by just dragging its edges.

Step Three:Â After a few seconds, a preview of your stitched pano will appear (as seen here). In the Panorama Options on the right, there's an option to crop away any of the white gaps that normally appear around the edges of your image from the process of putting this all together into one image (you folks that use Photoshop know those gaps all too well); if you prefer to do the cropping yourself manually, keep the Auto Crop checkbox turned off (or turn it on, then after your pano is stitched, just click on the Crop Overlay tool in the Develop module and it reveals the cropped away areas, so you can re-crop).

Step Four: At the top of the Panorama Options are your options for choosing your projection (the method Lightroom uses for creating your pano) but, honestly, just leaving the Auto Select Projection checkbox on (the default) does an awesome job of picking the right projection, and personally it's the only choice I ever use. However, here's what these three do: Perspective assumes the center image that makes up the pano is the focal point, and it does whatever it needs to do (including tweaking, warping, bending, etc.) to the other images so they fit nicely with that center one. Cylindrical seems to work best with really wide panos, and it tries to keep the height of all the images consistent so your pano doesn't wind up with the "bowtie" effect—where the ends of the pano are tall and then they angle inward toward the center image like a real bowtie. Spherical is for stitching 360° panos (of course, you'd have to have shot a 360° pano for this to work).

Step Five:Â Okay, now you can click the Complete Merge button and your final pano is rendered (it takes a minute. Or two. Or more). Of course, this all holds true unless there's a problem. Luckily, the most common problem is a pretty minor one, and it's one where there's a quick fix. You'll know if you have this problem because right under the Auto Crop checkbox, you'll see a warning icon (an exclamation point in a gray circle) and it warns you that Lightroom is "Unable to match a lens profile automatically. For best results, apply the appropriate lens profile to the photos before merging." Here's basically what that means: When making a pano, Lightroom first looks at the camera data embedded into your photos. When it finds out which lens you used, it applies one of Lightroom's built-in lens profiles to help make the best quality pano it can. If it can't find a profile for your lens, or it doesn't find the lens info it needs, it still puts the pano together, but it's not quite as good as it could be. It's not awful. Just not ideal.

Step Six:Â Here's how to fix this: All you have to do is tell Lightroom which lens you used. Here, it couldn't find a profile for the Tamron 28-300mm lens I used to make this pano. So, first, hit the Cancel button to close the dialog. Then, while your images are all still selected, go to the Develop module. With Auto Sync turned on (see Chapter 4), go to the Lens Corrections panel, click on the Profile tab (along the top of the panel), and then turn on the Enable Profile Corrections checkbox. Next, choose your lens make and model from the pop-up menus. If they don't have your exact lens profile, choose the closest one you can find. That's it. Go ahead and create your pano again and this time your results will be better.

Step Seven:Â Now that you know how to stitch a pano, and how to fix the most likely problem (another problem would be when it just can't stitch it together—maybe you didn't overlap each frame enough when you shot, or you tilted the camera too much so it just won't work. If that happens, it'll tell you, "I can't stitch this" [but in a much more formal way], and there's not much you can do at that point except go reshoot the pano), it's time to learn how to do it faster. To skip the Panorama Merge Preview dialog altogether, just press-and-hold the Shift key when you choose Panorama from the Photo Merge menu (or just press Control-Shift-M [PC: Alt-Shift-M]. It'll put the final stitched image together in the background, so you can continue doing whatever else you want to do in Lightroom, including creating another pano (yes, it can be rendering one when you work on another. Sweet!). Adobe calls this hidden dialog rendering "Headless" mode.

Step Eight:Â When it's finished rendering in the background, your final stitched pano appears as a (RAW) DNG file in the same collection as the images you used to create the pano (provided, of course, that the images were in a collection when you started. If not, it'll appear in the same folder) and you can continue tweaking the pano like you would any regular single image. Note: When your pano is created, Lightroom adds the word "Pano" to the end of its filename.

TIP: Making HDR Panos If you shot bracketed images when you were making your pano, first use the Photo Merge HDR feature to combine each set of bracketed photos into individual HDR images, then select all the compiled HDR images and choose Panorama from the Photo Merge menu to turn those into an HDR pano.
Learn how to do more from The Adobe Photoshop Lightroom CC Book for Digital Photographers here: http://kel.by/lrccbook and check out some of Scott’s Lightroom classes.

