
Why Use Screencasts?
Screencasts are video captures of a computer screen, with audio or subtitles narrating the video. They're perfect for teaching a piece of software or creative techniques. Best of all, a screencast is pretty easy to produce.


When you teach with screencasts, the viewer has an "over the shoulder" view for learning from an expert. Screencasts scale to an audience of any size. With this format, users can access what feels like a private training session any time. In this tutorial, I'll teach you to use Capto to create a screencast on a budget.
Meet Capto
Capto is a lightweight and inexpensive piece of software for Mac. It's perfect for anyone who wants to try out screencasting, without making a major financial commitment. It's one of several screencasting applications that can be used for the entire process from record, to edit, to export. It's has all the tools a screencaster needs and is simpler than a full-featured editor, like Premiere or Final Cut.


Grab a free trial of Capto from the Global Delight website. If you decide to license it, a full version is available for $30, or $20 for students and educators
Record Your First Screencast
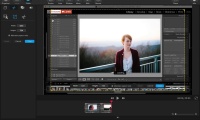
After you've installed Capto, open the application. The first time you run Capto, it might ask you where you wish to store your video recordings. I prefer to leave this in the default location, with videos stored inside the Capto application folder.
Successful screencasts start with a vision. A lesson plan can be as simple as an outline. While some screencasters prefer a written script, others stick to a loose outline and ad-lib the instructions. Both approaches can be successful.
We think of screencasts as video productions, but it's really high quality audio that will set your work apart. Whether you're using Capto or another tool, here are tips for upgrading your audio:
- Use an external microphone. The sky's the limit when it comes to buying microphone's, but even an inexpensive microphone that plugs in via USB is a huge upgrade over the built-in microphone on laptops.
- Avoid distracting sounds. Turn off fans, air conditioning, and other distracting sounds that may interrupt the viewer experience.
- Find a quiet space. A closet is the classic space for recording audio. Hanging clothes can dampen the echo, and it's generally a quiet space to record in.
-
Use headphones. An inexpensive pair of headphones are a must! Wearing headphones leads to mindfulness about the vocal delivery of a lesson.


Once you've prepared your audio setup and have a lesson plan, it's time to press record. In Capto, click on the Record button at the top of the application and choose either Screen or Area. Choosing the Screen option will capture the entire screen, while Area lets you draw a selection to record.


After selecting Screen or Area, Capto will show a new window to confirm our recording setup. You can tick Record Computer Audio to capture any audio that your Mac produces, such as the sound effects in an app. And, of course, we'll want to tick Record Microphone and choose the microphone from the dropdown list to select our recording device. I advise leaving the FPS at the default 30 for high quality video.


Once you press the red circle button, your screencast has begun! Click on the Capto icon in the menu bar to stop and save your finished screencast.

Edit Your Screencast
After you've captured your video, it's time to refine your screencast with some basic editing. Check out this screencast to learn how to edit yours!
Export Your Screencast
To share our screencasts with viewers, we need to export a finished video file out of Capto. To export a video, go to File > Export. Most video-sharing services prefer mp4 video files.
Capto's export options are limited, but should be enough for most purposes. For simplicity, I usually let Capto create my mp4 videos. Change the File Type to MP4, and leave the Format unchanged, to create an mp4 video file.
For maximum quality, set the File Type to mov. This will create a large file. Let Capto save the file, and then use a more efficient transcoding app (like Handbrake) to convert the resulting mov to mp4.
You can also reduce the video size while exporting by choosing a smaller size like 480p, but I suggest you don't. If you to need to reduce the resolution for some reason use a transcoding app instead, it'll usually produce a better picture.


Then it's time to share your video. You can use an online service like YouTube or Vimeo, or you can simply send the video to a friend using a file sharing platform like Dropbox.
Recap and Keep Learning
Teach with screencasts to show the viewer your creative approach. You don't have to be an expert or seasoned video producer thanks to tools like Capto. Press record, make some basic edits, and then take your skills online to share with the world.
If you want to learn more about lesson production, I recently wrote a piece about how courses get made at Tuts+. I share how I write my lessons and plan a course. Another tutorial from Melody Nieves, titled "Live Video: What's Keeping You From Hitting Record?" is a great piece to help you overcome anxiety about video as a format. Finally, this tutorial will help you improve your audio in post-production with just a few clicks using a site called Auphonic.
How are you using screencasts? What are your tips for creatives just getting started? As always, I would love to get your thoughts in the comments below.
.png)
.png)


