Earl Jarrett asks a question many people have about Time Machine backups. He’s currently using a 1TB external drive and wants to upgrade to a new 4TB drive. Time Machine can keep a deep history of your previous versions, and the more space, the deeper the history, which has led many people to upgrade the storage they allot to these bakcups.
How do I transfer the info from the 1TB external drive to a new 4TB external drive and use it with Time Machine, and then wipe the 1TB drive and use it to run Photos while making sure that any new pictures are backed up as well?
It’s fairly easy, but requires that you perform a number of actions in the right sequence to ensure no backups are in progress while you’re copying.
- Disable Time Machine from its menu item or via the Time Machine system preference pane.
- Mount both drives.
- Launch Disk Utility to check that the new drive is formatted correctly in the next two steps.
- Click the new drive’s icon in the left bar, and make sure Partition Map is shown in the description to the right as GUID Partition Map.
- Click the partition (named drive) below the drive icon, and make sure the name next to the drive icon ends with “Physical Volume Mac OS Extended (Journaled).”
- If neither 4 nor 5 matches what’s needed, back up any data on the new drive that you need to retain (if any), and then select the drive icon, click Erase, and set the options to Format: Mac OS Extended (Journaled) and Scheme: GUID Partition Map. Click Erase. Now your drive is prepared for Time Machine.
- In the Finder, select the drive and choose File > Get Info.
- Uncheck the box Ignore Ownership of This Volume if it isn’t already unchecked (in the Sharing & Permissions section, which you may have to click an expansion triangle to open).
- Copying is a breeze: just drag the
Backups.backupdbfolder from the old drive to the new one. Depending on your system, the copying may take a while. This leaves the original backup in place, too. - When it’s finished, open the Time Machine system preference pane, and click Select Backup Disk.
- Select the new disk in the list and click Use Disk. You should be prompted to re-enable Time Machine; if not, flip the switch back on.
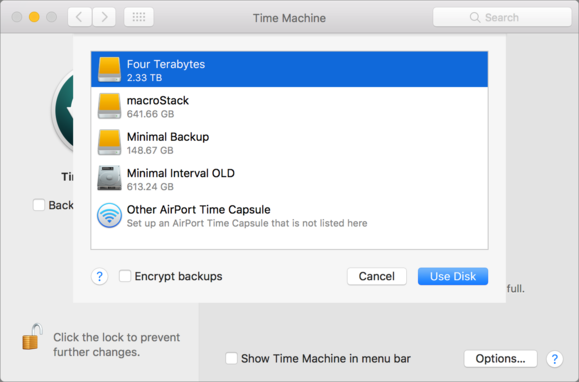
Add the drive you just prepared after it’s ready to go and permissions set in the Finder.
Once all of that is done, I’d wait for at least an hour and check that a backup occurred on the new drive in that period. I’d also browse through old backups, and make sure files you expect to see and be available back as far as your previous archive goes remain available.
Only when you’re absolutely sure Time Machine is working reliably and continuously and hasn’t lost any of your older files, then you can erase the older drive (using Disk Utility as in step 6 for the simplest way), and switch your Photos Library to that drive.
Ask Mac 911
We’ve compiled a list of the most commonly asked questions we get, and the answers to them: read our super FAQ to see if you’re covered. If not, we’re always looking for new problems to solve! Email yours to mac911@macworld.com including screen captures as appropriate. Mac 911 cannot reply to email with troubleshooting advice nor can we publish answers to every question.
Author: Glenn Fleishman, Senior Contributor

Glenn Fleishman’s most recent books include Take Control of iOS and iPadOS Privacy and Security, Take Control of Calendar and Reminders, and Take Control of Securing Your Mac. In his spare time, he writes about printing and type history. He’s a senior contributor to Macworld, where he writes Mac 911.