

If you’re new to audio recording and editing on your Mac, or upgrading from GarageBand or another audio recording suite to Apple’s Logic Pro X, Logic Pros 101 has you covered.
In this first installment, we give you an introduction to the app with a tour of its user interface. In the future, we’ll break down basic recording and editing features, using virtual instruments and effects, and much, much more:
Getting Started: Your Studio and Logic Pro X
The way Logic Pro X communicates with the physical elements of your studio is very important. You might be able to get started with USB accessories like speakers and instruments that you can already connect to your Mac’s ports, but connecting guitar cables, microphones, studio speakers and other professional audio gear usually requires an audio interface that expands your connectivity options. Audio interfaces vary in price point and range dramatically in terms of input and output options. Many connect to your computer over USB and some require a separate power supply or use Thunderbolt and other connectivity options.
Logic will automatically configure itself to correspond with the physical elements of your audio interface, including the speakers/headphones, audio inputs/outputs, MIDI I/O and more.

For example if you have an Apogee Duet with two mic/line/instrument inputs, then every time you load an audio track in Logic, it will make those physical inputs available to you. If you want to record the guitar plugged into “Input 2” on your interface, then simply choose Input 2 on the audio track you want to record it on inside of Logic. The same goes for outputs to your speakers/headphones. Logic’s master stereo audio output will automatically come out of the master outputs on your interface (usually labelled something along the lines of Outputs 1-2).
Logic Pro X Audio Preferences: Just in case things aren’t working as they should, you can go to the Logic Pro X top bar menu > Preferences > Audio tab and then ensure your interface is selected in the Input Device and Output Device pull-down menus. It looks like this.
If you’re not using an audio interface, Logic Pro X will simply default to using the physical audio output and input on your computer to interface with Logic.
Most MIDI controllers, which commonly come in the form of keyboards/drum pads and used to control virtual instruments inside Logic, will work right out of the box with your Mac and Logic Pro X. After connecting the device to your system via USB or MIDI cables, it should work with Logic straight away.
And with that out of the way, it’s time to dive into the Logic Pro X user interface.
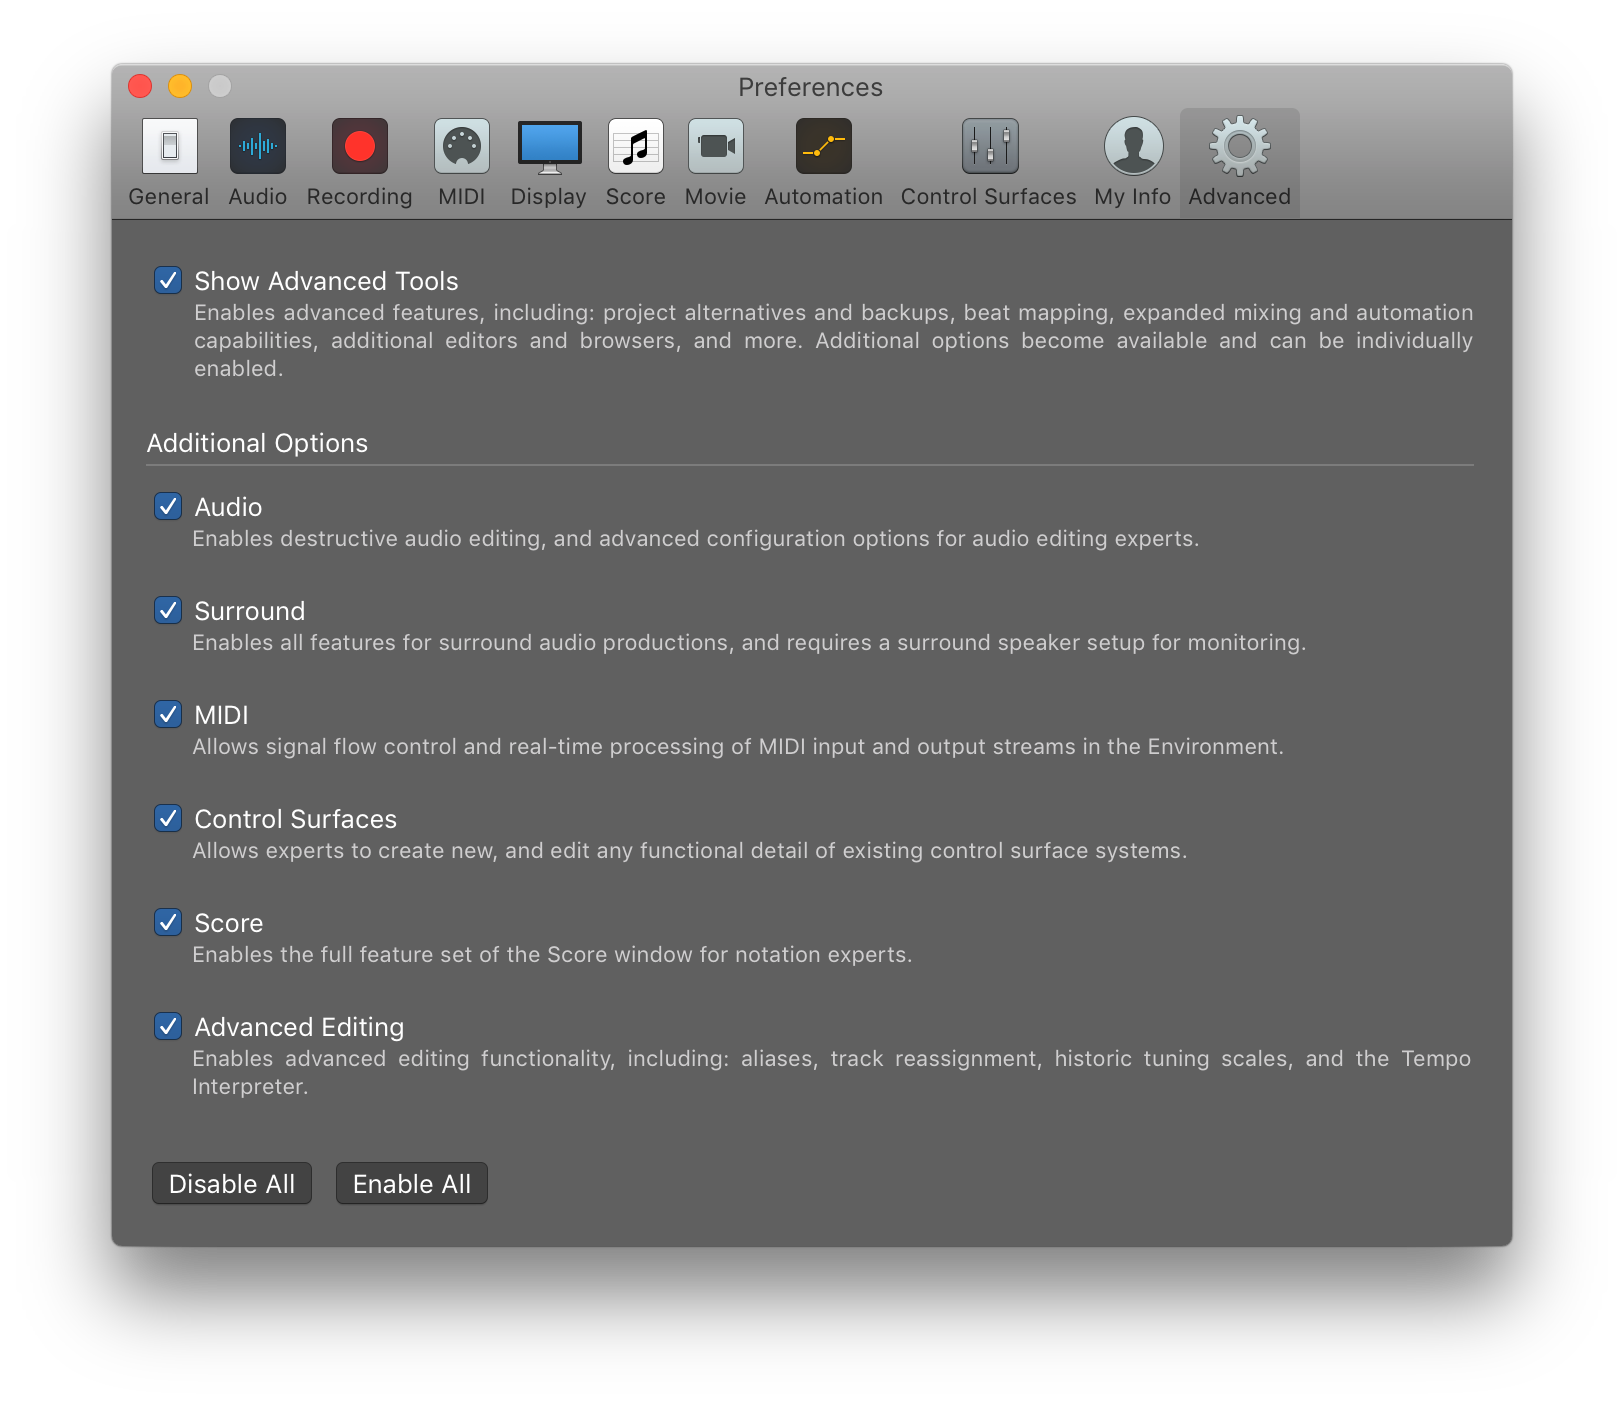
Settings: To get the most out of Logic Pro X, you’re going to want to enable all of the advanced settings right from the get-go, despite being new to the app. Go to the Logic Pro X top bar menu > Preferences > Advanced and then check off the Show Advanced Tools box. It looks like this.
Logic Pro X User Interface:
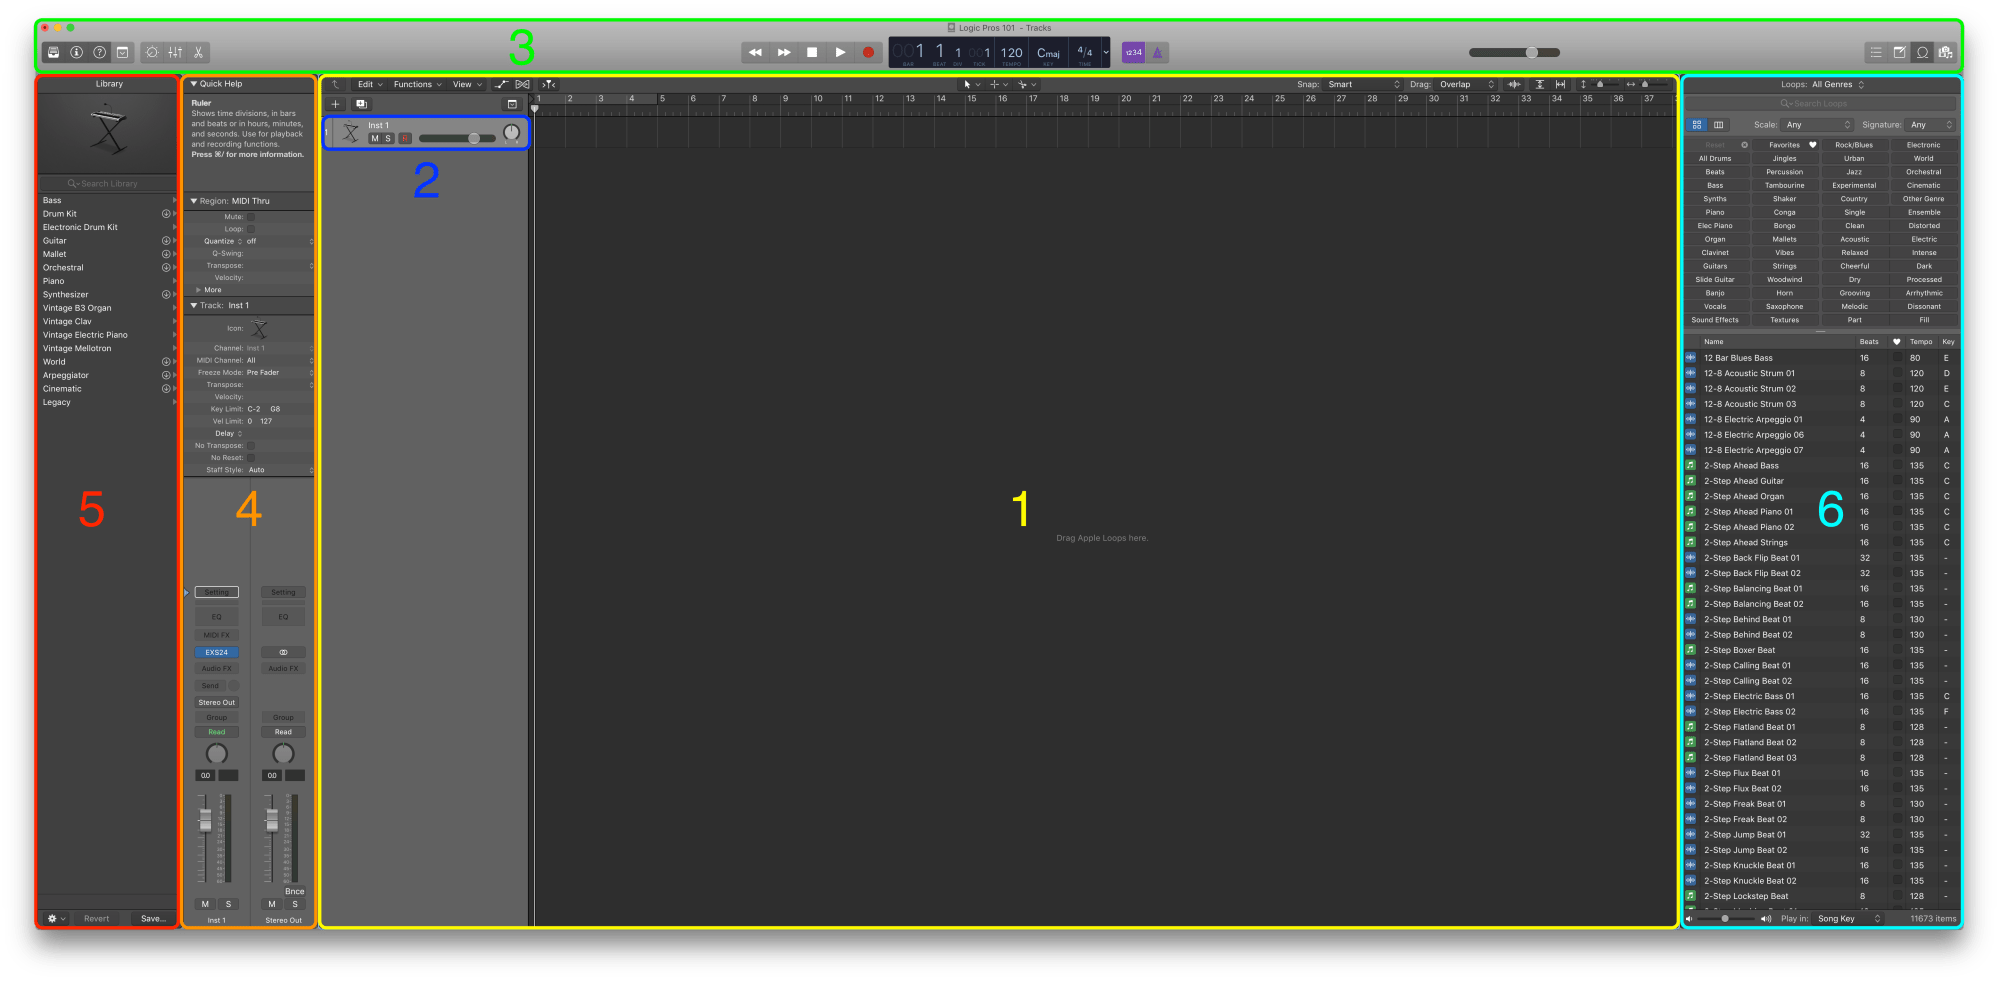
Click the image above to view full size…
Logic’s interface can certainly seem daunting at first glance, but don’t be intimidated. There’s a lot here but nothing you can’t handle. In many ways, Logic’s interface isn’t much more complicated than any app you use on a daily basis. It is essentially the main arrange window or Workspace, a series of helper side-panel menus, and some editors for your tracks.
(1) – (2) Workspace:
The Workspace (1) is a linear timeline where you’ll be doing most of your work: creating tracks to record on, editing the regions you record and arranging the way your tracks play out across the timeline. Surrounding the Workspace we have the Control Bar (3) that houses your main transport and various buttons that will show/hide the corresponding side-panel menus, among other things. Logic Pro X is laid out in such a way that just about all of the main areas of the program can be accessed via these buttons from the always-visible Control Bar.
Track Headers (2) are arranged vertically along the left-hand side of the Workspace and represent each track created in your project. We can adjust several things about a track from its header including the icon displayed, mute, solo, volume and pan settings, as well as the ever important record enable function. The “+” icon at the top of the Track Headers area is one of the ways to create a new track.
The most important element of the track header is the record enable button. That little red button with the “R” on it has to be enabled for you to both hear (monitor) or record on a track. If your keyboard suddenly isn’t making sound, the record enable button is likely the culprit.
Quick Help: See that little question mark icon in the top left of the Control Bar? Engaging this feature will bring up a small contextual helper window in the Inspector. This little square offers up very helpful tips and definitions for whatever section of the UI you are currently waving your mouse over. If you press command + / while waving your mouse over a certain aspect of Logic, it will automatically bring you to that section of the user manual. Leaving this little feature engaged for your first few weeks (months) with Logic can be an invaluable tool to becoming familiar with its mysteries.
(3) Control Bar:
The Control Bar (3) is where you’ll find all the basics for a given project. On top of housing the usual play, rewind and fast-forward buttons (aka transport controls), this is where we can set the master tempo for our project, engage various record mode types, adjust the time signature of our song and even the overall grid division (1/4, 1/8, 1/6…). For example, simply click on the BPM display in order to change the tempo of your project, and so on with the other options.
Much like many elements in Logic Pro X, the entire Control Bar area can be customized by the user to show various quick functions and data streams. All of which will be things you’ll be become more familiar with as we move through this tutorial. In fact, much of Logic’s interface is modular and customizable in this way (including Track Headers), allowing you to build your very own personalized recording workstation over time.
Right-click (or control + click) on the Control Bar to open the customize options. From here we can choose to view/hide a slew of different shortcuts. For now, it is a good idea to ensure all of the options in the “View” category are enabled like the image above.
(4) Inspector:
The Inspector (4) is one of Logic’s most handy tools and it can be accessed/hidden via the small “i” icon in the top left corner of the Control Bar. It is a powerful contextual side-panel menu that offers up various track/region settings, MIDI parameters, and a quick view of the selected track on the Mixer (more on the Mixer later). The Inspector will automatically show the controls for whatever track or region of a track you have selected.
It allows for a plethora of alterations to be made and acts as a very quick way to access the selected track’s volume, pan, mute, solo, MIDI FX, EQ, main FX slots and quantization settings. It also offers streamlined access to a track’s input/output in order to ensure it corresponds with your physical inputs on your audio interface properly. Or to access the UI of the virtual instrument you may be using, for example.
Many of the parameters found the Inspector are very powerful MIDI melody/rhythm manipulation tools. Including advanced quantization/rhythm adjustments that can be made to your beats/melodies and more, most of these will automatically be set the way you’ll need them from the get-go. We will be diving more into these features soon.
Along the bottom half of the Inspector side-panel is where you’ll find the aforementioned quick view for the selected track. To the right of that fader you’ll find a quick view of the project’s Master fader. This is essentially the master volume/level for all the tracks in your session that is connected to the main 1-2 outputs on your interface we mentioned above. (more on this later).
(5) Library:
Just to the left of the Inspector is the Library (5). You can open it at any time using the small drawer icon in the top left corner of the Control Bar. In here you’ll find a very long list of instruments with the corresponding FX and more. Logic Pro X comes with many GB’s of free instruments, samples, loops and more, and this is where we access many of them. The loops, however, are found in their own special menu (more on that below). We can also save our own instrument presets and channel strip settings for quick and easy access in other projects.
Downloading all of Logic’s free instruments, loops, channel strip settings and more: Logic includes a massive library of sounds and instrument settings and the Sound Library Manager is the best way to find those. It organizes everything available to you, shows what you already have or not, and offers up a quick way to download exactly what you want. Go to the Logic Pro X menu in the top bar while Logic Pro X is open, then choose Sound Library Manager from the list.
(6) Browsers/Media
On the right side of the interface we have another series of side-panel menus accessible via the buttons in the Control Bar:


The Loop Browser containing all the audio loops that come with Logic Pro X (and any others you might add). You can audition each of them and quickly add them to your project using the the Add button along the bottom of the menu or by simply dragging the desired loop over to the Track Header section of the Workspace.
We also have a simple system Browser allowing you to access your hard drives/storage for importing files and more. Within the Browser side-panel we have a tab labelled Project that contains all of the elements saved to the open project, as well as the ability to import specific tracks and elements from other Logic projects (more on this later).
The List Editors show a stream of data pertaining to your project in list form (we won’t need to pay much attention to this one for now).
And lastly, we have a basic Note Pad for making simple text reminders, track notes and more, etc.
Exercise:
1. Open a new Logic Pro X session. Select the “Empty Project” option if Logic asks you to choose a template. Once selected, Logic will automatically bring up the New Tracks window and ask you to create your first track. Add a new Software Instrument from the pull-down menu and hit Create.
2. Now select the Track Header of your new track to display its quick view in the Inspector (if it isn’t already).
3. You can also choose to load up a different Software Instrument on a track at any time: single click on the Instrument slot in the Inspector or choose an instrument patch from the Library.
Note: you might be seeing some options in my menu above that you don’t have in your system (years of collecting third party add-ons), but you will have all of the instruments that come with Logic Pro X.
4. Ensure the “R” button on the selected track’s Track Header is enabled and push the record button in the Control Bar (or the R key on your keyboard to put Logic in record). Play some chords or a melody on your keyboard/controller and press the Stop button (or the space bar) to stop recording.
Note: If you don’t a have a physical MIDI controller yet, you can use your QWERTY keyboard for now. Go to the Windows top bar menu with Logic Pro X open > Show/Hide Music Typing. Or use command + K to toggle the feature on and off.
5. And BOOM, your very first recording! Be sure to hit Command + S to save your work!
Shortcut Tips:
Play-Stop Logic: Spacebar
Create New Tracks: Shift + Command + N
Record: R
Saving Your Project: Command + S
Show/Hide Inspector: I
Show/Hide Library: Y
Show/Hide Browser: F
Show/Hide Loop Browser: O
Show/Hide Note Pad: Option + Command + P
Show/Hide Musical Typing: Command + K
Open Logic Pro X Preferences: Command + ,
More Logic Pros (101):
-
1. Getting started with Logic Pro X – The interface
-
2. Recording basics, creating tracks and getting started with editing
-
3. Understanding Channel Strip controls and navigating Logic’s Mixer
-
4. Working with Audio Effects and Software Instrument Plug-ins
The Logic Pros are: Justin Kahn and Jordan Kahn, who also front Toronto-based electronic/hip-hop group Makamachine.
Want more Logic Pros? Check out the archives here and stay tuned for a new installment each week in 2017.
FTC: We use income earning auto affiliate links. More.


Comments