

“Don’t repeat yourself” is one of the most important rules programming. And it makes sense: why do the same thing over and over again manually when we have computers to do that for us? For fortunately, you don’t need to be a programmer to avoid repeating yourself. Hazel brings programming concepts to even the most code-illiterate. The app can help you organize your files automatically, increasing your efficiency and freeing your mind painstaking process of filing all your bits manually.
What Is Hazel?
Hazel brings the logic of programming to folks that don’t know how to write code. It’s a macOS app with an easy-to-use graphical interface for some fairly advanced scripting capabilities. It relies on a simple “if this, then that” sort of structure, meaning that it matches specific parameters to specific files, and then performs a task if those parameters are met. The logic is simple but powerful.
Setting Up Hazel
Hazel is easy to set up. After you’ve downloaded and installed the application, you’ll find it in your System Preferences. Click on the icon to open the preference pane, and you’ll be able to get started.

When you first launch the pane, you’ll be in the Info tab which tells you whether or not Hazel is currently running. You’ll see a button that says “Start Hazel,” but leave it off for now.
Tick the box below that says “Show Hazel status in the menu bar.”

On the left side of the window, you’ll see a column with a list of folders. Click on one of those folders, and you’ll see the pane on the right, labeled “Rules,” fill up with some checkboxes.

These rules are what tells Hazel what to do with different files in different situations. We’ll be creating some of our own, but the included demonstration rules are useful for inspiration. Rules apply to particular folders, and each folder contains its own set of rules.
1. Clean Your Downloads Folder Regularly
I use my Downloads folder as a sort of “on deck” folder for containing working files. Unfortunately, I don’t clean it up too often. Hazel can help me out with that, however.
1. To create a new rule in Hazel, we first need to select the folder we want the rule to “watch.” Since we’re working in the Downloads folder, we’ll obviously select Downloads. Then, I’ll add a new rule by clicking the plus button.

2. Let’s give our rule an easy-to-understand name.

Now we’ll set up our criteria. These are the criteria a file has to meet before Hazel processes it. My goal is to set up files older than seven days for processing, so I’ll tell Hazel to target those.
3. Click the drop down menu labeled “Name,” and change it to “Date Last Opened.”

4. Check the drop down labelled “is,” to “is not in the last.”

5. Change “1 hour” to “7 days.”

In the next section, we’ll set what to do with files that match our criteria.
6. Click “no folder selected,” and change it to “Trash.” This will move all the old files into the trash.

7. To save the rule, click OK. Since we have Hazel turned off right now, the rule won’t apply immediately. We’ll need to turn Hazel on before we can do that.
This is perhaps the simplest possible Hazel rule, but it’s still useful. Here’s a few other rules I use to manage my downloads folder.


2. Organize and ZIP Old Files
This rule has two bits. First, we’ll set up a rule that puts old files into a specific folder. Then, we’ll archive that folder.
1. Select on your Desktop folder in the sidebar. If the Desktop folder isn’t there, click the plus button under the list of folders and add it.
2. Click in the plus button in the rules pane to create a new rule.
3. Change your Name drop-down to “Date last modified,” “is not in the last,” and change the time interval to one week.
4. Change the “Move” drop-down to “Sort into subfolder.”

5. Click the text box after “with pattern” to bring up a list of renaming tokens you can use. Select “current date.”

6. Click after the current date token in your text box and type “archive.”

7. Click Done to close the text box and OK to confirm the rule.
Now we’ll set up as a rule to compress those folders into ZIP archives.
8. Create another new rule in the Desktop folder by clicking the plus button under the rules list.
9. Create two rules: Name contains “archive” and Kind is folder.
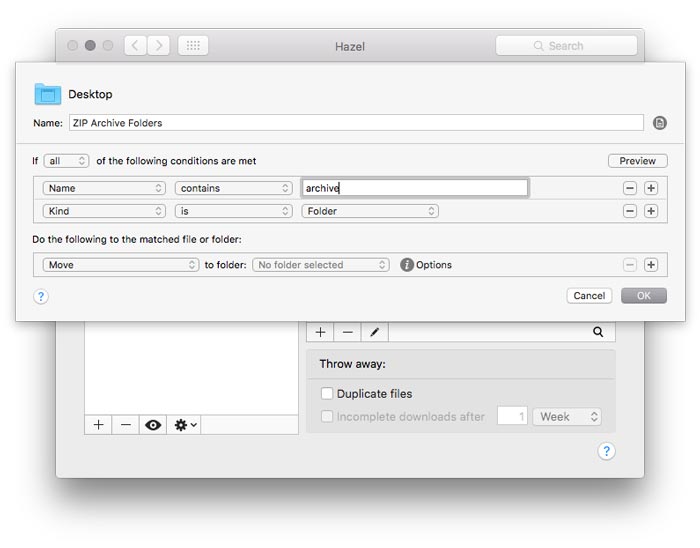
10. Click the action drop-down to select Archive.

This rule will automatically archive everything that hasn’t been modified in the last seven days.
3. Rename and File Scanned Documents Based on OCR Content
This last rule requires some external hardware or software to make it work. I use my ScanSnap, which converts scanned documents into PDFs with live text data embedded. This way I can automatically file scanned paperwork into the appropriate folders.
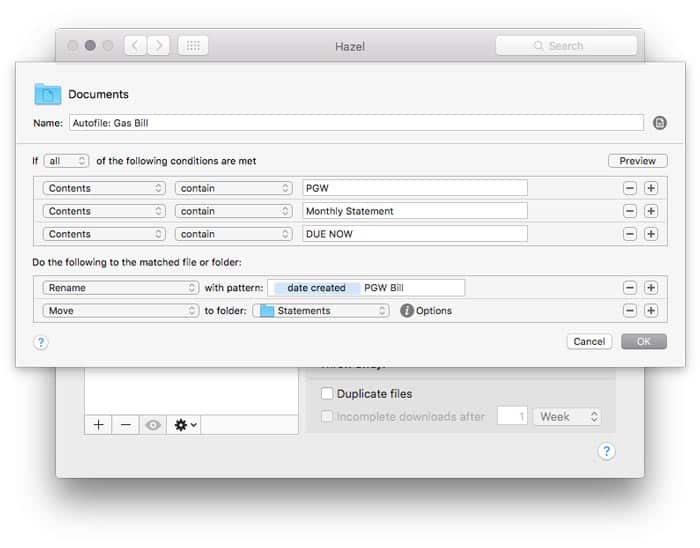
By now, you know how to read this rule. It matches three conditions, using the contents of the PDF as triggers for the actions below. When it finds a match, the rule renames the folder with the date the scan was created and the name of the bill, and files it in my “Statements” folder.
Conclusion
Once you’re done creating all your rules, you can return to System Preferences and turn Hazel on. All your rules will apply immediately, so make sure you’ve got everything correctly programmed!
You might also like:


One thought on “3 Hazel Rules to Make macOS File Management Easier”
When I installed Hazel it starts to put files from the download folder in the trash,so I put a document folder there for downloads from safari.this time I let it mark the files red,then you stop Hazel ,move the files to the document folder,that will keep my hard drive intact.