How to manually control your iPhone's cloud photo storage with Photo Stream

One of the most frustrating things about iPhone photography is storing said photos: iOS 11 brought with it a new High-Efficiency Image Format (HEIF) that cuts iPhone image sizes in half, but it's still a struggle for 16, 32, and 256GB iPhone users to avoid seeing that dreaded "No more space" error.
iCloud Photo Library does provide an Optimize Storage option that can help by deleting older images locally on your phone after they've been uploaded to iCloud, but there's no way to manually adjust when those photos get deleted; as such, you may still run out of space even after enabling the option.
What are 16, 32, and 256GB owners to do? iMore forum user Johnny Lloyd Rollins suggested a tip that takes advantage of both of Apple's photo sync services — Photo Stream and iCloud Photo Library — to keep your photo collection on your iPhone small, but also back everything up.
Here's how to do it!
How does this tip work, exactly?

It's more of a MacGyver of a hack than it is a proper tip if we're being honest. Essentially, it relies on the Photo Stream architecture (which automatically syncs the last 1000 photos to your computer), rather than the iCloud Photo Library architecture (which provides you with access to any photo you've ever taken that you've stored in iCloud).
What's the difference between iCloud Library and My Photo Stream?
When you follow the steps below, you'll switch your iPhone over to the Photo Stream sync service, which disables your access to iCloud Photo Library (and thus, the Optimize Storage solution). You'll now be in manual control of how many photos you're storing locally on your phone at any one time, but they'll still sync to your Mac or PC.
Master your iPhone in minutes
iMore offers spot-on advice and guidance from our team of experts, with decades of Apple device experience to lean on. Learn more with iMore!
On your Mac, you can keep iCloud Photo Library enabled if you like; this effectively turns iCloud Photo Library into an online backup service for your images and video. All Photo Stream images will sync to your Mac via the internet, where they can then be backed up to iCloud Photo Library, Time Machine or an alternate cloud backup service.
Of course, while the benefit (manual control of how many images live on your phone) is useful, it's worth weighing the cons before proceeding:
- Photo Stream only syncs the latest 1000 images, and only via Wi-Fi — so if you're traveling, you have to make sure you stop by a Wi-Fi hotspot now and again
- You'll need a Mac (or external hard drive) large enough to store your complete library
- If you want easy online photo backup, you'll still likely have to pay for iCloud Photo Library
- You can't automatically sync videos via Photo Stream — you'll have to sync them manually via USB or AirDrop
- Manual control over your images means manual: When you run low on storage, you'll have to be the one to delete old images on your iPhone.
How to set up your iPhone for manual image storage
Still want to try this tip out? Here's how to do it.
1. Disable iCloud Photo Library on all your portable devices
- Launch Settings from your home screen on your iPhone or iPad.
- Tap your Apple ID.
- Tap iCloud.

- Tap Photos.
- Tap the iCloud Photo Library switch to turn it off.
- Tap Remove from iPhone or Download Photos & Videos on the prompt that appears on screen.

2. Enable My Photo Stream on your portable devices
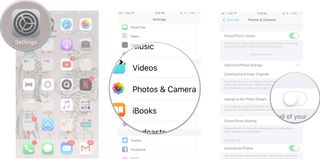
- Launch Settings from your Home screen.
- Tap Photos & Camera.
- Tap the Upload to My Photo Stream switch to turn it on.

3. On your Mac, open Photos and choose your backup solution
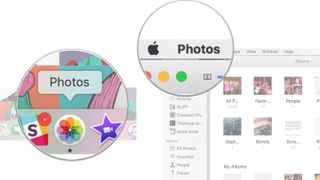
- Launch the Photos app.
- Select the Photos menu in the upper left corner.

- Click Preferences.
- Click iCloud.
- Click the iCloud Photo Library checkbox to enable it, if it isn't already.
- Click Download Originals to this Mac.

- Click My Photo Stream to turn it on.

From here, you'll have to decide how you want to further back up your images and video. iCloud Photo Library will make full-resolution copies, but requires buying an iCloud storage subscription (if you don't already have one). While we highly recommend enabling iCloud Photo Library to provide a complete cloud backup for your images, you can also just sync via Photo Stream if you prefer to use a different cloud backup service. You can also back up locally for free, of course, using Time Machine and an external hard drive.
How to use My Photo Stream on iPhone and iPad
How to manually control your iPhone's image storage
Once you've set up Photo Stream and iCloud Photo Library working in tandem, here's the workflow for taking new photos and managing old ones.
1. When you take a photo, it saves to your Camera Roll and Photo Stream
Every time you snap a photo, your image will save locally to your iPhone, as well as get uploaded to Photo Stream when you have Wi-Fi access. Pictures in Photo Stream show up on all your account's devices that have Photo Stream enabled; if you have iPads or other computers linked, you'll have full access.
2. Let the Photo Stream images sync to your computer.
When you're in Wi-Fi range, your images will sync to Photo Stream, where they will then automatically populate on your computer (assuming it's connected to a wired or wireless network).
3. Back up your images
Once your Photo Stream images have synced to your Mac, your backup system should kick in. If you've enabled iCloud Photo Library and purchased enough storage, every photo and video in your Mac's library will automatically back up to the cloud. (If you've chosen to sync with a different cloud service, you'll likely have additional steps here.)
Note: If you delete images or video from your Mac, they'll be deleted from iCloud, but your iPhone (and its images) will now be unaffected.
You can also eschew cloud backup altogether and use Time Machine, though we highly recommend having some sort of offsite backup in addition to your local storage.
Best photo backup services for iPhone, iPad, and Mac
4. Sync your video
If you've taken any videos on your iPhone, I recommend syncing them now, if you have access to your Mac — this will ensure that you make a copy of them ASAP and get them off your phone. It's also worth checking to make sure all your images have properly synced over to your Mac at this point.
5. Delete your old images on your iPhone
Once you've confirmed that your images have successfully ended up on your Mac, you can delete them from your iPhone. Any image you delete from your Camera Roll will automatically delete from your Photo Stream storage, so I recommend being absolutely sure that your images have synced with your Mac before getting rid of them.
What do you think?
Is this trick worth using, or do you find it too hacky? Let us know what you think in the comments below!
Updated June 2018: This article has been updated with the most recent Photos info.

○ Backing up: The ultimate guide
○ Best backup services and programs for your Mac
○ Best cloud service apps for your iPhone and iPad
○ How to back up your Mac
○ How to back up your iPhone and iPad
○ How to back up your Apple TV
○ How to back up your Apple Watch
○ How to restore your Mac from a backup
○ How to restore your iPhone or iPad from a backup
○ How to restore your Apple Watch from a backup
○ How to recover your files when you don't have a backup
Cella writes for iMore on social and photography. She's a true crime enthusiast, bestselling horror author, lipstick collector, buzzkill, and Sicilian. Follow her on Twitter and Instagram: @hellorousseau
Most Popular


