
The greatest pain in owning a high-powered gaming PC is the simple fact that you can't play it all the time. Sometimes you have work or school, and other times, you may just want to go mobile. When something like this impedes your ability to play PC games, you may end up settling for mobile games. What if, instead of doing that, you were able to play your PC games from your iPhone?
Let me introduce KinoConsole, a free app that lets you stream games from your Windows PC to your iPhone in HD. It's a little tricky to set up, but once you get the hang of it, streaming your favorite games will be a breeze. The only limitation is that your devices need to be on the same network. After you set everything up, you'll enjoy buttery smooth gameplay being broadcasted to your iPhone from your PC all the way in the next room. If that doesn't scream "the future is now," nothing does.
Step 1: Install Kinoni Streamer
First, let me clear up some confusion with the naming scheme for this suite of apps. On Windows it's called Kinoni Streamer, and on mobile it's called KinoConsole. Kinoni themselves don't always stick with this naming convention either, so don't get to hung up on it.
To start, download Kinoni Streamer on your PC, then launch the EXE file and follow the prompts to get the Windows portion of the software suite installed.
Step 2: Set a Password
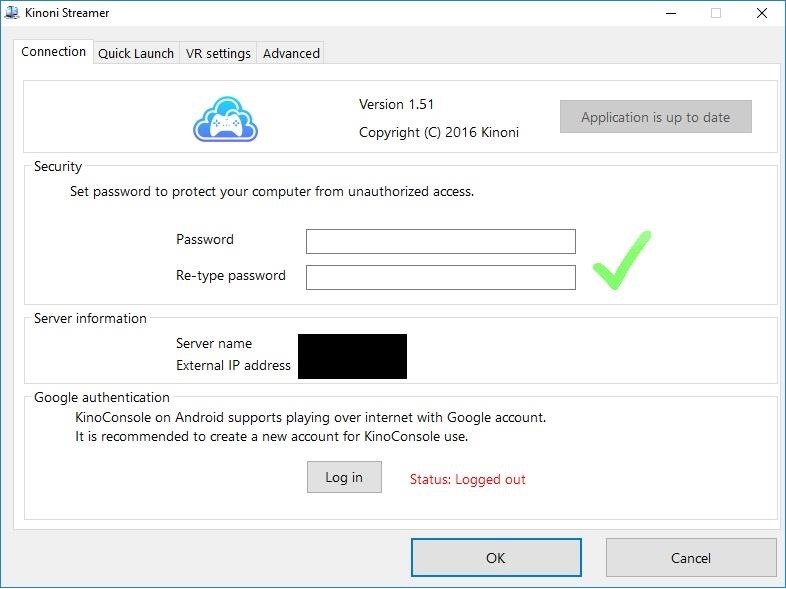
Once you install Kinoni Streamer, the first thing you should do is set a password. This will allow you to give your phone access to your PC when you use it to play games. This added level of security is much appreciated, as it stops just anybody from being able to gain access to your games.
To do so, open the Kinoni Streamer app on your PC and make sure the Connection tab is selected. From there, enter a password in the Password field, then confirm your password by entering it again in the Re-type Password field. Finally, click "OK" to save your password.
Step 3: Add Your Favorite Games
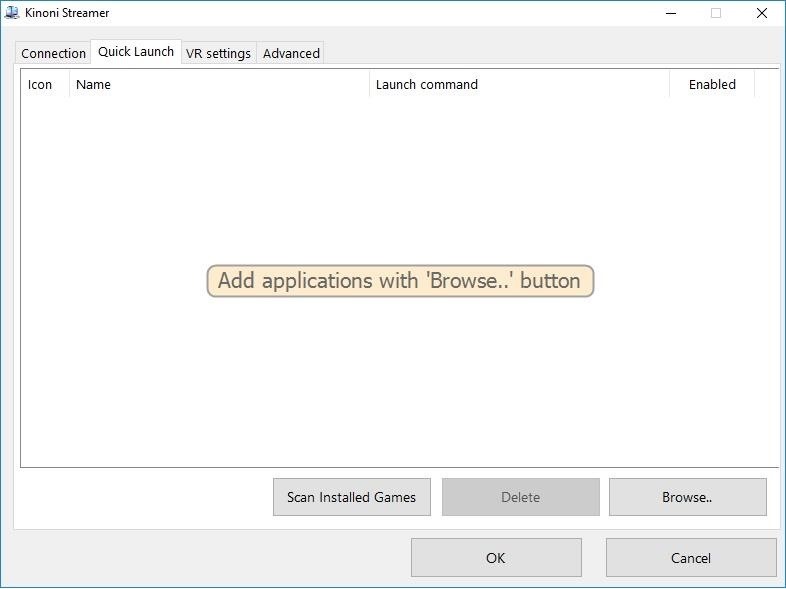
This step is probably the most complicated one, so pay attention. Head over to the Quick Launch tab in Kinoni Streamer's main menu to begin. Here, you'll need to choose which games can be streamed to your iPhone.
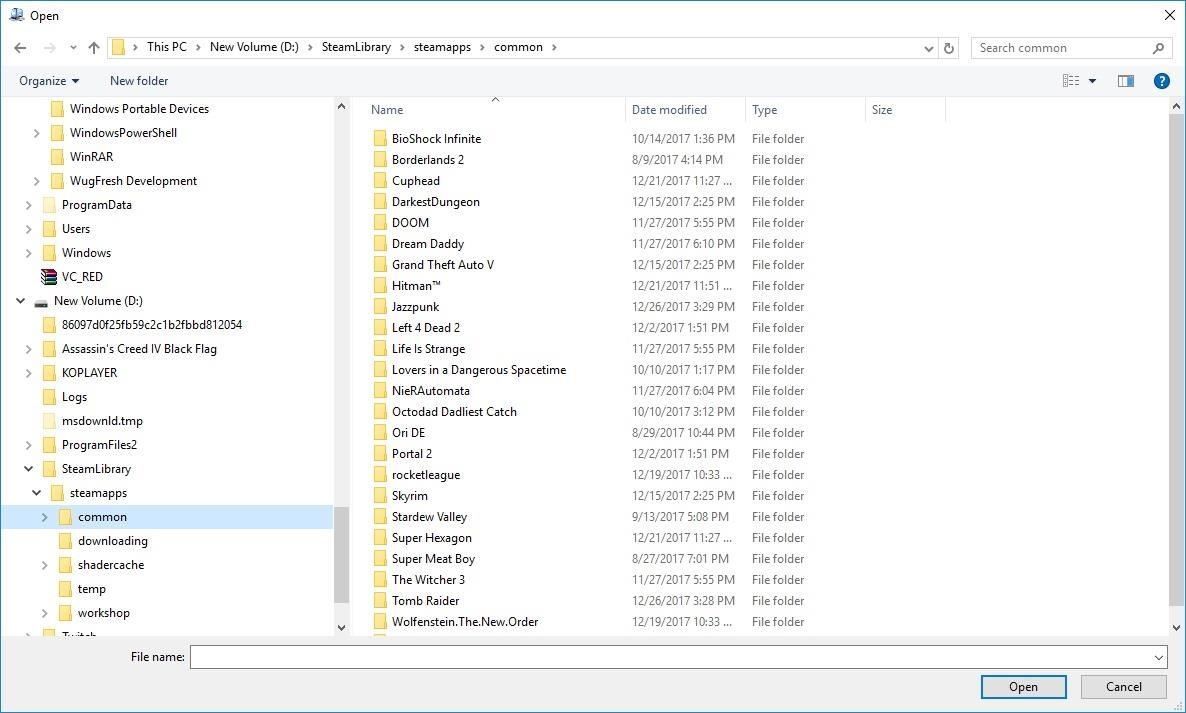
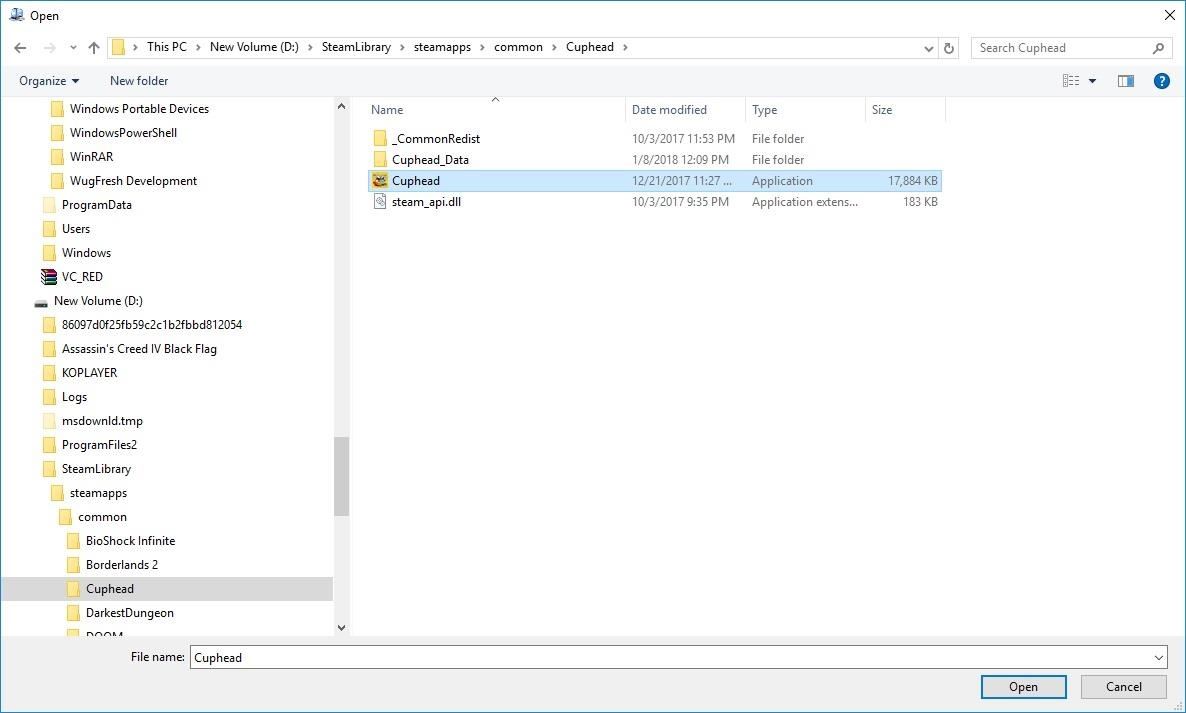
Click "Browse," bringing up Windows Explorer. You'll need to manually select each game, and sometimes they're located in drastically different places. I'll walk you through finding your Steam games, as that's the most popular place for people to play games. If you're looking for the application folder for a non-Steam game, your best bet would be to Google "<game name> file location Windows."
Go to the hard drive where your Steam Games are (probably your C:\ drive). Next, click on the "SteamLibrary" folder, then "steamapps," and finally "common." Inside the "common" folder, you'll see all the Steam games that are in your Library.
Double-click on a folder to open it, and find the application. You'll know it's the application itself as its "type" is displayed as "Application" in Windows Explorer, and it's the only file in the folder with the game's icon. If there are two files that show the game's icon, one is likely not an "Application."
Once you've clicked on the application file, click "Open" in the bottom-right corner. After that, repeat this same process for any other games you'd like to stream to your iPhone. Once you get a few games loaded in the Quick Launch tab, click "OK" in the bottom-right corner. This will close out the application window on your computer, but it'll keep running in the background.
Step 4: Install KinoConsole on Your iPhone
Next, you'll need to install the KinoConsole app on your iPhone. To do that, either search for "KinoConsole" on the App Store, or just use this link to jump directly to it. Tap on "Get" to download and install it (you may need to use Touch ID or Face ID to continue), then open it up.
Step 5: Enter Your Password
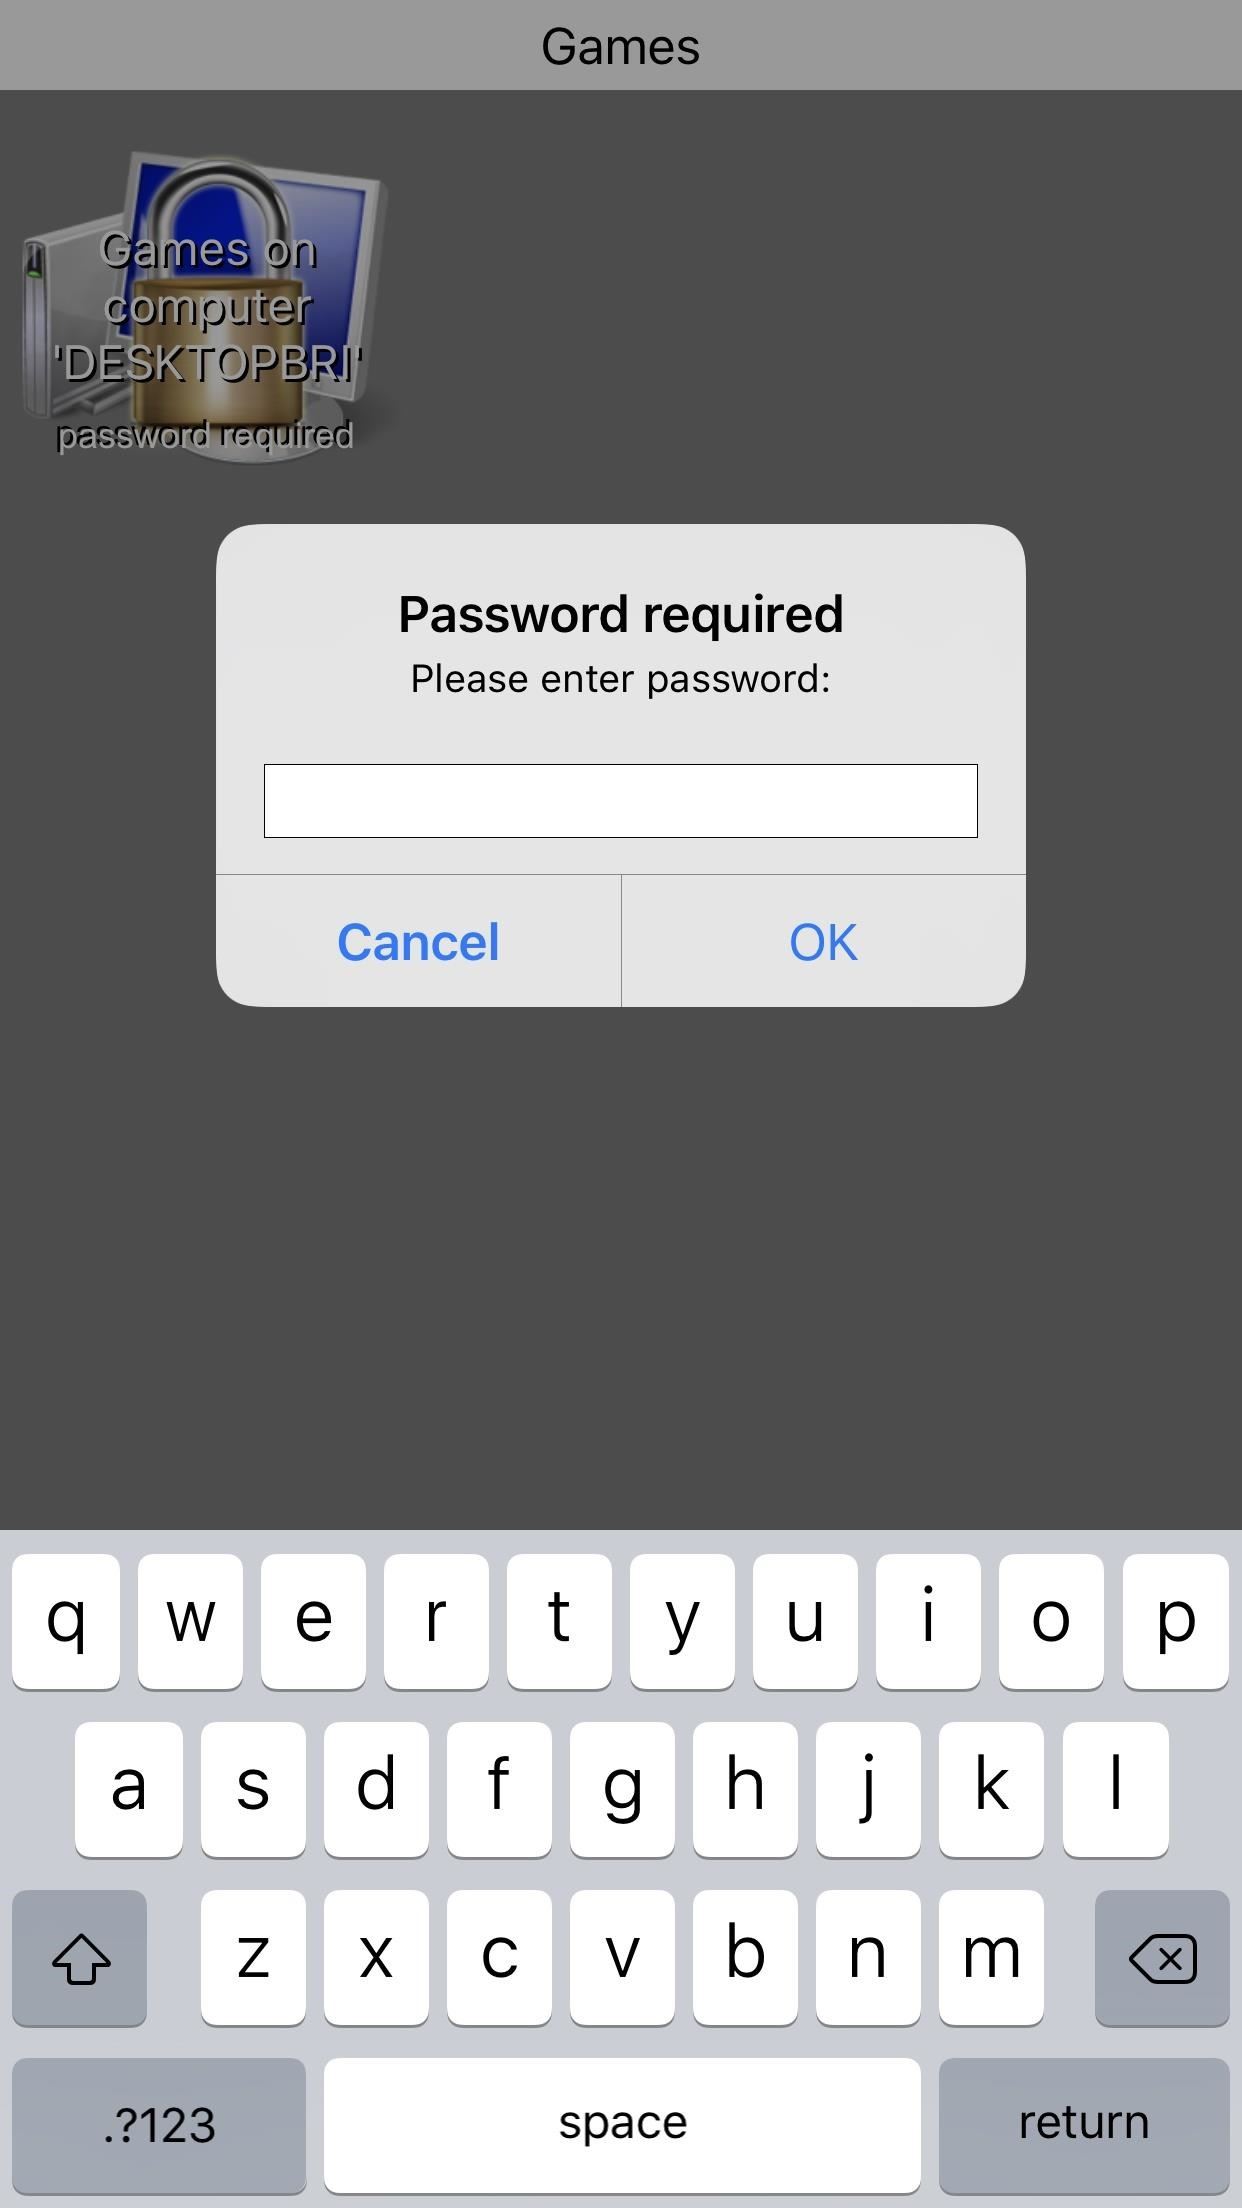
Next, make sure your iPhone is connected to the same local network as your PC. When you open up KinoConsole, your computer's name should show up, and it'll have a padlock on it. This indicates that you need to enter in the password that you set up on your PC in Step 2, so tap on the padlock and enter your password.

Step 6: Play a Game
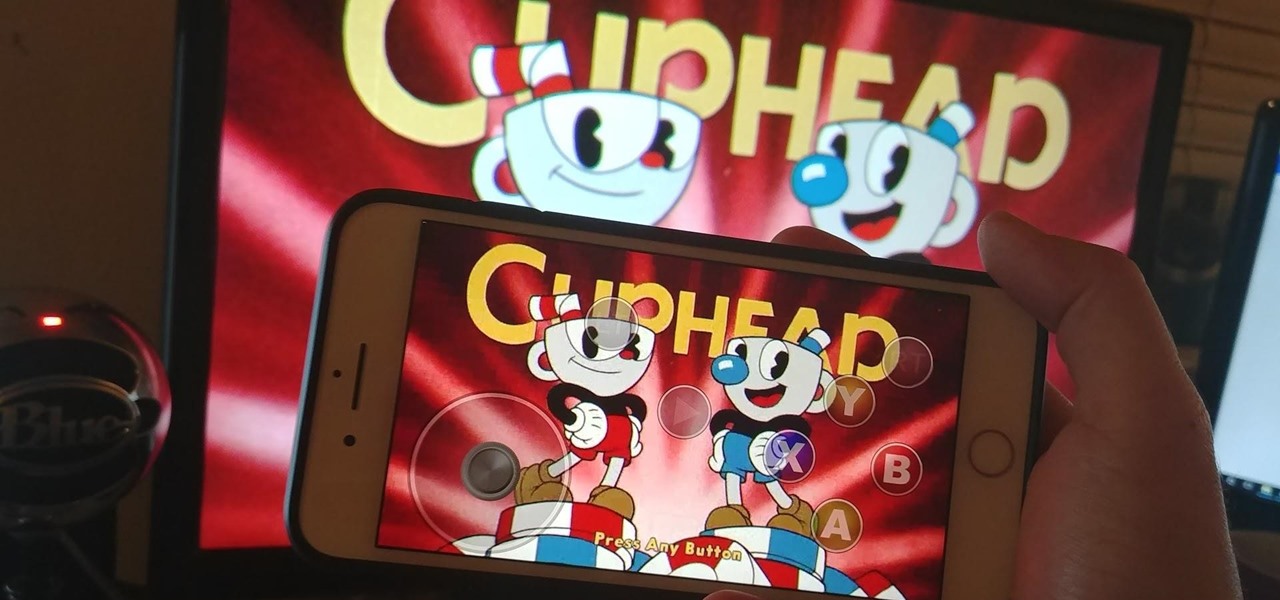
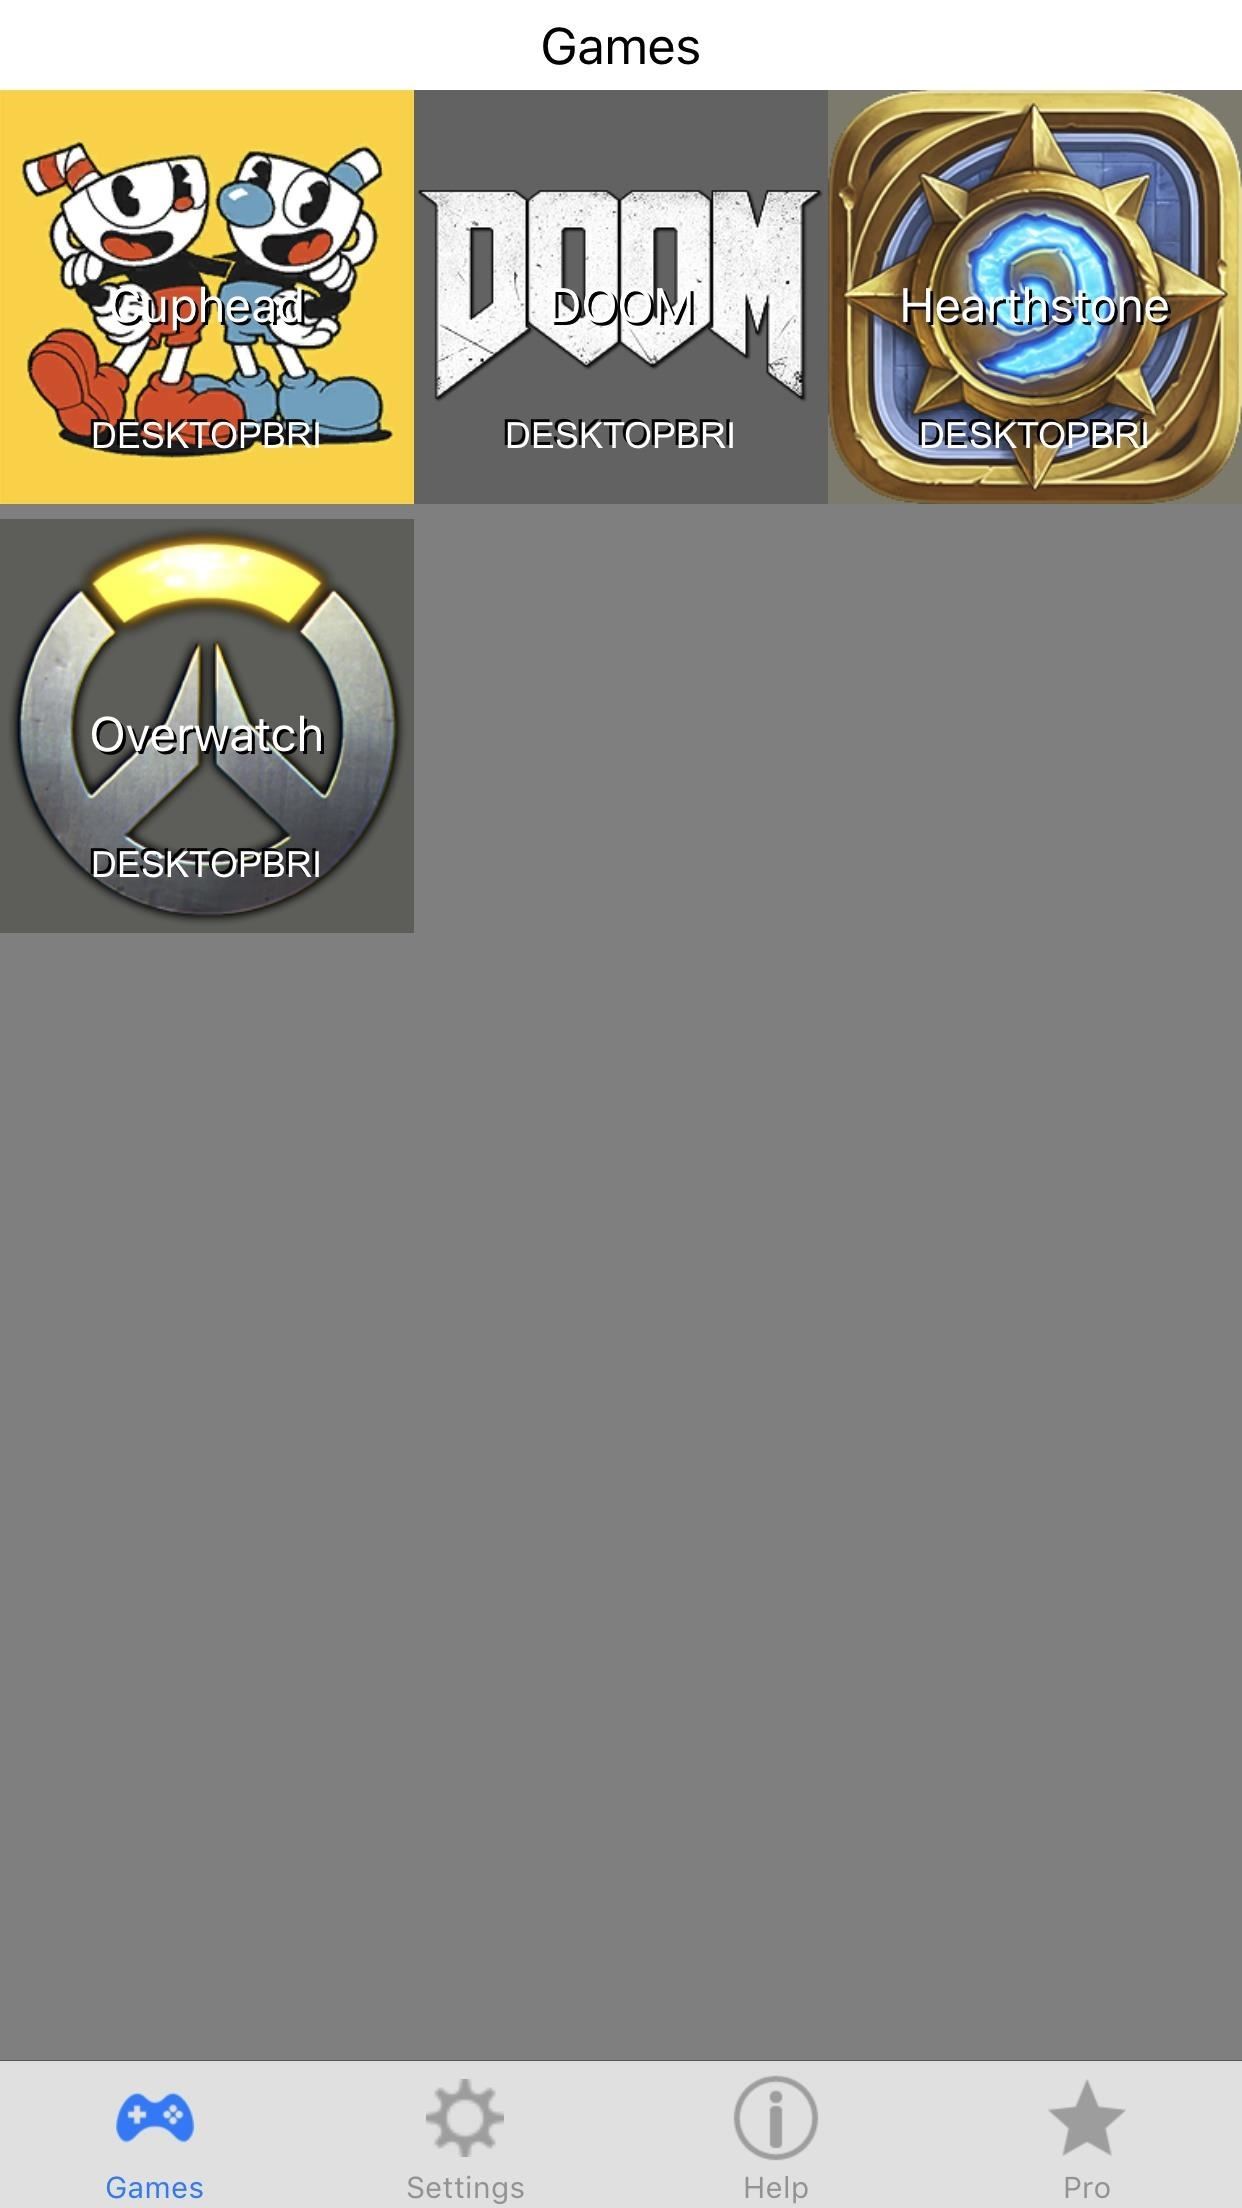
Your games should appear on the main screen now, and they should be the exact same ones you added via Kinoni Streamer in Step 3. If you tap on a game, it'll be launched on your computer, which then gets mirrored to your iPhone via KinoConsole. Before you run off, though, read the rest of the article to learn the in-game control system.

Step 7: Learn the in-Game Menu
Once you launch a game, slide out from the left side of the screen to open the in-game menu. Each of the four options here are integral to your gaming experience, so don't shy away from testing each one thoroughly.

Option 1: Mouse Mode
The first button in the slide-out in-game menu is "Mouse mode," which toggles between two options. The first option is enabled by default, and it lets you use your finger to drag items. The second option doesn't have any clear applications, but it seemed to do the trick when the first one was behaving incorrectly. The first option displays a circle around the mouse pointer, while the second one does not.

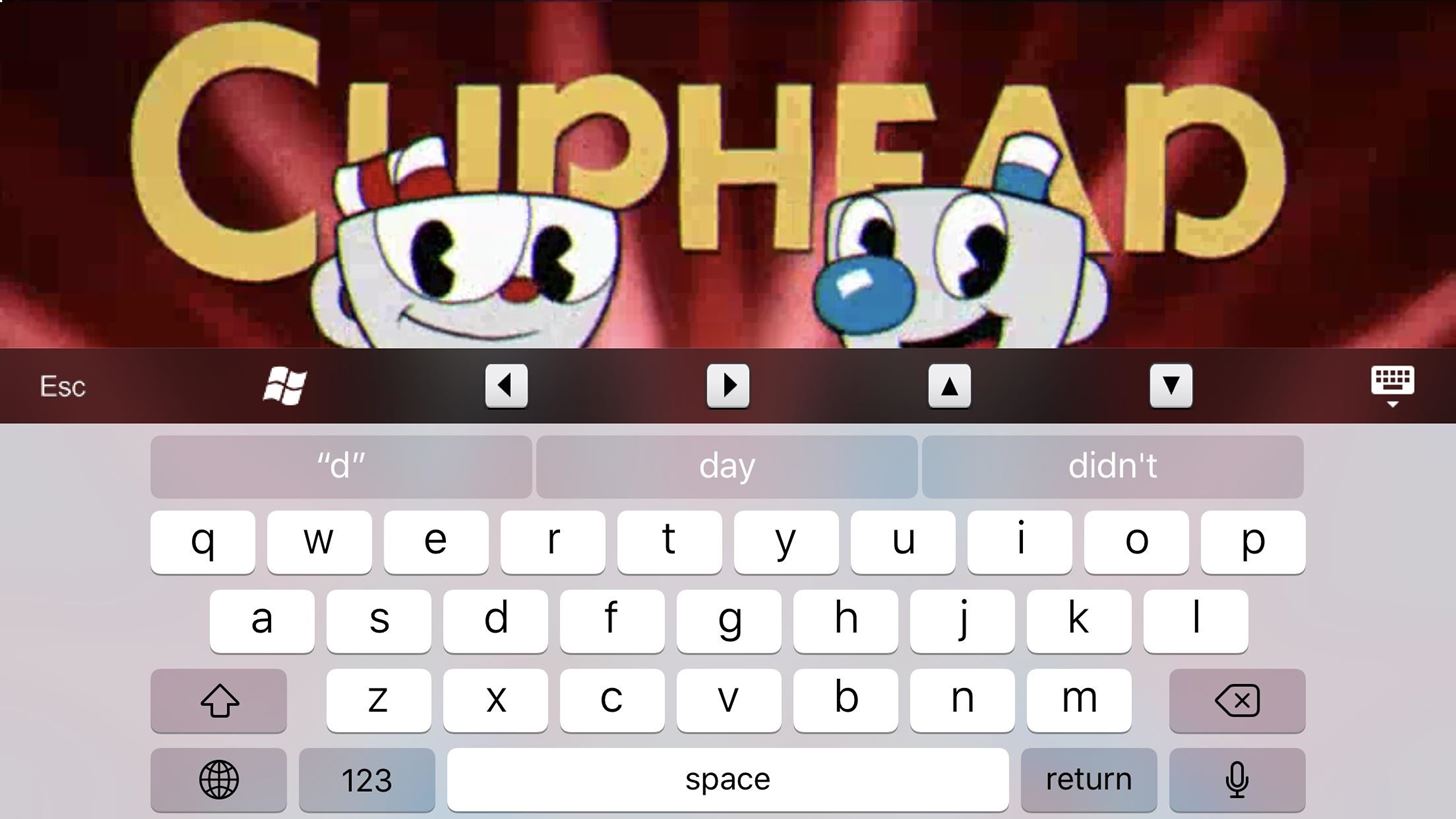
Option 2: Keyboard Mode
While using a virtual keyboard isn't the best way to play games, typing can be important in games for communication or for logging in. When you hit a snag, tap on the keyboard icon in the in-game menu to bring up your keyboard. Exit keyboard mode by tapping the icon again.
Option 3: Edit Game Controls
Unlike other solutions and games, KinoConsole has no on-screen controls by default. While this may seem like a hassle at first, it's actually liberating to only use the controls you need. Instead of superimposing an Xbox controller onto the screen, you get to mix and match which controls you need for any given game.
KinoConsole, in-turn, saves each configuration on a per-game basis — so don't worry about needing to reconfigure each game every time. You're also free to connect your own Bluetooth controller if you'd like. KincoConsole has full support for them.
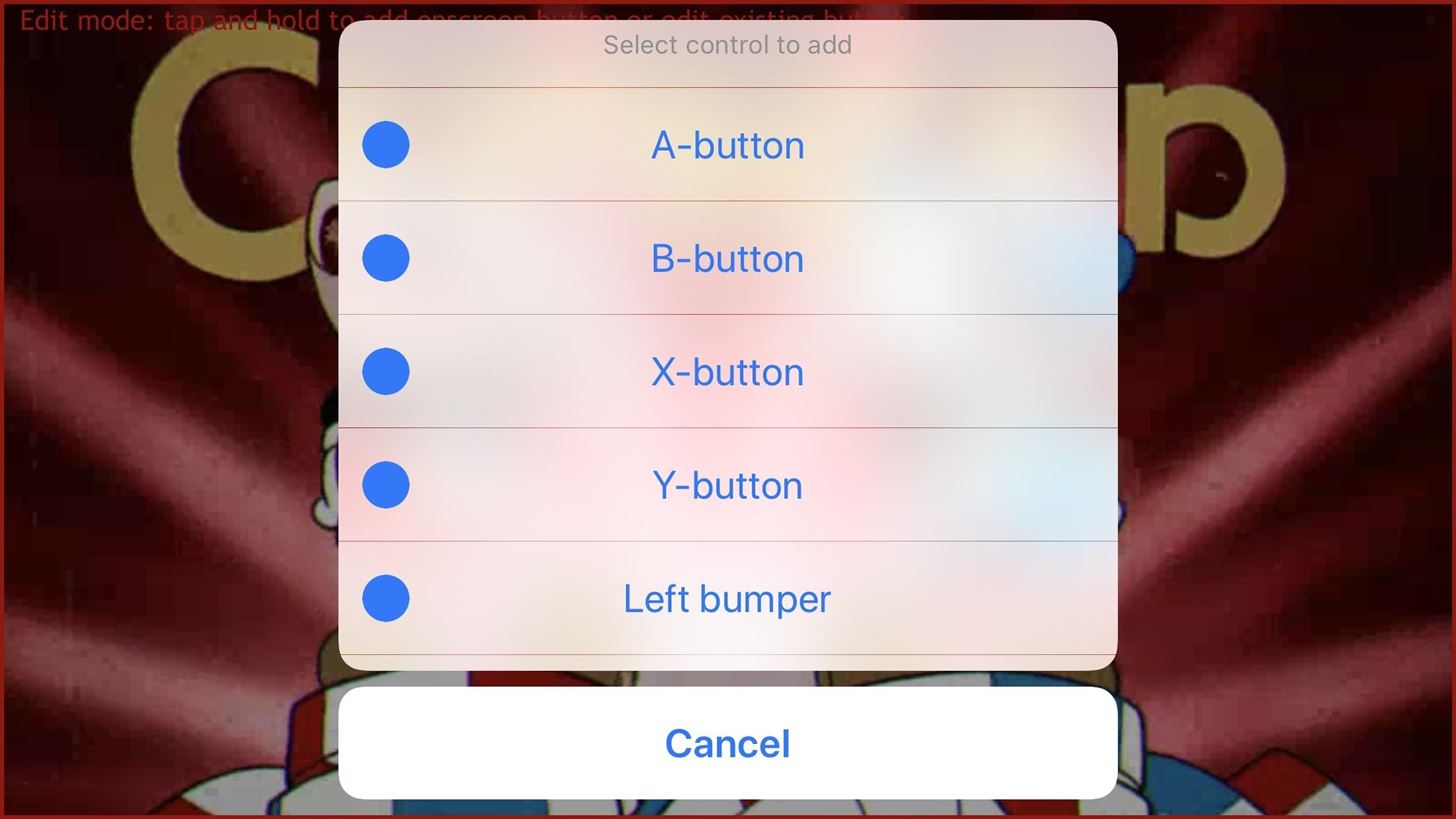
Tap the third option (the wrench icon) in the in-app menu to get into edit mode. You know that you're in edit mode because a red rectangle will frame the screen.

Add a new control by long-pressing where you want to add it. A menu will appear, where you get to choose exactly which control you want to add. The scheme and naming conventions mirror the Xbox 360 and Xbox One style, so the "A" button would be located in the bottom-middle on the right side. Of course, you can put it anywhere you want, but the game will act like it's located there.
You can move around a control by dragging it — while you're still in edit mode, of course. You can also modify or remove a control. First long-press it to bring up two icons: Arrows and an "X." If you tap on the "X," the control will be deleted. Tap on the arrows to resize the control or change opacity. Resize the control by pinching (like making a picture larger), and change the opacity by performing a rotating gesture (like you're turning a radio knob).

When you're done, swipe from the left again and tap on the wrench icon to stop editing the controls. Then, you can use the controls you created to navigate the game.

Option 4: Close the Game
The fourth option, which looks like a power button, fittingly closes the game, bringing you back to the "Games" page in KincoConsole.

And there you have it. Now you won't need to be near your gaming PC in order to take advantage of all that it has to offer. What have you been playing via KinoConsole? Have you enjoyed your seamless 720p streaming? Let us know in the comments below.
Just updated your iPhone? You'll find new emoji, enhanced security, podcast transcripts, Apple Cash virtual numbers, and other useful features. There are even new additions hidden within Safari. Find out what's new and changed on your iPhone with the iOS 17.4 update.


Be the First to Comment
Share Your Thoughts