
Ultimate Screenshot Guide for All of Your Apple Devices
 Credit: Apple
Image via Apple
Toggle Dark Mode
This guide will walk you through how to take screenshots (or screen grabs) on all of your Apple Devices, how to stitch multiple screenshots together, and more. By the time you’re done reading this, you’ll be a screenshot pro.
A screenshot is a digital capture of what is being displayed on a display at the time the capture is initiated. Using screenshots, users can share or display still images of apps, websites, and other data output from their device’s display. Since iPhone OS 2 and Mac OS X Panther, screenshots have been available to Apple users without the need for third-party services.
Screenshots on Mac
There are four or five different screenshot techniques depending on which Mac you’re using. They are:
- Entire Screen
- Selected Portion
- Window
- Menu
- Touch Bar
Screenshots taken on your Mac are saved to the Desktop as a .png file by default (Mac OS X 10.6 and later).
? Screenshot Your Entire Screen
To take a screen shot of your entire display:
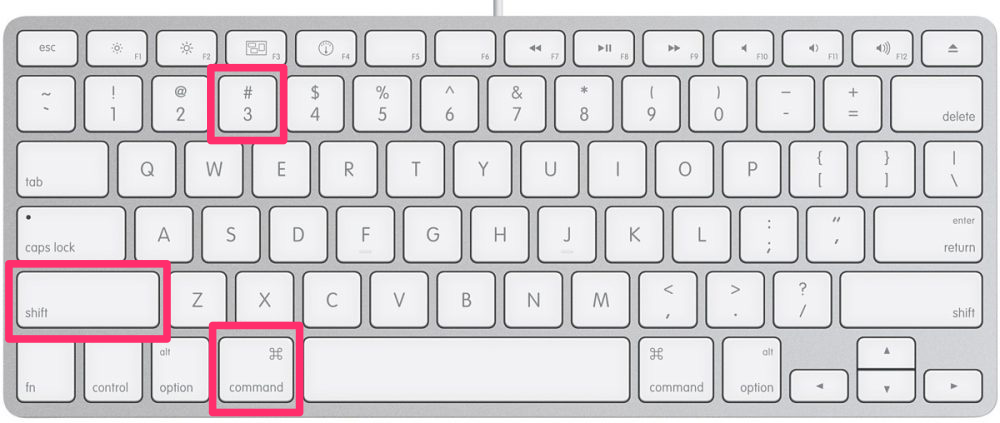
- Press Shift + Command (?) + 3 simultaneously.
? Screenshot a Selected Portion
To take a screenshot of a selected portion of your display:
- Press Shift + Command (?) + 4 simultaneously so that the cursor becomes a crosshair. If the cursor becomes a Camera, just press Space to switch to the cross hair.
- Click and drag to select the portion of the screen you want to use for your screenshot (to cancel selection, press the Esc key).
- To take the screenshot, release the mouse button or trackpad.
? Screenshot a Window
Sometimes you want a screenshot of a specific window. Luckily, macOS allows you to specify a window so you don’t have to manually crop your screenshot later.
To take a screenshot of a specific window:
- Press Shift + Command (?) + 4 simultaneously.
- Press the Space bar so that the crosshairs becomes a camera. If it’s already a camera don’t press Space.
- Move the camera over the window you want to screenshot. It should cause that window to become selected (to cancel, press the Esc key).
- To take the screenshot, click your mouse button or trackpad.
? Screenshot Menus
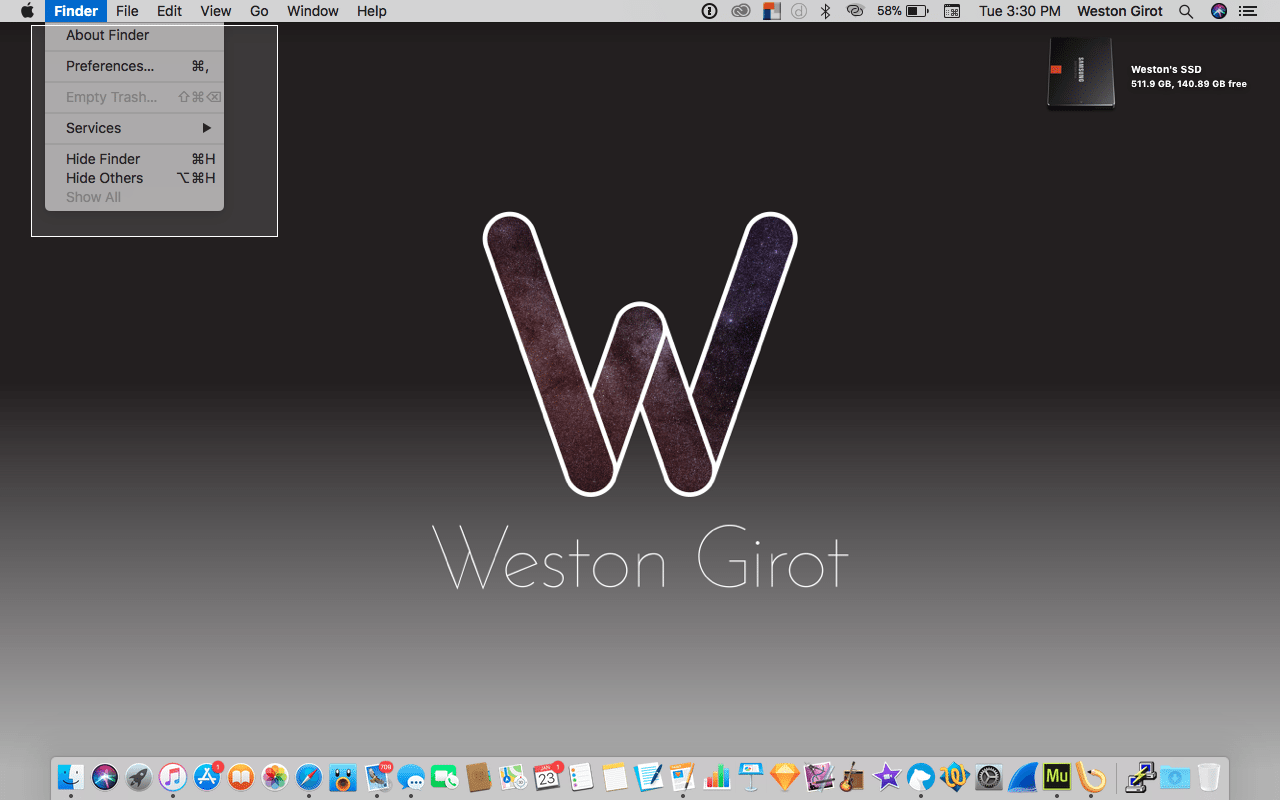
There may be times where you want to screenshot specific menus. You can do this by following these steps:
- Click-to-expand the menu—and any submenu(s)—you wish to screenshot.
- Press Shift + Command (?) + 4 simultaneously so that the cursor becomes a crosshair (to cancel selection, press the Esc key).
- (3A) To screenshot the title and contents of the menu: click and drag to select the menu. (3B) To screenshot only the contents of the menu: Press the Space bar so that the crosshairs becomes a camera. Then select the menu and click.
? Screenshot Touch Bar (If Equipped)

If your Mac has a Touch Bar—and is running macOS 10.12.2 or later—you can just do this to take a screenshot of it:
- Press Shift + Command (?) + 6 simultaneously.
Of course, if you do have a Mac with a Touch Bar, you could save yourself the hassle of remembering all of the above and just add a dedicated screenshot button to your Touch Bar’s Control Strip.
You can customize the Control Strip by going to: System Preferences > Keyboard > Keyboard (tab) and click “Customize Control Strip…” Here you can drag a screenshot button to the Touch Bar below.
? One More Thing
Okay, two more things really:
- Most apps, but not all apps will let you take a screenshot. This is used to prevent piracy and other things.
- If you would rather have the screenshot copied to your clipboard—rather than saved to the desktop—simply add Control to any of the above commands.
Screenshots on iPhone, iPad, and iPod touch
Since iPhone X ditched the Home button, there are now two different screenshot methods. One for iPhone X and one for all the other iOS devices. But first, note the following.
- After taking a screenshot on an iOS device using iOS 11, the screenshot will appear as a thumbnail in the bottom left corner.
- You can tap the thumbnail to add text, shapes, and more with Markup; or, you can hold the thumbnail to bring up the share sheet.
- Swiping left on a thumbnail will dismiss it, but it will still be available in the Screenshots album in Photos.
Keep reading to learn how to take a screenshot in iOS 11.
? Screenshot iPhone X
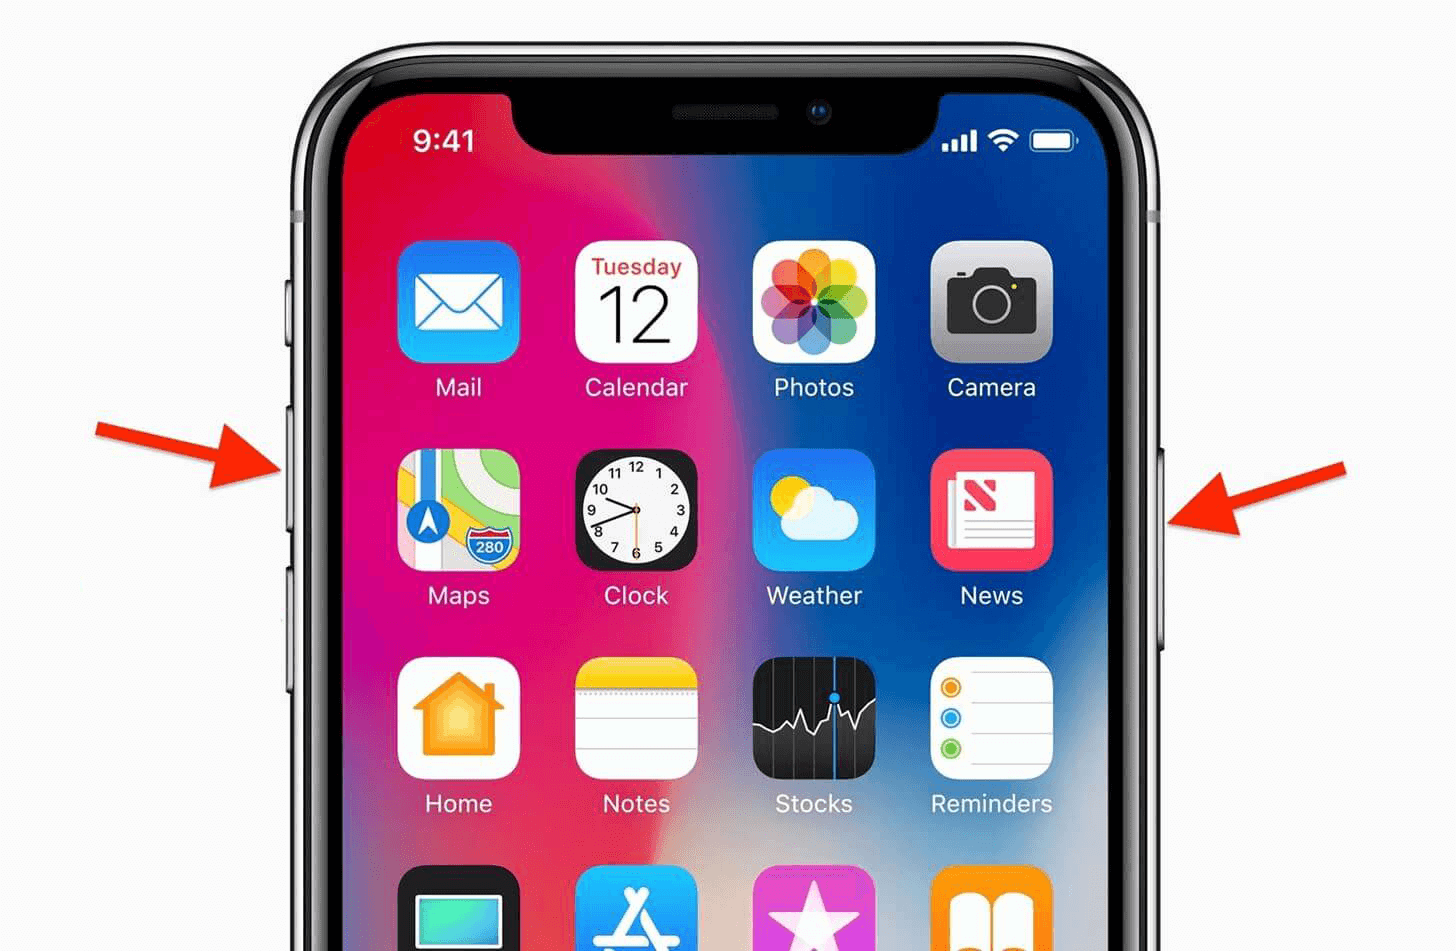
To take a screenshot on iPhone X:
- Quickly press and release the Side button + the Volume up button simultaneously.
? iPhone 8 (and earlier), iPad, and iPod touch
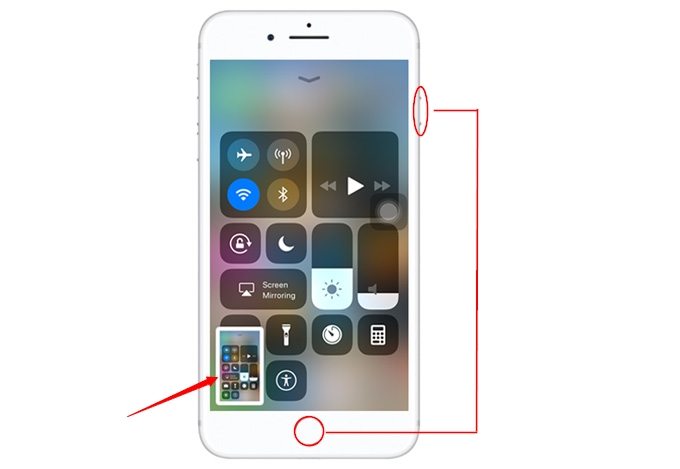
To take a screenshot on all other iOS devices:
- Quickly press and release the Top or Side button + the Home button simultaneously.
? One More Thing
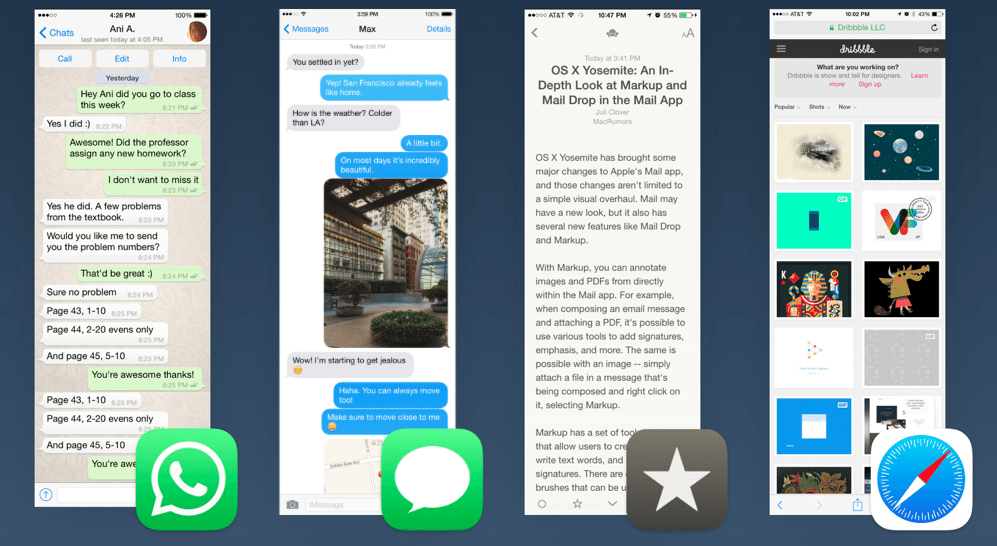
Apps like Tailor are available on the App Store and let you stick together multiple screenshots so that you have one continuous screenshot of things like Web pages and emails. If you’re looking to feature screenshots on a blog or website, you may want to consider a third-party app.
Screenshots on Apple Watch

You can enable screenshots on your Apple Watch in the Watch App on your iPhone. In the Watch App on the My Watch tab, select General and toggle on “Enable Screenshots.” Once enabled, screenshots from your Apple Watch are saved on your iPhone in the Screenshots album in Photos.
Here is how you take a screenshot on Apple Watch:
- Quickly press and release the Side button + the Digital Crown simultaneously.
How to Screen Record on macOS and iOS
Just like screenshots, screen Recordings are captures of content on your display. However, rather than still images you can record video of what is happening. Apple makes it easy for you to create screen recordings in macOS and iOS without the need for third-party software.
? Screen Recordings on Mac
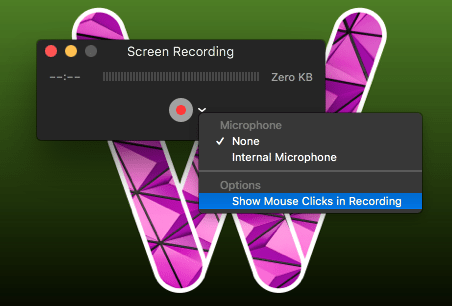
If you’re looking to record your Mac’s display, Apple’s Quick Time includes a screen recording feature. To get started, just open Quick Time and follow these simple steps:
- From the Quick Time menu bar select File > New Screen Recording.
- Press the red record button and then click to begin recording (when recording begins the menu bar icon will go from gray to black).
- Click the menu bar icon to stop recording or press Control + Command (?) + Esc key (Escape).
- The recorded clip will appear, you can choose to save it or discard it.
Options
Before you record you can click the arrow icon on the right side of the record button to select audio input (default is none) and choose to “show mouse clicks” which will visualize mouse clicks in your recording with a small circle animation.
? Screen Recordings on iPhone and iPad
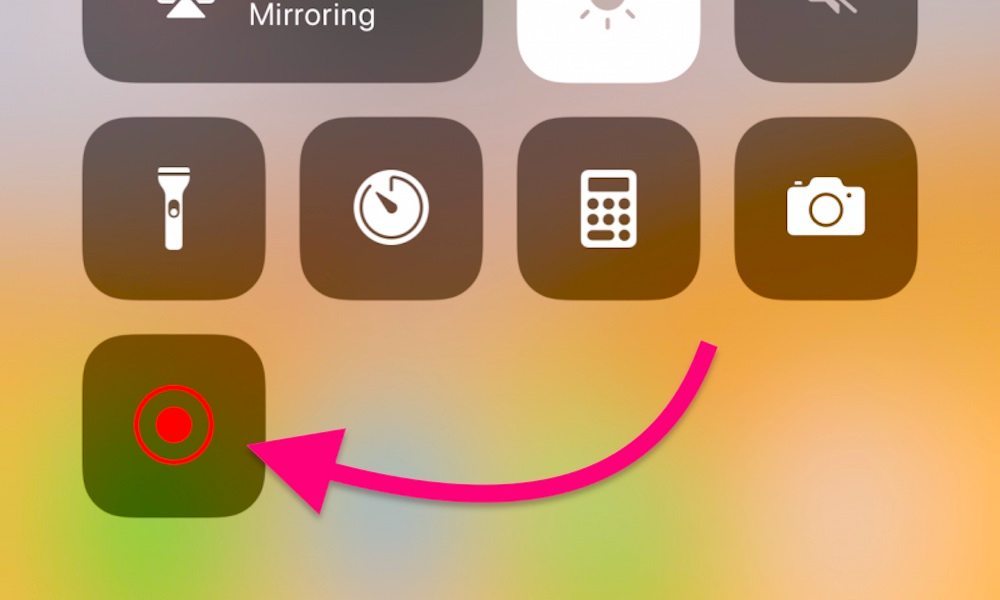
Recording your screen on your iOS device may be even easier than on your Mac. Recordings are created using a Control Center control, so you’ll need to enable it.
Go to Settings > Control Center> Customize Controls and add ![]() the Screen Recording control to get started. Now you’re all set to record:
the Screen Recording control to get started. Now you’re all set to record:
- Access the Control Center (on iPhone X swipe down from the top right of the display, on all other devices swipe up from the bottom of the display).
- Tap the Record Screen control button (
 ). The button will turn red and pulse (
 ) to indicate it’s recording.
 - Use your device. When you’re ready to stop recording you can tap the red status bar (or top right indicator on iPhone X) and select “Stop.” Alternatively, you can press the Control Center button () again.
- The recording will be saved to the Videos album in the Photos app on your device.
Limited Audio Support
Please note, audio isn’t always recorded in iOS screen recordings, it depends on what is being recorded. You can use apps like Clips or iMovie, or third-party apps to edit your screen recordings and add voiceovers and music.
Final Thoughts
Apple makes it really easy to take screenshots and recordings on your Mac and iOS devices. These can be great for online videos, blogs posts, digital receipts, explanations, and more. If you haven’t been taking advantage of these awesome, easy-to-use features, you may want to give them try. Memorizing the keyboard shortcuts for Mac screenshots is not only incredibly useful, but it will show you really know your way around macOS.


