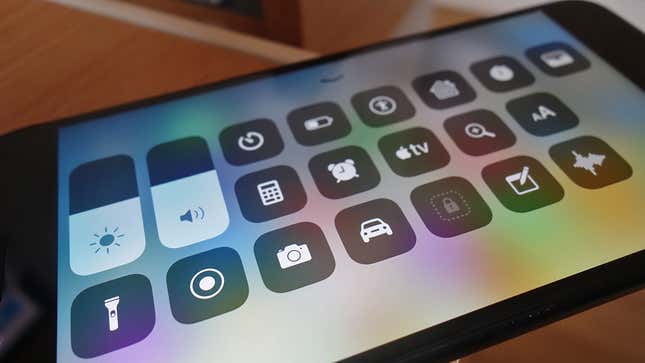
It’s your all-in-one iPhone settings screen, accessible with a swipe up from the bottom of the display (or a swipe down from the top-right corner on an iPhone X or a double-tap of the Home button on an iPad). But do you know what all the Control Center options and switches actually do? And how you can make the most of them?
To customize it on any device, open up the Settings app then choose Control Center from the list: Turn the Access Within Apps toggle switch to off to restrict Control Center to the Home screen, and tap Customize Controls to set which options appear on the panel.
Okay, now that that’s out of the way, let’s talk about what all these things do.
Airplane Mode
Activate airplane mode and all connectivity gets cut off—mobile data, wi-fi, Bluetooth, AirDrop and any personal hotspots you might have running. Use it when you’re on an actual airplane, or to troubleshoot connectivity problems, or to save battery life, or just because you don’t want to be disturbed for a few minutes.
Mobile Data
Enables or disables your device’s cellular data connection, a handy option to have if you’re traveling or have a restricted data plan (or both). There are no hidden settings or clever tricks for this one, though as with airplane mode it can be helpful if you’re trying to fix patchy cell connectivity—just turn it on and off again.
Wi-Fi
You can disconnect from or connect back to wi-fi with this switch, but it doesn’t turn off wi-fi completely. Instead, it drops the current wi-fi network and disables auto-join, so wi-fi is still enabled in iOS Settings. You can still use AirDrop, and wi-fi pinging is still being used to help determine your location.
What’s more, full wi-fi connectivity will automatically come back on if you reset your device or hit 5am local time the next day. If you want to completely turn off wi-fi, go through the Settings app instead.
Bluetooth
Like the wi-fi button, the Bluetooth button disconnects Bluetooth accessories (or connects them back up again)—it doesn’t switch off Bluetooth at the system level. You can still use your Apple Watch, Apple Pencil, Handoff, and any personal hotspots using Bluetooth.
Again, Bluetooth switches back on and works as normal again if you reset your device, or at 5am local time the next day. Apple would prefer you keep these technologies working in the background, but you can fully disable Bluetooth from iOS Settings.
AirDrop
To manage AirDrop on your iDevice, use a long press or a deep 3D Touch press on the network settings card (with wi-fi and Bluetooth), then tap the AirDrop button. The mini menu that pops up lets you turn AirDrop off completely, leave it open for your contacts only, or leave it open to everyone.
Personal Hotspot
As with AirDrop, the Personal Hotspot toggle switch doesn’t appear until you do a long press or a deep 3D Touch press on the network settings card in Control Center, the one to the top left corner. When you activate the hotspot, which uses the default settings, wi-fi is disabled and AirDrop is turned off; when you deactivate the hotspot, they come back.
Now Playing
To the top right of the Control Center is the Now Playing box—if you’re already mid-way through a playlist in the Music app or a third-party alternative like Spotify, you can see what’s playing, pause and resume playback, and skip between songs.
Apply a long or deep 3D Touch press to the Now Playing card to bring up a new window where you can adjust the volume of the music and send it to another AirPlay device. To open the app currently playing, tap the album art thumbnail.
Orientation Lock
One of the simplest settings in the Control Center—turn the Orientation Lock icon on, and your device stays in portrait mode unless it’s specifically overridden by an app like YouTube. Turn it off, and your device switches automatically between portrait and landscape modes in many apps, including Mail, Safari, and Calendar.
Do Not Disturb
Tap the Do Not Disturb button, the moon icon, to enable or disable Do Not Disturb—calls, alerts, and notifications still come through, but everything is silenced, letting you get on with whatever else you’re getting on with (like sleeping).
When you activate Do Not Disturb from Control Center, it uses the configuration already set in the Do Not Disturb screen in Settings. If no schedule is set, it won’t use one; if a schedule has been set, Do Not Disturb will stay active until the designated end time.
Screen Mirroring
The Screen Mirroring button puts your screen up on a compatible AirPlay device—specifically, the Apple TV. Tap the button, choose your Apple TV from the list that pops up, and the display on your iOS device gets mirrored over to a bigger screen.
Brightness
In the middle of the Control Center panel you’ll see a brightness slider: Just move your finger up and down to adjust the brightness of the screen. This overrides the auto-brightness setting (under General, Accessibility, and Display Accommodations), if you’ve got it switched on.
With a long or deep 3D Touch press you can bring up a bigger slider for more granular control. This operation also reveals a Night Shift toggle switch, so you can quickly enable or disable the Night Shift feature, which adjusts the warmth of the display the later in the evening it gets (so that it gets more orange). If your device supports the display tech, there’s also a True Tone toggle switch which adjusts the white balance, brightness, and contrast for a better reading experience.
Volume
The volume slider on the Control Center controls the volume of media playback on your device—it doesn’t adjust the volume of incoming notifications and alerts, which you can get to via Sounds & Haptics in Settings. With a long or deep 3D Touch press on the slider, you can bring up a bigger version of the volume control, but it works in the same way.
Flashlight
A tap on the Flashlight button turns it on; another tap turns it off. There’s more though: A long press or a deep 3D Touch press on the switch launches a slider that lets you choose between four different light intensities—handy for those times when you need a bit of light but don’t want to dazzle anyone.
Screen Recording
A new tool for the masses arrived in iOS 11 with on-board screen recording for iOS devices, and you can access it right from the Control Center. Tap the Screen Recording button and a countdown starts, after which you can get busy doing whatever it is you want to record. Tap the same button or the red bar at the top of the screen to stop recording.
Your footage gets saved to the Camera Roll by default. With a long or deep 3D Touch press on the Screen Recording button, you can choose to send it to an app instead—Facebook was one option when we tried it. A microphone audio toggle switch is also available on the same pop-up dialog.
Timer
Tap once on the Timer button and you jump straight to the Timer screen in the iOS Clock app, where you can set your countdown accordingly (remember you can also use this to fall asleep to music). There’s a long or deep 3D Touch press variation here as well: It lets you quickly set a timer for between 1 minute and 2 hours without having to open up another app.
Calculator
Need to do some sums, huh? The Calculator button is your Control Center shortcut to the Calculator app, but if you do a long press or a deep 3D Touch press on the button instead, you can copy the most recent result to the clipboard. Oddly enough, this still seems to require launching the Calculator app for some reason. Of course you don’t get this on the iPad—there’s still no Calculator app there.
Camera
We’re really into the more simple Control Center switches now. The Camera button launches the Camera app, straight into whatever the last mode was you were using (Photo, Video, Square, or whatever). Again, you can access more options with a long or deep 3D Touch press on the icon, in this case shortcuts to four camera modes: Selfie, Video, Slo-mo, and Portrait.
Low Power Mode
If you’re on an iPhone, you’ll see the Low Power Mode button, fashioned to look like a battery symbol. A tap on this enables Low Power Mode, just like the toggle switch under the Battery menu in Settings—various background processes are switched off, including the always-on “hey Siri” command (you’ll see a message to this effect when you switch it on for the first time).
Alarm
This one doesn’t take too much figuring out—tap the Alarm button to jump to the Alarm section of the Clock app in iOS. There’s no extra hidden menu here but hitting this switch will silence any alarms that are currently ringing, so that might come in handy.
Do Not Disturb While Driving
Another new feature that Apple introduced with iOS 11—the Do Not Disturb While Driving button looks like a car icon and is basically a manual switch for the option you can find in the Do Not Disturb menu in Settings. The mode is like Do Not Disturb with extras, like auto-reply for your texts, and you can have it kick in automatically if you prefer.
Accessibility Shortcuts
Get instant access to the shortcuts you’ve enabled from the Settings app under General, Accessibility, and Accessibility Shortcuts (like AssistiveTouch and VoiceOver). Any kind of touch on the button brings up the list, and you can enable (or disable) multiple accessibility features at once.
Apple TV Remote
Who needs the remote you get bundled with your Apple TV? Use your iDevice as a remote instead by tapping this button, which will let you select an Apple TV on the local network and then control it as normal, with playback controls, access to Siri, and menu navigation controls as well.
Guided Access
To use Guided Access—which limits a friend or child to a single app on your device until a PIN is entered—open the app you want to stay locked inside, then open Control Center and tap Guided Access. You can even limit certain areas of the screen that are off limits before the mode gets enabled. The feature is also available through the Accessibility Shortcuts menu we mentioned above.
Home
The Home button doesn’t take you back to the Home screen but does give you access to any Accessories and Scenes you’ve set up inside the Home app with HomeKit—you can, for example, get your smart lightswitch to do something or power down all your smart home equipment for the evening.
Magnifier
Simply a shortcut to the Magnifier accessibility feature, which turns your device’s camera into a magnifying tool for taking a closer look at text and other objects. Hitting this button is much more convenient than diving into Settings and choosing General, then Accessibility, then Magnifier, then triple-tapping the Home or Slide button (which is what you have to do otherwise).
Notes
Need to note something down? The Notes shortcut launches you straight into the Notes app on iOS, specifically the screen to compose a new note, so you can start tapping down your ideas straight away. With a long or deep 3D Touch press on the button, you can choose between creating a new note, a new checklist, a new photo, or a new sketch.
Stopwatch
Another shortcut to send you straight into the Clock app in iOS, in this case the Stopwatch screen. There are no extra menu options here, and no buttons for starting and starting the stopwatch, unfortunately—it’s just a simple shortcut into the app.
Text Size
You may not have known you can change the text size on your iPhone, iPad, or iPod touch, but you do now. This button gives you a simple slider to adjust the text size in iOS, and you’ll see a message on screen when you’re at the default level (exactly half way). You can get at the same option by opening up Settings and tapping General, then Accessibility, then Larger Text (you can actually increase the number of available sizes from here too).
Voice Memos
A very simple shortcut to the Voice Memos app in iOS—tapping this button takes you straight to whatever screen inside the app you were last using. You can opt to record new memos with the record button, or listen to ones you’ve already got saved.
Wallet
If you’re an iPhone and Apple Wallet user then this shortcut takes you straight into the app, including access to Apple Pay: Anything you can do in the app, you can do via this button. With a long or deep 3D Touch press on the button, meanwhile, you can get quick shortcuts to your cards (or add a new one).