

How to Easily Share Lightroom Photos to a Group


Did you photograph a group event, family gathering, or client shoot and want to make those images available for just the participants? The sharing features in most photo applications let you either send pictures to a friend or two, or post them to social services such Facebook, Twitter, or Flickr. If you use Adobe’s Lightroom CC or Lightroom Classic CC, there’s an easy way to share your photos with a closed set of people, and even make the photos downloadable just for them.
The piece that makes this sharing possible is the connection between the two Lightrooms and Adobe’s Creative Cloud. (This approach does require a CC subscription plan, such as the Photographer’s Plan that includes Lightroom CC, Lightroom Classic CC, and Photoshop.) By syncing photos through Creative Cloud, they’re made available via the Lightroom for web service.
The technique works similarly in both Lightroom editions, with one caveat in Lightroom Classic, which I’ll explain in a moment.
Step 1: Create an Album
When you import photos into Lightroom CC, they’re automatically uploaded to Creative Cloud—that’s what makes the images available on all of your mobile devices. If you weren’t already aware, you can go to lightroom.adobe.com, sign in using your Adobe ID, and access your library (and make edits) on the web.
That access is just for you, of course. To share photos to others, you need to put the images into an album. The easiest way to do that in Lightroom CC is as follows:
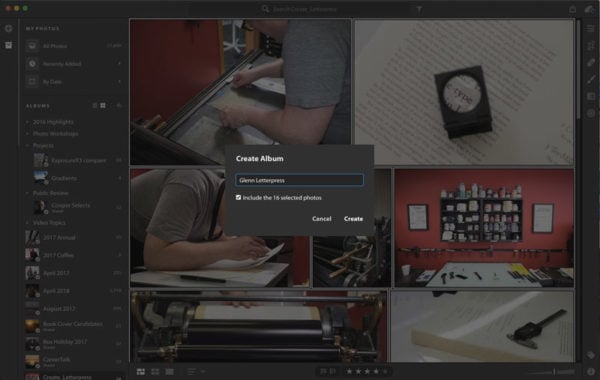
- Select the images you want to include.
- Open the My Photos panel.
- Click the + button and choose Create Album.
- Give your album a name and make sure the Include the Selected Photos box is checked.
- Click Create.
In Lightroom Classic, the steps are similar, but Classic refers to albums as collections:
- In the Library module, select the photos you want.
- Click the + button in the Collections panel and choose Create Collection.
- Name the album and, under Options, mark the Include Selected Photos box.
- Also, be sure to mark the Sync with Lightroom CC box.
- Click Create.

Here’s where the Lightroom Classic caveat comes into play. Lightroom CC not only uploads all your photos, it sends the original files. Lightroom Classic, however, uploads only Smart Preview versions of the images in a folder when you sync it with Creative Cloud. When the feature was first implemented, the idea was that the smaller Smart Preview files—which are reduced to 2048 pixels on the long side—contain enough data to sync with mobile versions of Lightroom for review and editing. (That’s still true. Although the Lightroom CC apps on iOS and Android can work with originals, you get the same functionality with the DNG-formatted Smart Previews; edits are synced as small text snippets describing what changed, instead of shuttling altered image files.)
For someone who wants to simply review photos on the web, this situation is fine. However, the limited resolution means that if you enable the option to let people download the photos (explained ahead), the files they receive have much smaller dimensions than the originals, because the downloads are based on the Smart Previews.
Step 2: Share the Album or Collection
The next step is to share the album or collection so anyone with a unique web address can view its contents.
In Lightroom CC, do the following:
- Right-click (or Control-click) the album and choose Share Album. After a few moments, you’re given the URL that you can send to the other people who you want to give access to the photos.
- Copy the link in the dialog that appears, or click Close.
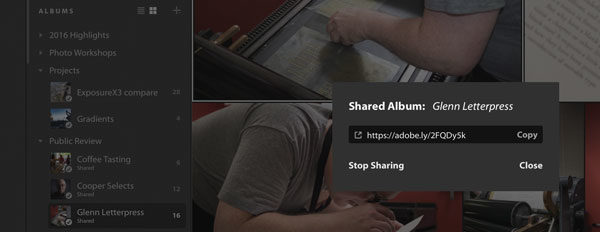
At any point, right-click (or Control-click) the album in the My Photos panel to reveal options to open the folder in a web browser, copy the link, stop sharing, or rename or delete the album.
In Lightroom Classic, do this:
- Right-click (or Control-click) the collection and choose Lightroom CC Links > Make Collection Public.
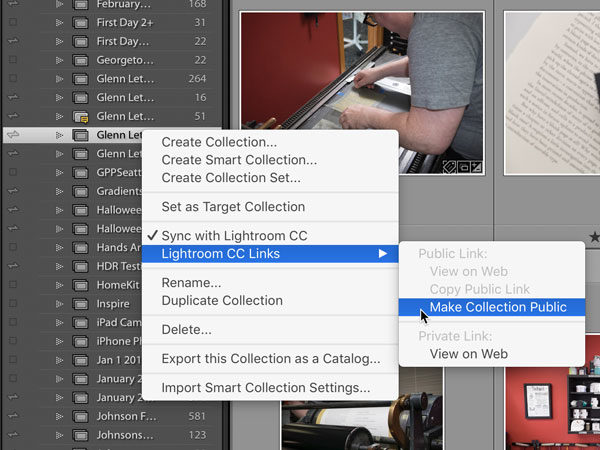
- Next, do the same thing to reveal the contextual menus and choose View on Web or Copy Public Link, which have become active options.
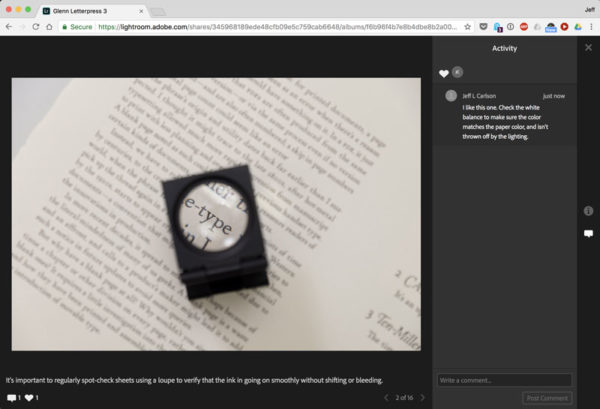
Send the link to the people in your group so they can review the photos. Only that album or collection loads in their web browser. In addition to reviewing the material, visitors with Apple IDs can sign in and comment on and mark favorite photos.
Step 3: Enable Downloads
If you want to allow your viewers to download JPEG versions of the photos, you need to take an extra step that’s outside the Lightroom applications.
- Go to adobe.com, sign in with your account, and click the Shared button (the globe) on the left to view your shared albums.
- Click the Settings button (the gear icon) next to the album name to reveal the Album Settings dialog, and click the Share heading.
- Enable the Allow Downloads option.
- Click Done.
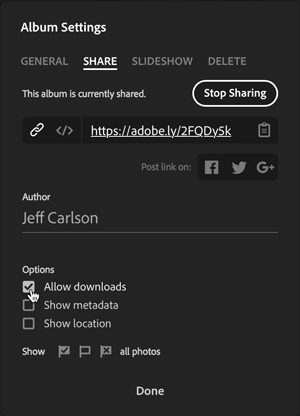
When someone views a photo, a download button appears at the top-right of the page. Clicking it gives them a JPEG version of the photo.

If you ever want to stop sharing an album or collection, use the contextual menus in Lightroom CC or Lightroom Classic, or the Album Settings dialog in Lightroom on the web, to choose the Stop Sharing (or Make Collection Private, in Lightroom Classic) command.
Until recently, making photos available to other people was highly dependent on which devices, software, and services you and they both used. Now, if you use Lightroom CC or Lightroom Classic, sharing albums of images is easy and straightforward.
Hi, great article. Thanks. When I share an album or a link from LR Cc from my iPad the one who I send to is requested to enter a password. How can that be avoided?
/per
In the Share & Invite screen that has the settings for the shared album, is Link Access set to Invite Only? Change it to Anyone Can View. That removes the need to sign in, although the people viewing still need to sign in if they want to comment on photos.