How to add your own Quick Actions to the new macOS Mojave Finder
 William Gallagher
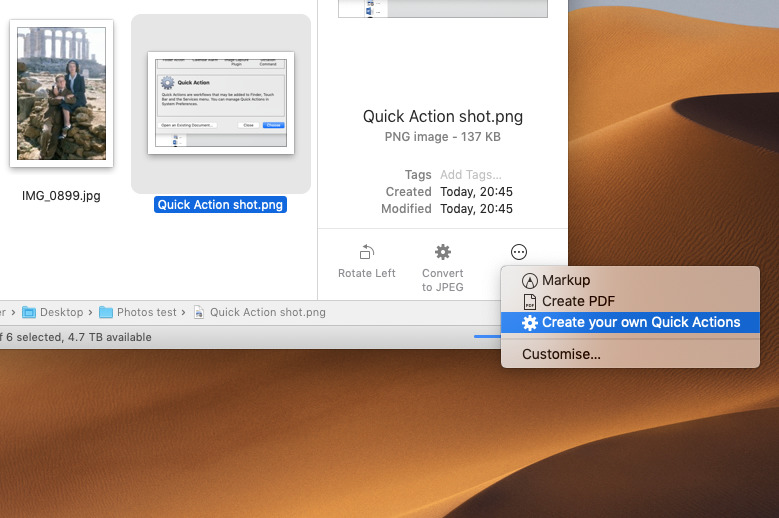
Apple's new macOS update means you can markup images, rotate photos, trim videos and more without ever opening an application. It's only going to get better, too, because you can very easily create your own Quick Actions. AppleInsider shows you how.
It's not as if it's really a pain to go open Photoshop when you want to rotate an image or, say, QuickTime Player when you want to trim the start and end of a video. And yet now that seems such a chore — because Apple's simply removed the need.

Now when you find the image or the document you want on the desktop or in a folder, you just work on it right there. Select it, then tell the Finder you want to rotate it left or right. Get the Finder to open it up into a Quick Look-like window — but one where you can annotate and draw and mark it up.
These options are called Quick Actions and while Apple has been showing them as part of the new Gallery view in the Finder, in truth they're available to you all the time. Whether you like to see icons or you prefer lists, Quick Actions are a click away.
And you can add to them. It's close to absurdly easy to add your own Quick Action, to give yourself an option to edit or manipulate any document on your Mac.
There is a reason it isn't completely easy, though: you do it using Services and this is a Mac feature that rarely gets discussed.
Method and means
Normally we would say that you need to think of a job you want to do, a task you want to achieve, before you look into how it's done. That's because invariably you learn faster by having a specific goal.
And this time we started with the fact that we often have to convert images from PNG format to JPEG. It would be great to have that as a simple Quick Action — and now that's exactly what we've got.
However, the way that Quick Actions works is that it ties the Finder in to macOS's Services. A Service, if you've not had occasion to look before, is a function that an app can offer to any other software on the Mac.
For instance, TextSoap is a standalone application but it offers a Service. If you're in Word, Pages or really anywhere that you can write text, you can select that text and then choose to use one of TextSoap's functions on it.
You do this by choosing the Services option which is always in the application's eponymous menu: it's in the Word menu in Word, the Pages one in Pages and so on. Choose, say, Ulysses, then Services and you get a list of all relevant services on your Mac.
The problem is that few apps make as big a deal of this as they should. You will never see any app be advertised as having a lot of Services to offer.
Which means until you start making a Quick Action, there's no way to know what Services the apps on your Mac are offering. Even if you choose an application's menu and then Services, you'll only see ones that are relevant. So you'll only see text ones if you've got some text highlighted and you'll only get graphics tools if you've selected an image.
So this once, start making a Quick Action and that's when you'll see what the possibilities are. If you find there's nothing of any use to you, wait a while and come back: Quick Actions is surely what will finally prompt more developers to offer more Services.
Get started
You create and manage Quick Actions in Automator, the free automation app included with every Mac. It's in the Applications folder and if you've ever opened it before, you're going to see a difference now.
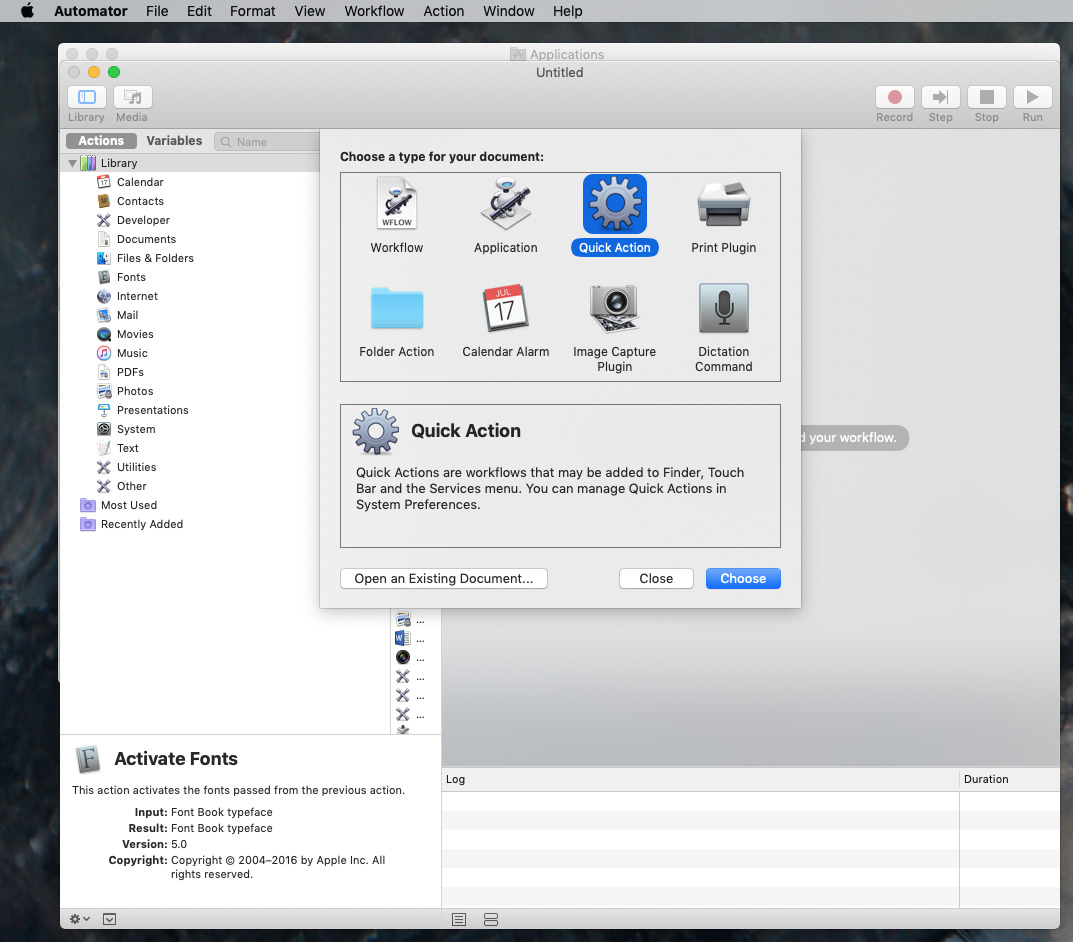
It now includes a very prominent Quick Actions button as soon as you open it. Click on that and Automator changes to offer you a mostly blank working area and a list of options to the left that's headed with the word Library.
The blank area has a header with options and the text "Drag actions or files here to build your workflow".
Under the Library heading, there are sections for Calendar, Contacts, Documents, Files & Folders and many more. Click on any of them and you'll get a list of Services. Clicking on Calendar, for instance, will show you Services such as New Calendar Event, New Calendar Event and so on.
You will definitely have these because they're to do with Apple's own Calendar app. Click on Documents, though, and now you may see nothing at all.

In this example, we have Word and Excel installed on a Mac so we're seeing many, many Services from them. We've got the ability to Add Content to Word Documents, for instance, or Create New Excel Workbook.
Look through all of the categories like Documents, Files & Folders and so on. And then look at all of the Services that appear. With our desire to convert images, we looked in Photos and saw over 60 Services — including Convert into JPEG.
You'll notice that there's always a small app icon next to the Services title but if you click to select it, you'll see a bigger, clearer one at the bottom left of the Automator screen.
This not only shows you the icon of the App that's offering this Service but also explains more about what it can do. That will include a text description that may or may not be that useful:
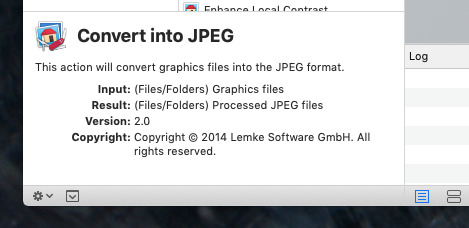
After the description, though, there is more useful information about what the Service is capable of doing. This is very much like you may know from Siri Shortcuts in iOS: it says what the Service can receive and what it will give you back afterwards.
In this case it's saying that it takes graphics files and gives you them back nicely converted into JPEG.
We have this option because we've got GraphicConverter 10 installed. That's a $39.99 application that does a huge amount with photos and images — and offers Services.
This is the only part where Quick Actions is a little frustrating. If you don't happen to have that GraphicConverter 10 app then you can't do what we have with making a Convert to JPEG Quick Action. Except you might have another app that offers the same Service.
There is simply no way to know until you look.
If you do have it or if you find any other Service that is going to be useful to you, drag it over to the blank area.
Automator may very well give you a notification about the Service you're using. That may appear as a pop up before it accepts the Service into the blank area.
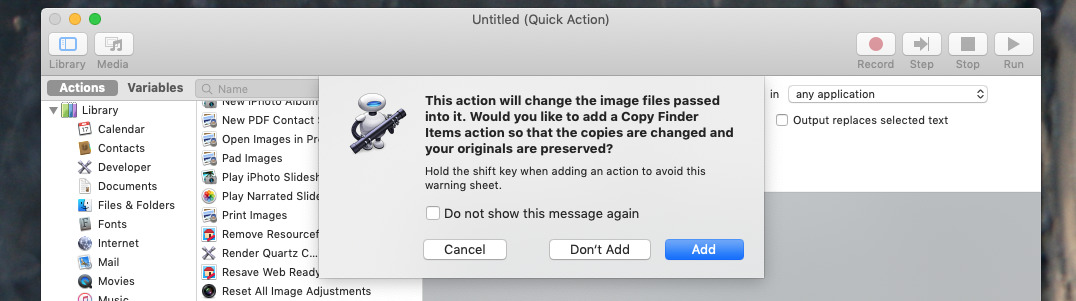
If the Service comes from an Apple app then the notification will be a helpful suggestion. For instance, if you're going to do some changes to an image, Automator will offer to add in a step that always make a copy of the original first.
However, most of the time you're going to be using Services provided by third party developers — simply because there are so many more of them. The first time you pick one of these, though, Automator will include the step but require you to explicitly confirm that you want to use it.
Say yes and that's it, your Quick Action is complete.
Automator is designed to let you do huge numbers of functions in sequence but for Quick Actions, you usually just want one. If Automator's offered to make a copy of the original before you convert or alter it, then you'll have ended up with two steps but you won't need any more.
Well, you could do one action that first Converts to JPEG, then rotate the image, then resize it. You aren't limited to how much you can do in Automator but Quick Actions are meant to be, well, quick actions. So keep it to one or two steps and then save your new Quick Action.
You just need to choose Save from the File menu: you don't then have to choose where it will be saved on your Mac. It's only going to one place: the spot where all Quick Actions live.
Check it out
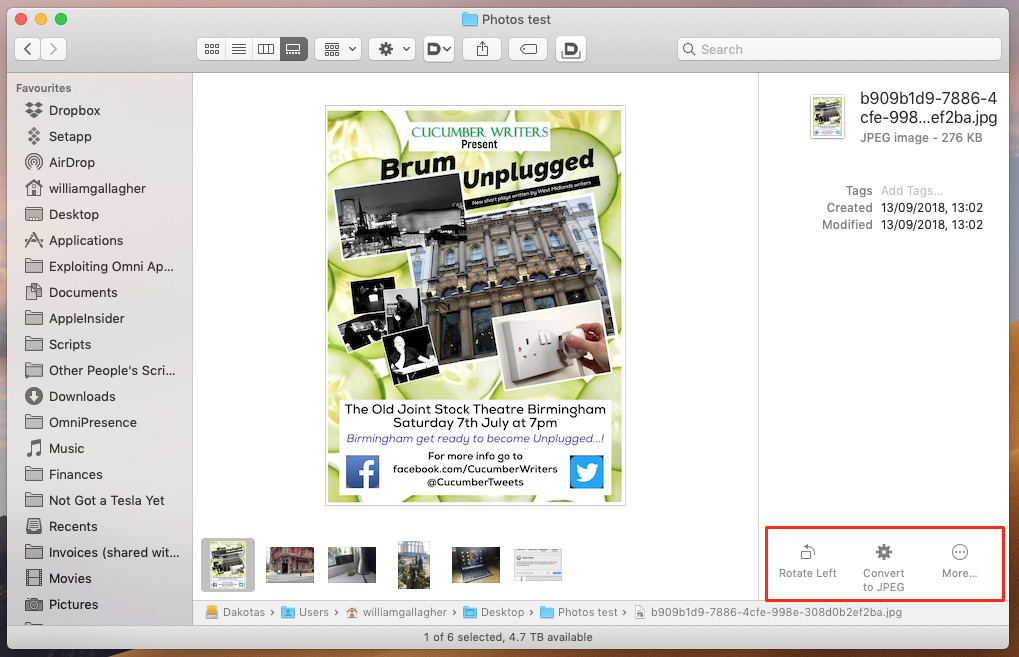
Quit Automator and go to the Finder. Open a window and navigate to an image. Click to select it and then look at the Preview pane to the right — if it's there. If it isn't, if you're seeing only your files and maybe the navigation bar on the left, then choose View, Show Preview or press Command-Shift-P.
The preview pane opens and it will be showing you some details about the file you've selected. At the bottom of that detail pane there will be the Quick Actions buttons Rotate Left, Markup and More.
Choose More and a small pop out menu will appear — which includes your newly created Quick Action.
It will now be there in every Finder window forever, unless you change it.
Quick Actions in use
From this moment on, we can select any image in any folder and choose Convert to JPEG from our Quick Actions menu. When we do that, though, it opens the app that provides the Service: in this case GraphicConverter 10.
Fine, only some apps open with an instruction screen and we found that this can prevent the Quick Action from running. The answer is to let the app open, then look for the "Show at launch" option that's invariably on these starting instruction screens. Switch that off and from now on the Quick Action will work.
Editing, moving and deleting
There's also a Customize option in that pop out menu. Choose that and System Preferences opens to a pane called Extensions. It will have already selected the right section for you but what you're looking for is the Finder at the bottom of the list.
With that selected, you get a list of all the Quick Actions you have installed. Each has a tick box next to it which switches them on or off.
You can also drag to re-order them — and if you do that, you can move your new Quick Action so that it's always on the preview pane. Then you won't have to select More first.
You can also right-click on any of the Quick Actions here and get the option to delete them.
Quick, Quick Actions
For a few minutes reading through the available Services or commands in Automator and a few moments picking one you want, you've now added something brilliantly useful to every single Finder window you ever see.
It seemed like such a small addition to macOS Mojave but the Finder's new Quick Actions are going to be one of those features that mean you can never go back.
Have to open Pixelmator Pro to rotate an image? That's so High Sierra.
Keep up with AppleInsider by downloading the AppleInsider app for iOS, and follow us on YouTube, Twitter @appleinsider and Facebook for live, late-breaking coverage. You can also check out our official Instagram account for exclusive photos.


 Wesley Hilliard
 Malcolm Owen


 Christine McKee
 David Schloss