

Not everyone can always get together in the same room for a presentation. As businesses and work teams are more far-flung and working remotely, finding ways to collaborate is more important than ever!
That's why you'll want to use a feature like Apple Keynote Live to stream presentations to your audience. You don't have to use a separate meeting software to take a presentation and share it with your audience online. This feature spans both the desktop and mobile versions of Keynote as you'll see in this tutorial.


In this tutorial, I'm going to walk you through using Keynote Live to stream your presentations. You might be surprised how easy it is to take a Keynote presentation and broadcast it to collaborators.
Guide to Making Great Presentations (Free eBook Download)
If you want to learn even more about making presentations be sure to grab our free eBook: The Complete Guide to Making Great Presentations. It'll help you master the presentation process, from: initial idea, through to writing, design, and delivering with impact.


Now let's dive into this tutorial, to learn all about how to use Apple Keynote Live.
What Is Apple Keynote Live?
Amongst the Apple Keynote users that I know, it feels like Keynote Live is one of the lesser-known features that should be more popular. We've all been in a position to share a presentation with an audience, and using Keynote Live offers that functionality online.
Often, that means saving the presentation, sending it to an audience, and adding your notes to an email so that they'll follow the presentation. But with Keynote Live, there's a better way. Press play, share the URL, and everyone can follow along in real-time.
In short, Keynote Live allows you to stream your Keynote presentations to an audience. Using this feature turns your presentation into an online experience that anyone can jump into. Let's walk through using Keynote Live to share a presentation online.
Watch & Learn
Screencasts are one of the best ways to pick up a new skill. Check out the video below for an "over-the-shoulder" view of how you can use Apple Keynote Live to stream your presentations in real-time.
Still want to learn more? Keep reading the rest of the tutorial to see the complete guide to using Keynote Live for sharing presentations.
How to Use Apple Keynote Live
To get started with Keynote Live, you'll first need to save the presentation to your iCloud account. I always launch Keynote Live by clicking on the corresponding Keynote Live button on the menu at the top of the application.
After you click on Keynote Live, you'll see a pop-up window that reminds you that you'll need to move the presentation to iCloud for streaming. As you may already know, iCloud is Apple's cloud storage service for storing files and media so that you can access them from anywhere.
Learn more about the service with iMore's guide that explains iCloud, but the critical bit of knowledge for this tutorial is that you move your presentation to iCloud to use Keynote Live.


Now, you'll see a brief pop-up that explains the benefits of using Keynote Live. Just click on Continue to move to the next step.


Believe it or not, that's it! You'll see a pop-up window that shows that your slideshow is ready to share as you can see in the screenshot below:


How to Share the Presentation With Viewers
Now that you've walked through the setup for sharing a Keynote presentation with your audience, it's time to invite viewers in to view the presentation.
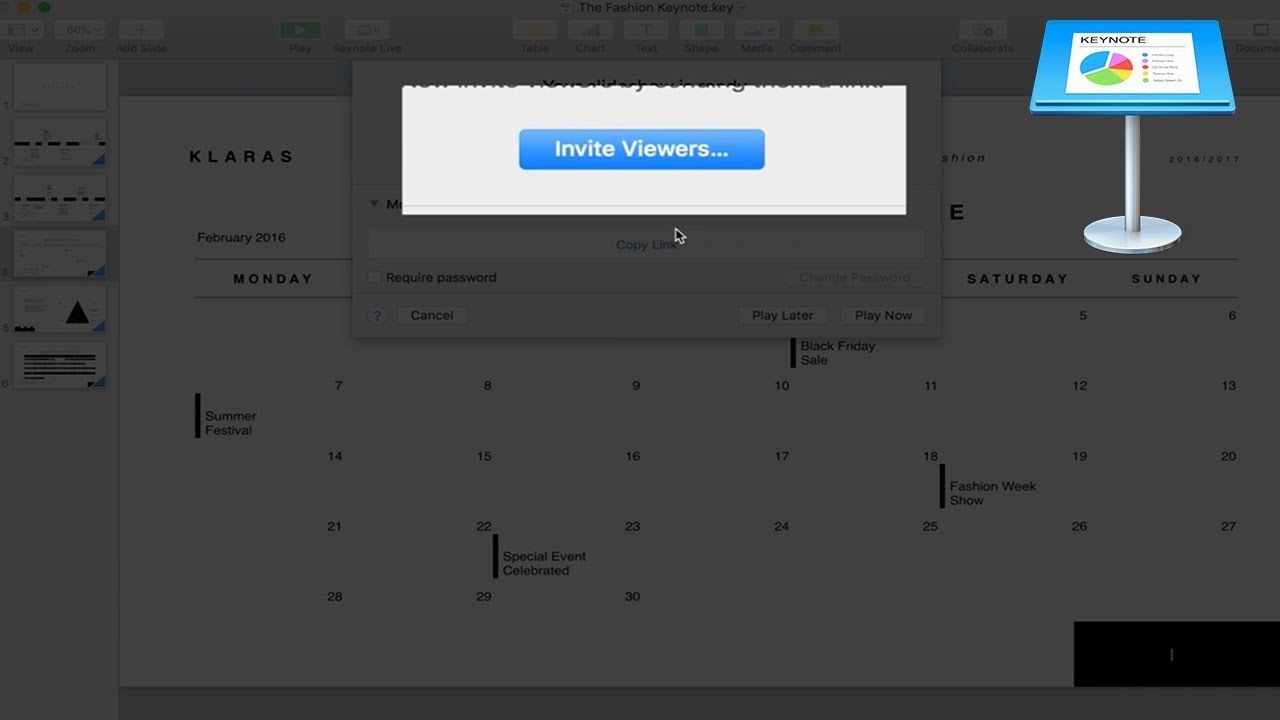
As you can see in when you click on the More Options menu in the screenshot above, one option is to share a URL that you can share easily. It's easy to take this Apple Keynote Live stream link and drop it into an email or meeting invite with collaborators.
The advantage of sending this URL is that anyone can view it. Even if the recipient is on a Windows PC with access only to a web browser, they can still view your Keynote Live presentation.
If you decide to directly share Apple Keynote link, I highly recommend using the Require Password option. Using a URL to share with viewers is convenient and makes it easy to connect, but you might not want that URL to make its way to the masses. In that case, it helps to add a password that adds a layer of authentication as you can see in the screenshot below.


For viewers that might be using iOS devices, using the Invite Viewers button is a great option. For example, using Messages to send the presentation link will help users on an iPad or iPhone jump straight into the presentation from their device.


How to Start Your Keynote Live Presentation
Now that you've connected with your audience and sent the link, it's time to start the presentation! Within Keynote, you'll see an icon that shows how many people are in the "waiting room," ready for the presentation to begin.
Click on the play button and choose Play on Keynote Live to start broadcasting your presentation. You'll go into the standard presentation view with all of the typical aids for presenting.


After you start the presentation, you'll see the familiar interface for sharing your Keynote slides. In the upper right corner, you'll also see the number of viewers that have currently joined your presentation.


That's it! Proceed with your presentation, and the audience will see all of the animations, content, and data that you've built into your slides.
If you want to share audio or voice over the slides, you might need to consider a separate setup for that. Either set up a call-in number or conference call or pre-record the audio that you want to play with this guide from Apple.
Consider turning on Keynote Live any time that you're in a conference room with no big screen display to share the slides. I've personally used this feature in that exact situation, and it saved everyone from crowding around a screen or printing paper copies beforehand. Instead, everyone jumped into the slides on their own devices.
Keynote Live on iOS Devices
One of the options for viewing a Keynote presentation is using the Keynote app for iOS devices. In this section of the tutorial, let's take a brief look at how Apple Keynote Live works for those viewers.
The good news is that the experience for iOS viewers is almost identical to the desktop version. As you can see in the image below, the presentation that shows on an iPad more or less mirrors the exact version built on Keynote for Mac. It's that continuity that makes Apple Keynote Live an ideal choice to share a presentation.


Finally, one of my favorite ways to share Apple Keynote Live presentations online is with viewers who only have a web browser to jump in. Sharing a URL from the More Options menu helps ensure that no one is left out for viewing the presentation, no matter what platform they prefer to work on.
Recap & Keep Learning
In this tutorial, you learned how to showcase your Apple Keynote presentations online. This feature can bring together an audience with no extra apps or setup required. It's that type of flexibility that keeps me turning to Keynote as my go-to presentation software.
Don't miss out on MacMost's tutorial that offers another perspective on using Keynote Live.
Want to learn more about Apple Keynote? We've got you covered. Check out any or all of the tutorials below to keep leveling up your skills with Apple's flagship presentation software.

 How to Quickly Make a Timeline in Keynote With Templates


 How to Use Keynote Slides (Layout Dimensions, Sizes, & Design)

 How to Add Pictures & Backgrounds in Keynote Presentations
.jpg)
.jpg) How to Quickly Change Keynote Custom Themes (In 60 Seconds)
How to Quickly Change Keynote Custom Themes (In 60 Seconds)
We also have the perfect complement to this tutorial, which will walk you through the complete presentation process. The Complete Guide to Making Great Presentations is available for free with a subscription to the Tuts+ Business Newsletter. Learn how to write your presentation, design it like a pro, and prepare it to present powerfully.


How do you share your presentations with an audience? If you've got a favorite Keynote tip that you want to share with the rest of the Tuts+ audience, make sure to leave a comment below this tutorial.


