
You can of course sign AppleScript apps and applets from Terminal’s command line, but the two major AppleScript development environments also offer this feature. If you develop any more than the occasional script, then you should buy the amazing Script Debugger, which has long supported signing and a great deal more.
If you only develop the occasional script, you may still get away with using the bundled Script Editor, in /Applications/Utilities. Here, signing your app is offered in the step to export your script as an app, using that command in the File menu.

At the foot of the Export dialog is the option to sign the app. Script Editor inspects your keychain for suitable signing certificates, and should offer them all in its popup menu.


What you then end up with is a signed app which needs its Info.plist changed, as it is automatically given generic Usage strings to cover any possible access to protected data and services – which I’m sure is not Apple’s preferred solution to Mojave’s privacy controls. Of course the moment that you edit Info.plist, that invalidates the signature which Script Editor has just generated, so you’ll then need to re-sign the app from the command line.
Thankfully, Script Debugger does this far better, and so much more.
Signing a command tool is extremely easy if you build it in Xcode: it’s built into the tool’s General settings, just as for a full-blown app.

What happens then is that the signature is built into its single executable file. But that doesn’t bring with it the settings which are normally provided in an app’s Info.plist file. Adding one to be embedded along with the signature is slightly more complex, but worth it if you want your tool to enjoy the full benefits of a signature.

Add a new file to your project, choosing Property List as its template, and giving it the name Info.plist, with a capital I. Ensure that this is saved in your main development folder alongside the source code.

Your empty Info.plist file needs two essential fields, for the Bundle identifier (such as com.mycorp.toolname) and its Bundle name (such as toolname). While you’re adding properties here, you’ll probably want to add versions and copyright, and anything else that your tool will benefit from.

When you’re happy with the contents of the Info.plist, add it to the project at the top of its General pane.
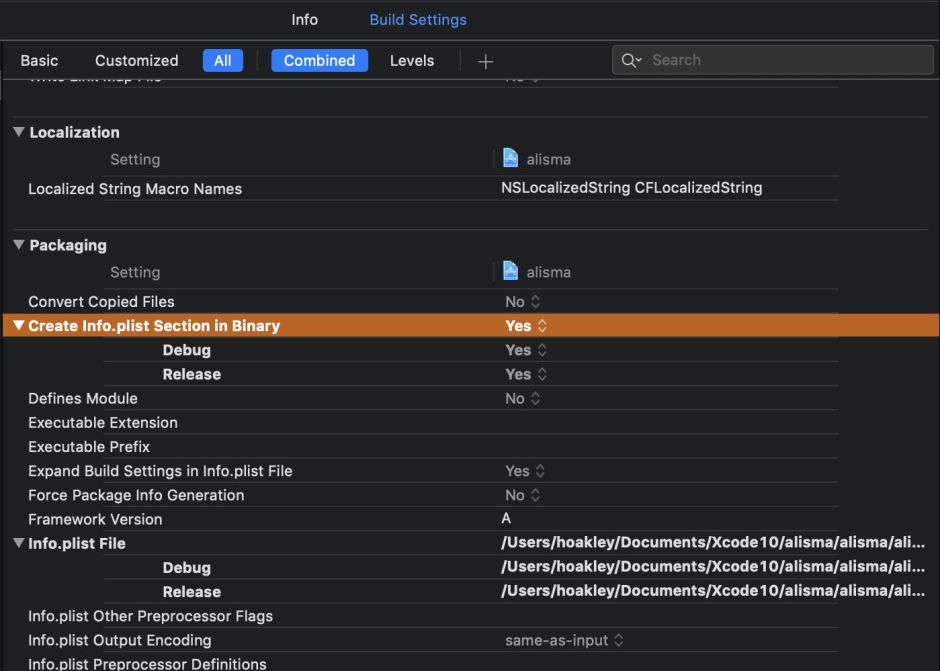
You then need to adjust the Build Settings to ensure that the Info.plist is created and embedded in the command tool’s binary. You need to do that in the Build Settings for the target, and I also add it to them for the Project, although that may be unnecessary. Select the Build Settings panel, and scroll down to the Packaging section.
Ensure that Create Info.plist Section in Binary is set to Yes, and that the path to the Info.plist File is given further down. That may well appear automatically in the Build Settings for the tool itself, and can be copied and pasted from there into the same section of the Project.
Then just build your command tool in the normal way, and its single-file binary should contain the embedded signature and Info.plist.
Don’t assume that this works perfectly: remember to check, at the very least by using Whats Your Sign?
If you need to refresh your memory on how to sign code at the command line or in Xcode more generally, this article describes them both.
