Phone or tablet tethering can give you some precious internet connectivity when you’re out of wifi range, and in terms of connecting on the go, it’s much more secure than the public wifi you’ll find in hotels, coffee shops, and so on. Here’s how to do it, simply and painlessly, whether you’ve got Android or iOS on your mobile device.
We’re going to focus largely on wifi tethering here—creating a wifi hotspot from your phone or tablet—but you do have other options. If you’ve got a spare USB cable you can create a more stable connection between laptop and mobile device, or you can tether via Bluetooth, which is significantly slower but less taxing on battery life.
Picking a data plan
Before you can fire up tethering on a phone or tablet, you need a suitable data plan—specifically, one that allows tethering. Most now do, but hotspot data is sometimes counted separately to standard data you use on your phone, and you’ll probably see slowdowns (or extra charges) after you exceed your limits.
Check out Sprint’s unlimited plans and you’ll see the hotspot data allowance goes from 500MB to 50GB per month depending on how much you’re willing to pay. Some hotspot data allowance is available on more limited plans, and separate deals can be picked up if you’re connecting a tablet.
It’s largely the same across the other carriers: Most AT&T plans, Verizon plans, and T-Mobile plans include a mobile hotspot allowance for tethering, though as we’ve said sometimes hotspot data is counted as separate (check with the carrier directly if you’re not sure). Note the transfer speeds too—some Verizon plans offer unlimited hotspot data but at a maximum speed of 600 kbps, while T-Mobile distinguishes between 3G and 4G LTE speeds (the latter costs more).
And that’s another important consideration when tethering: Actually having a strong enough 4G LTE data signal to get by. If you’ve got a patchy cellular connection then chances are you’re not going to get the browsing speeds you need on your laptop, and you’ll need to move to an area with better coverage.
Tethering from Android
With so many devices and variations on Android out there, it can be hard to provide a definitive guide to its functions, but most Android phones or tablets will work along similar lines—even if the manufacturer of your smartphone has changed some of the settings and menus around, the tethering process should be broadly the same.
When it comes to the stock or close-to-stock version of Android 9 Pie you’ll get on Pixels and phones like the Nokia range, you need to open up Settings then pick Network & Internet, Hotspot & tethering, and Wi-Fi hotspot. Turn the toggle switch to On, and you can set your hotspot name and password (something you definitely want in place if you don’t want a bunch of strangers borrowing your data connection).
The same Hotspot & tethering screen gives you access to wired and Bluetooth tethering as well—just tap the relevant toggle switch to enable the feature. Alternatively, there should be a Hotspot icon in the Quick Settings draw at the top of the screen, which you can tap to enable tethering over wifi using the default configuration.
If you’re connecting wirelessly from Windows or macOS, the process is just the same as it is for connecting to any other wifi network: Search for available networks or devices, then select your phone or tablet when it appears.
If you’ve picked Bluetooth tethering, from the Windows Settings pane you need to go to Devices, Bluetooth & other devices, and Add Bluetooth or other device to get connected. On macOS, open up System Preferences then choose Bluetooth and click Connect next to your phone or tablet when it appears.
For wired connections (USB tethering), Windows should automatically detect your phone or tablet as a wired connection once you’ve enabled the option on the device. That said, you might well run into driver problems that seem to vary by device—we’d recommend using the wifi option unless you have good reason not to.
On macOS, cabled tethering is even more complicated. Just in case you absolutely have to do it, you need this driver very generously provided by a third-party developer. You also need to enable Developer Options and USB debugging (on the Developer Options menu) on your phone before the connection will appear. There’s a useful and comprehensive walkthrough here.
When it comes to Chromebooks, there’s now an Instant Tethering feature available for connecting to Pixel phones (with support for more Android devices rolling out as we speak). Essentially, it makes the tethering process just a touch easier, with Chrome OS automatically latching on to an available and recognized cellular device if a normal wifi network isn’t detected.
From the Settings pane in Chrome OS, you need to scroll down to Connected devices and choose Setup. Follow the instructions on screen to make the connection, which also enables the Android Messages app for Chrome OS (so you can send and receive SMSes through your Chromebook).
After the connection is made, select the device in Settings to configure it further (and turn off the SMS feature if you don’t like it). You also need to make sure the Instant Tethering option under Google in Settings is switched on, but it should be by default.
You can use wired tethering if you wish—it should be as simple as plugging in your Android phone or tablet via a USB cable and then enabling USB tethering on your mobile device. When we tested it, the device immediately created a connection labeled “Ethernet” on the Chromebook we were connecting to.
Tethering from iOS
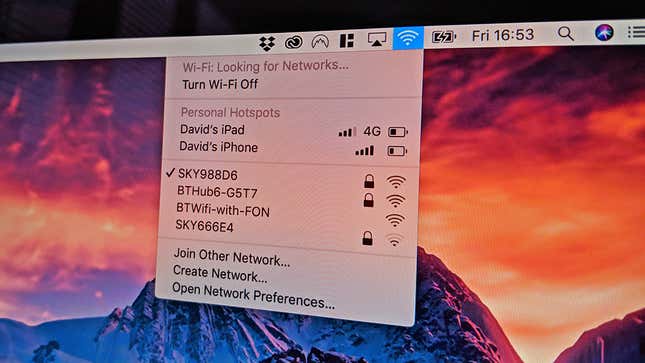
If you’ve got an iPhone or a cellular-enabled iPad to hand, then tethering life is a bit more straightforward, especially if you’re needing to hook up to the web from a Mac. From Settings, pick Personal Hotspot, enable the feature, and... you’re just about done. Connect to the device as a wireless network or a Bluetooth device to use its internet.
If you’re signed into the same iCloud account on both the Apple device you’re using as a hotspot and the Apple device you’re connecting from, it’s even easier: The device appears as an option in the networks list and can be connected to with a click, no password required.
Should the situation demand a wired connection, again this is very straightforward if you’re using a macOS computer with an iOS device. You still need to switch the personal hotspot feature on, but when the device gets attached via USB, it immediately appears as a hotspot in the network connection list.
As on Android, the wireless option is probably the one to go for, particularly if you’re not using a Mac. In theory, the wired USB option should work with Windows too... but in practice it tends to throw up several issues, mostly around drivers and older OS versions. That said, it worked fine on our Windows 10 and iOS 12 setup—the iPhone immediately acted as a wired network connection without any other configuration.
If you’re connecting from a Chromebook, the iOS device can be connected to as a wireless network without any issues. At the time of writing, Bluetooth and USB tethering isn’t supported in Chrome OS, however, so you don’t have those as options unless you’re using an Android device.
For those of you with a decent data plan, a strong 4G LTE connection and plenty of battery life left, you might find tethering an even better option than wifi in some situations, working from your phone or tablet as a mobile hotspot is usually relatively straightforward—unless you’re trying to do cabled tethering from Android to Mac