In this guide, we share 30 useful tips to help you get the most out of your AirPods Pro 1st and 2nd generations.
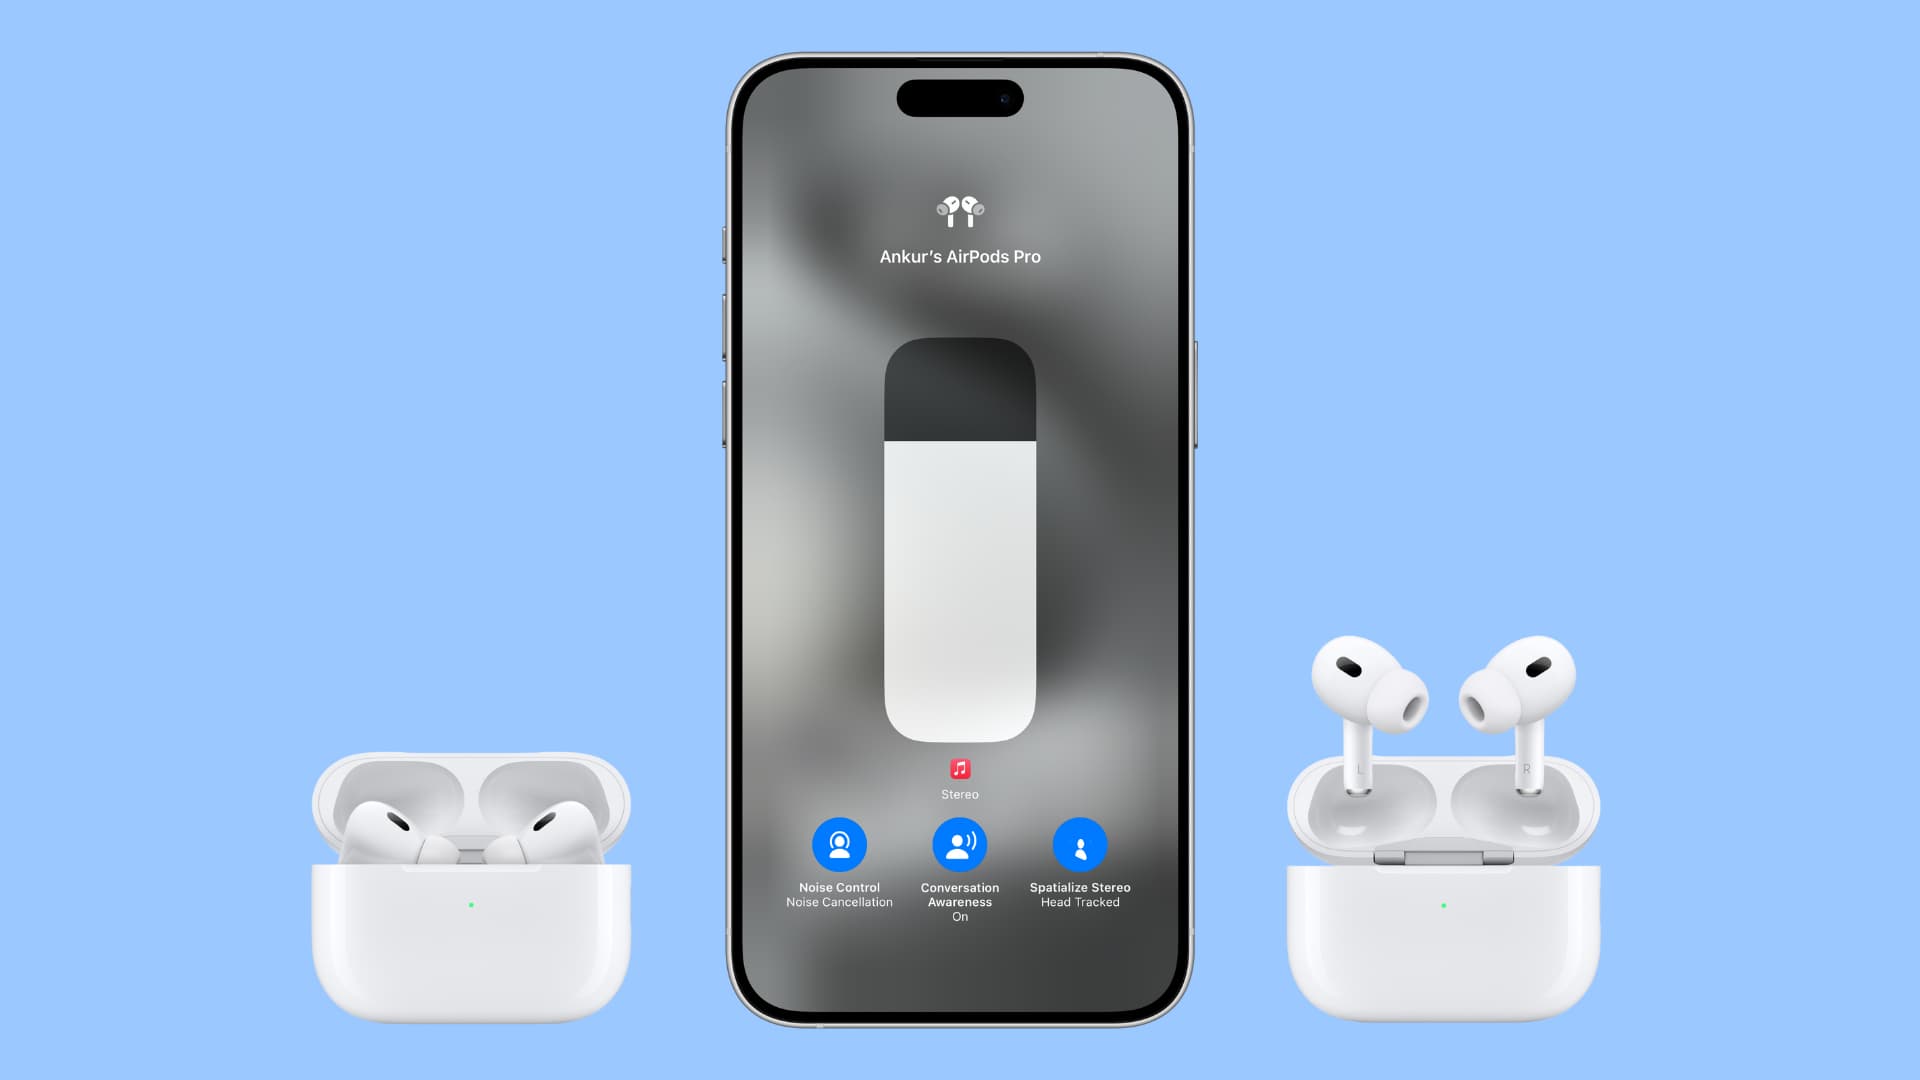
Note: Some of the features here may only be available on AirPods Pro 2nd generation.
Before you begin: You must know that you can access AirPods Settings by connecting them to your iPhone and then tapping your AirPods name from the top of the Settings app.
1. Change volume
Swipe up on either AirPod Pro stem to increase the volume and swipe down to decrease. If you want to change the volume by multiple points, you will have to swipe repeatedly.
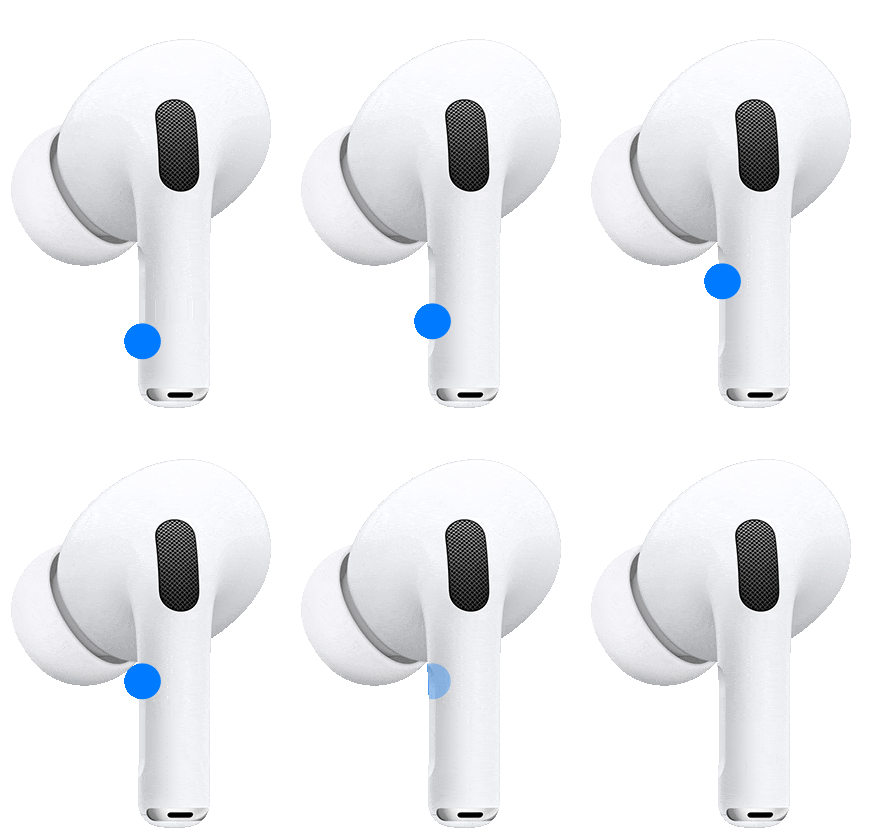
Note: If you find yourself making unintended changes to the volume or don’t ever use it, you can turn off AirPods Pro volume control from AirPods Settings > Accessibility > Volume Swipe. Or, keep the Volume Swipe active and set wait times between swipes to Longer or Longest to prevent accidental volume adjustments.
2. Control music
You can control your media playback using these simple AirPods Pro actions:
- Pause and resume: Press either AirPod stem once.
- Skip to the next song: Double-press either AirPod stem.
- Go to the previous song: Triple-press either AirPod stem.
3. Customize AirPods Pro call controls
By default, you can:
- Answer an incoming call: Press either AirPod stem once.
- Mute and unmute the call: Press either AirPod stem once when the call is in session.
- End the call: Press either AirPod stem twice.
I think this setup is practical and easy to remember. But if you think otherwise, you can change the second and third options by going to AirPods Settings > Call Controls.
4. Noise Cancellation
AirPods Pro offers active noise cancellation, making them ideal for plane and train rides. It also comes in handy when you want to drown out the noise around you and enjoy your music or movies without outside sounds. Here’s how to turn it on:
- Open the iPhone or iPad Control Center.
- Touch and hold the volume slider to reveal more options.
- Tap Noise Control and select Noise Cancellation.
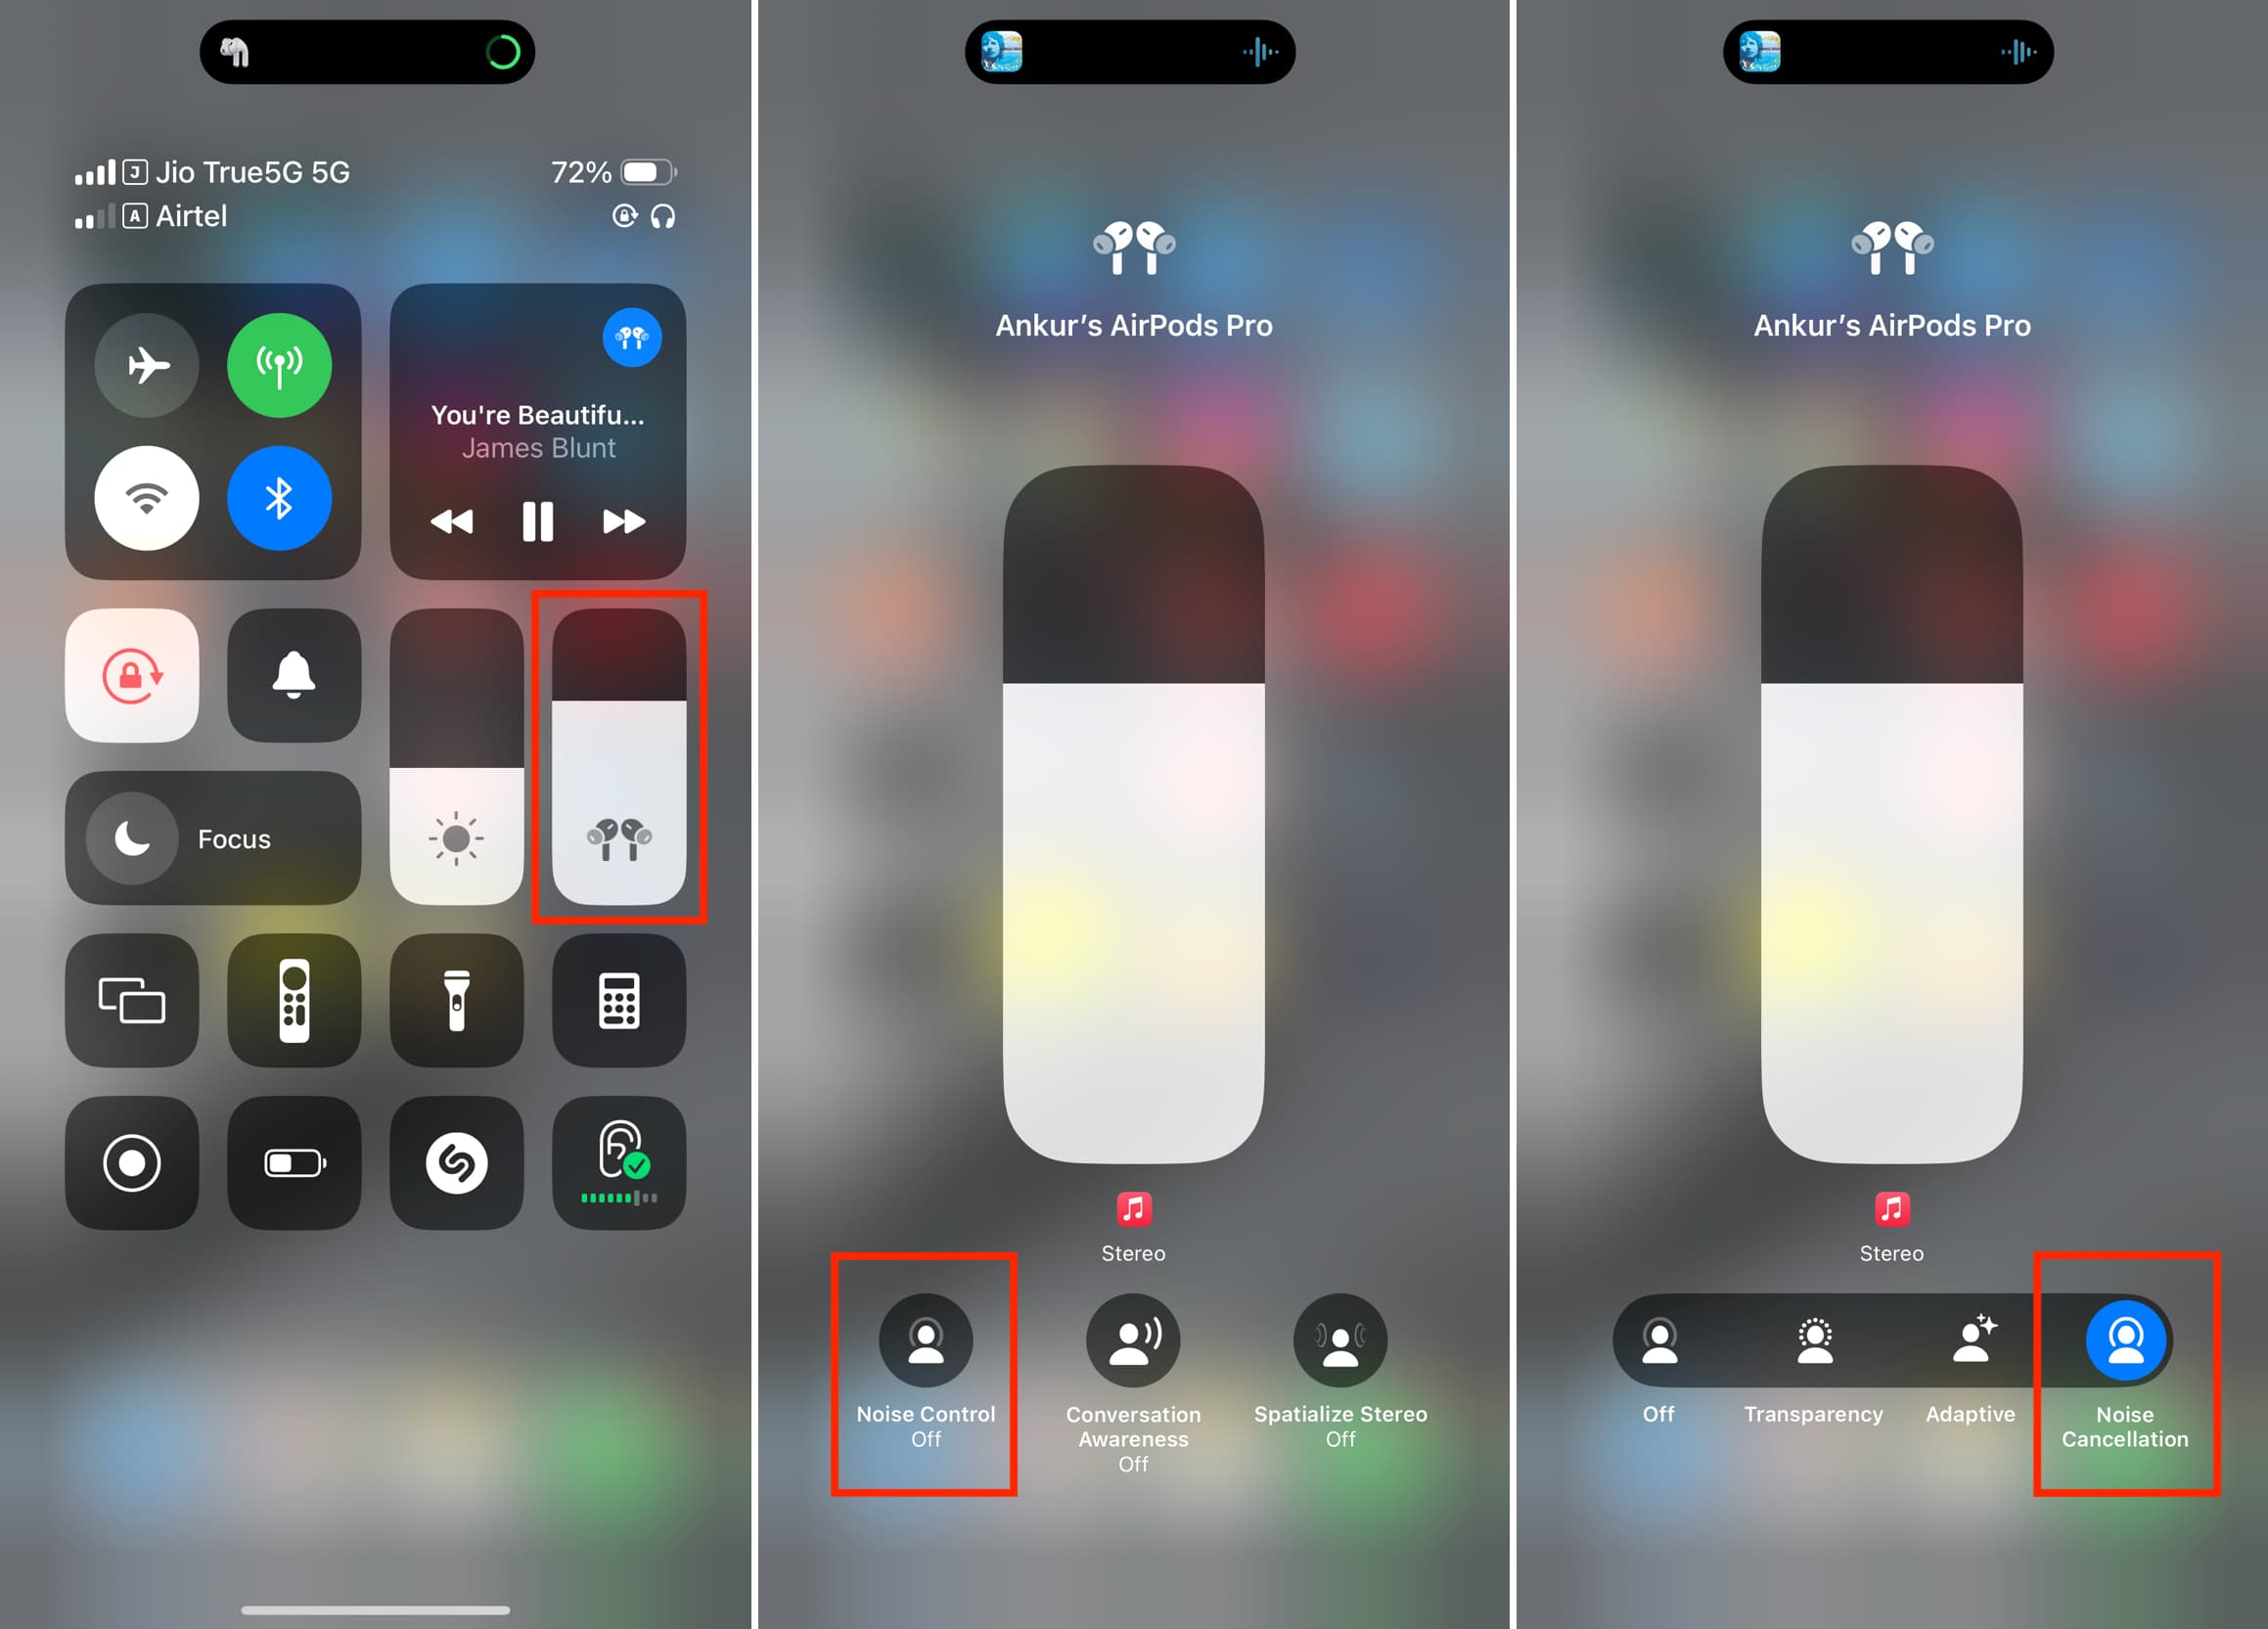
Note: Both AirPods must be in your ears for Noise Cancellation to work. However, you can go to AirPods Accessibility Settings and turn on Noise Cancellation with One AirPod.
5. Transparency
While Noise Cancellation cuts out the background sounds, Transparency is the opposite as it enhances those sounds so you can hear them even while listening to audio on your AirPods. This can be useful in certain situations like when you’re watching a movie with AirPods on but also want to hear the oven’s sound when it goes off.
To turn on AirPods Pro Transparency:
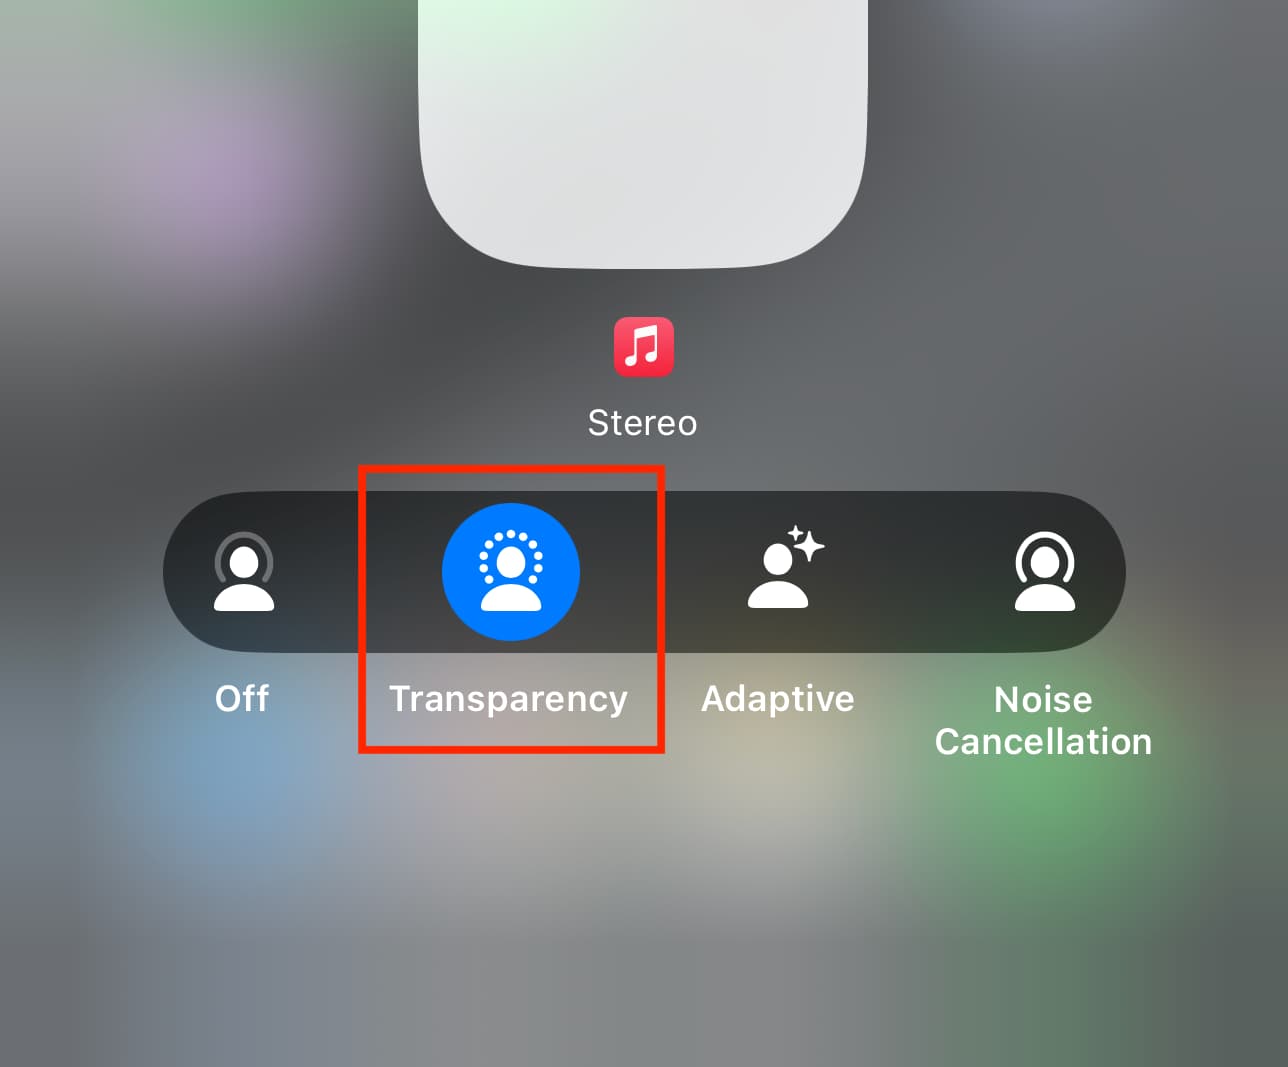
- Touch and hold the volume slider in the iOS Control Center.
- Tap Noise Control.
- Select Transparency.
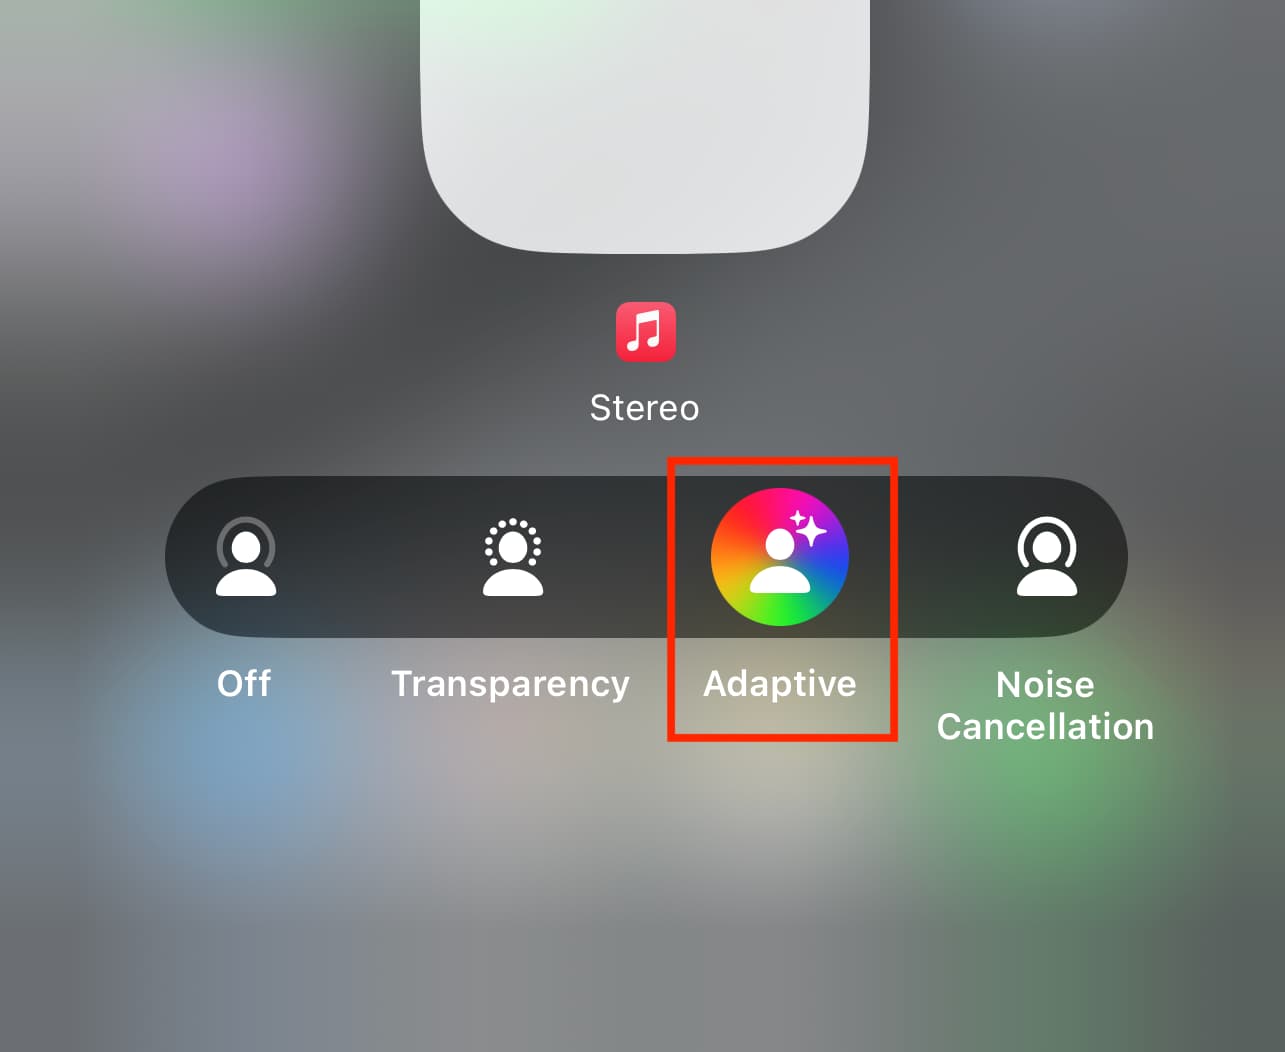
6. Adaptive
Adaptive Noise Control is available on AirPods Pro (2nd generation) with USB-C or Lightning ports. It’s a mix of Noise Cancellation and Transparency as it blends both these modes and sets the overall noise control based on the sound around you.
Here’s how to activate Adaptive hearing mode on AirPods Pro:
- Go to the iPhone and iPad Control Center.
- Touch & hold the volume slider.
- Tap Noise Control and select Adaptive.
7. Conversation Awareness
Conversation Awareness on AirPods Pro lowers the audio playback volume when you start talking and enhances the voices around you so you can hear what the other person is saying. Once your conversation ends, the volume level and Noise Control settings will automatically return to what they were before.
To activate it:
- Open the iPhone or iPad Control Center.
- Touch and hold the volume slider and tap Conversation Awareness.
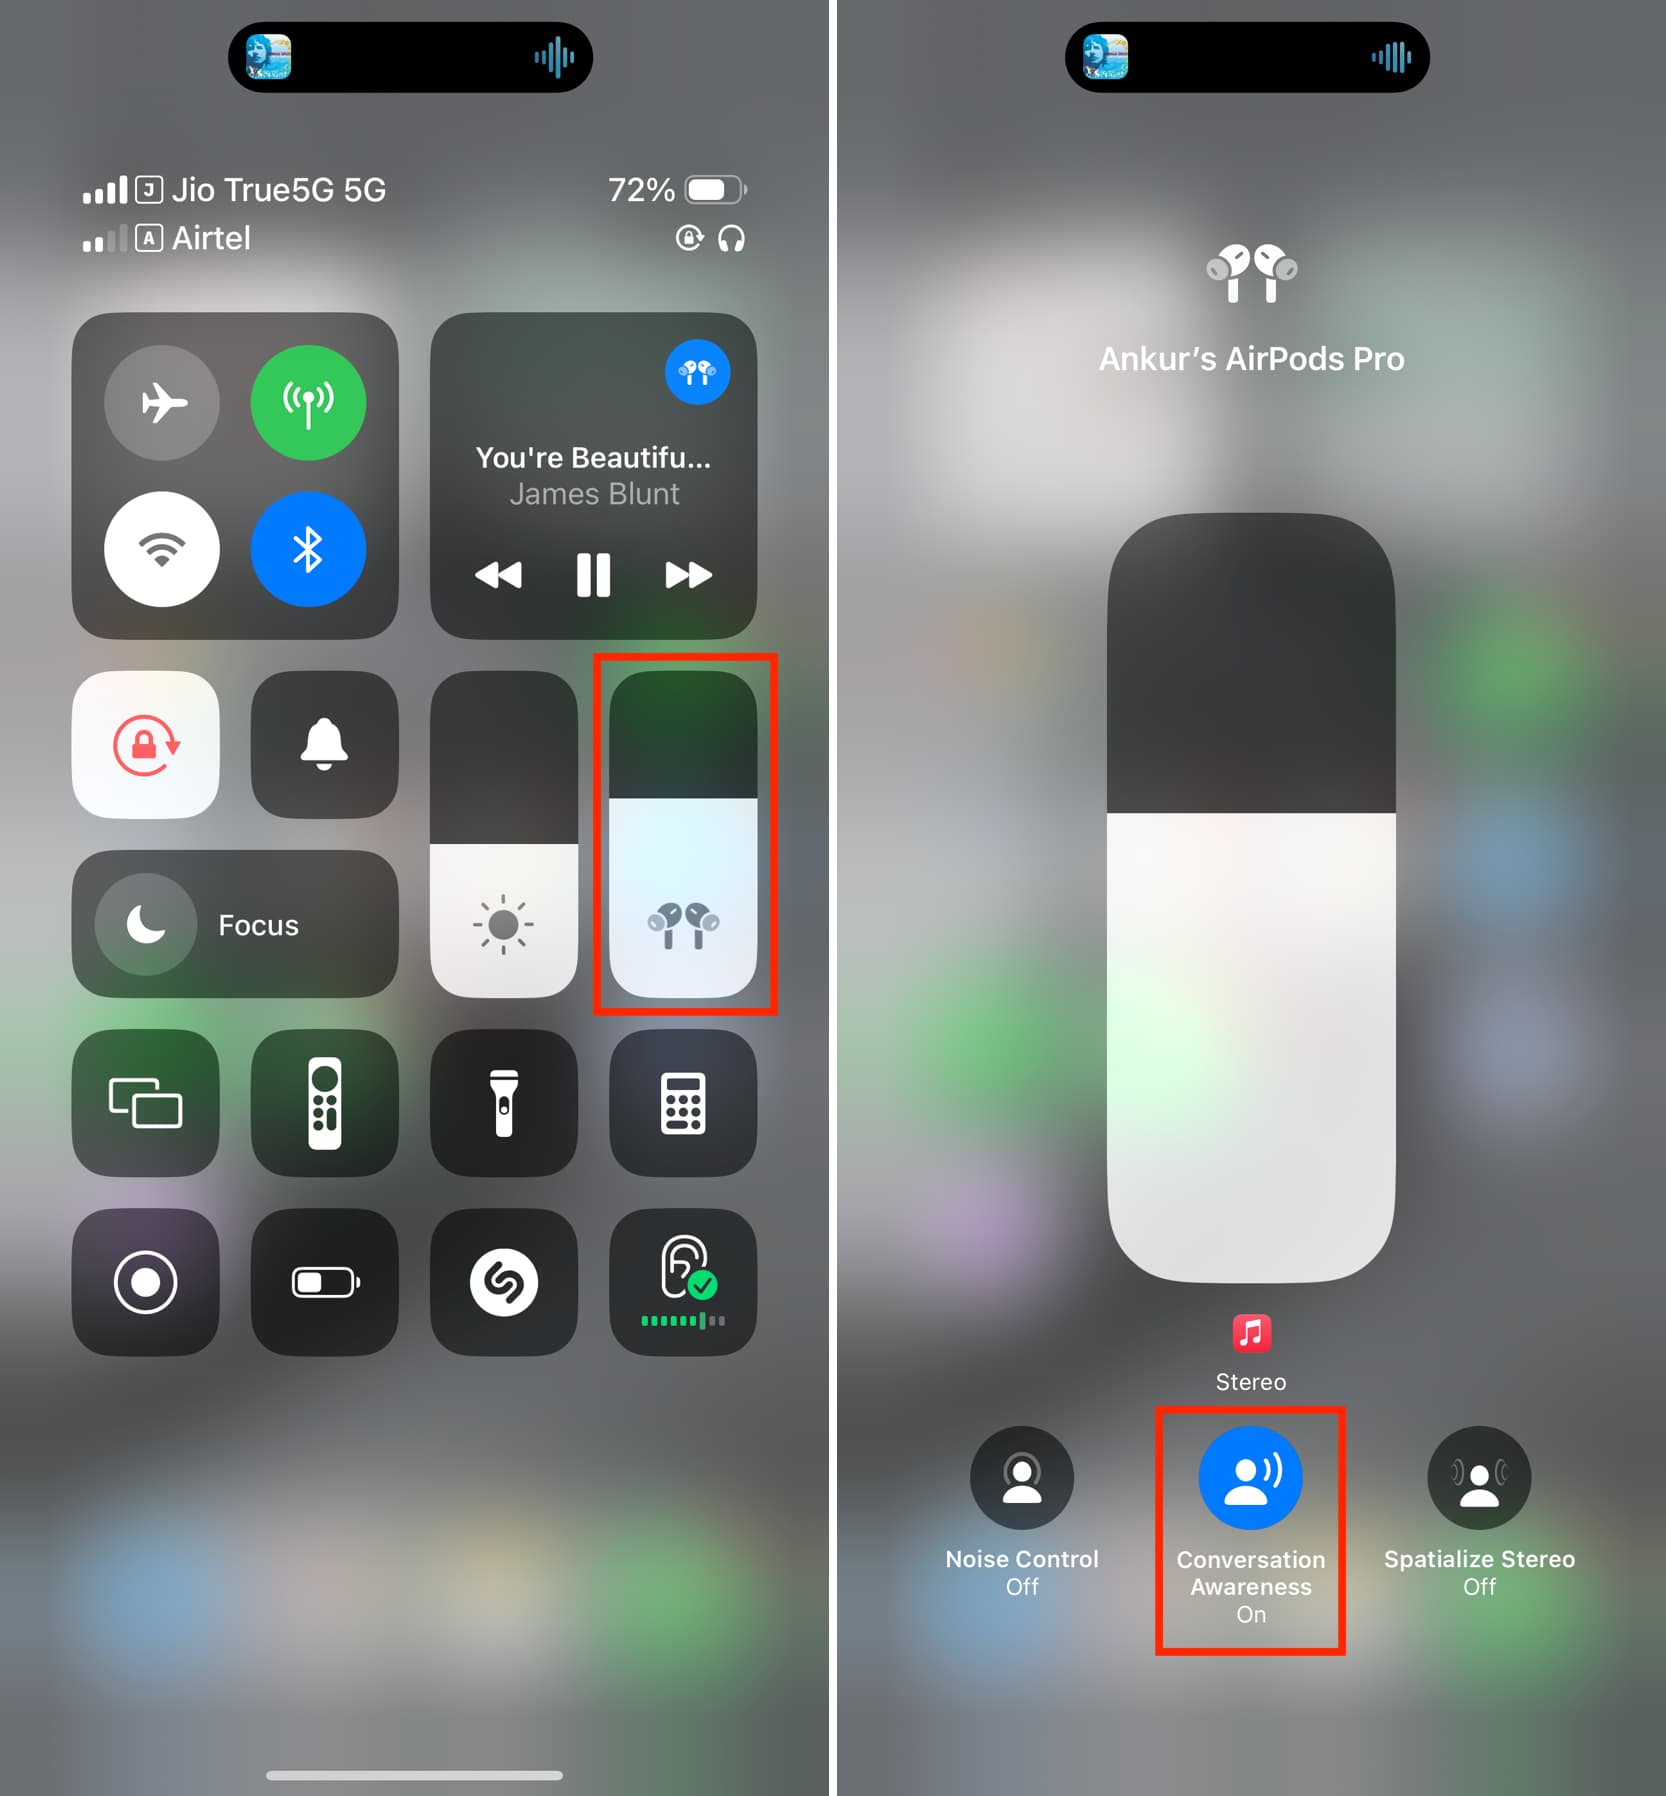
As mentioned, it will automatically bring AirPods volume back to before once your conversation ends. But if you want to do that manually mid-conversation, just swipe up on an AirPod stem (like you do when increasing the volume) or press & hold the stem.
8. Spatial Audio
With Spatial Audio, you can create a 3D listening experience that gives you the effect of sound coming from all directions or based on your head movement. You can activate it from the iPhone Control Center by pressing the volume slider and selecting Spatialize Stereo > Fixed or Head Tracked.
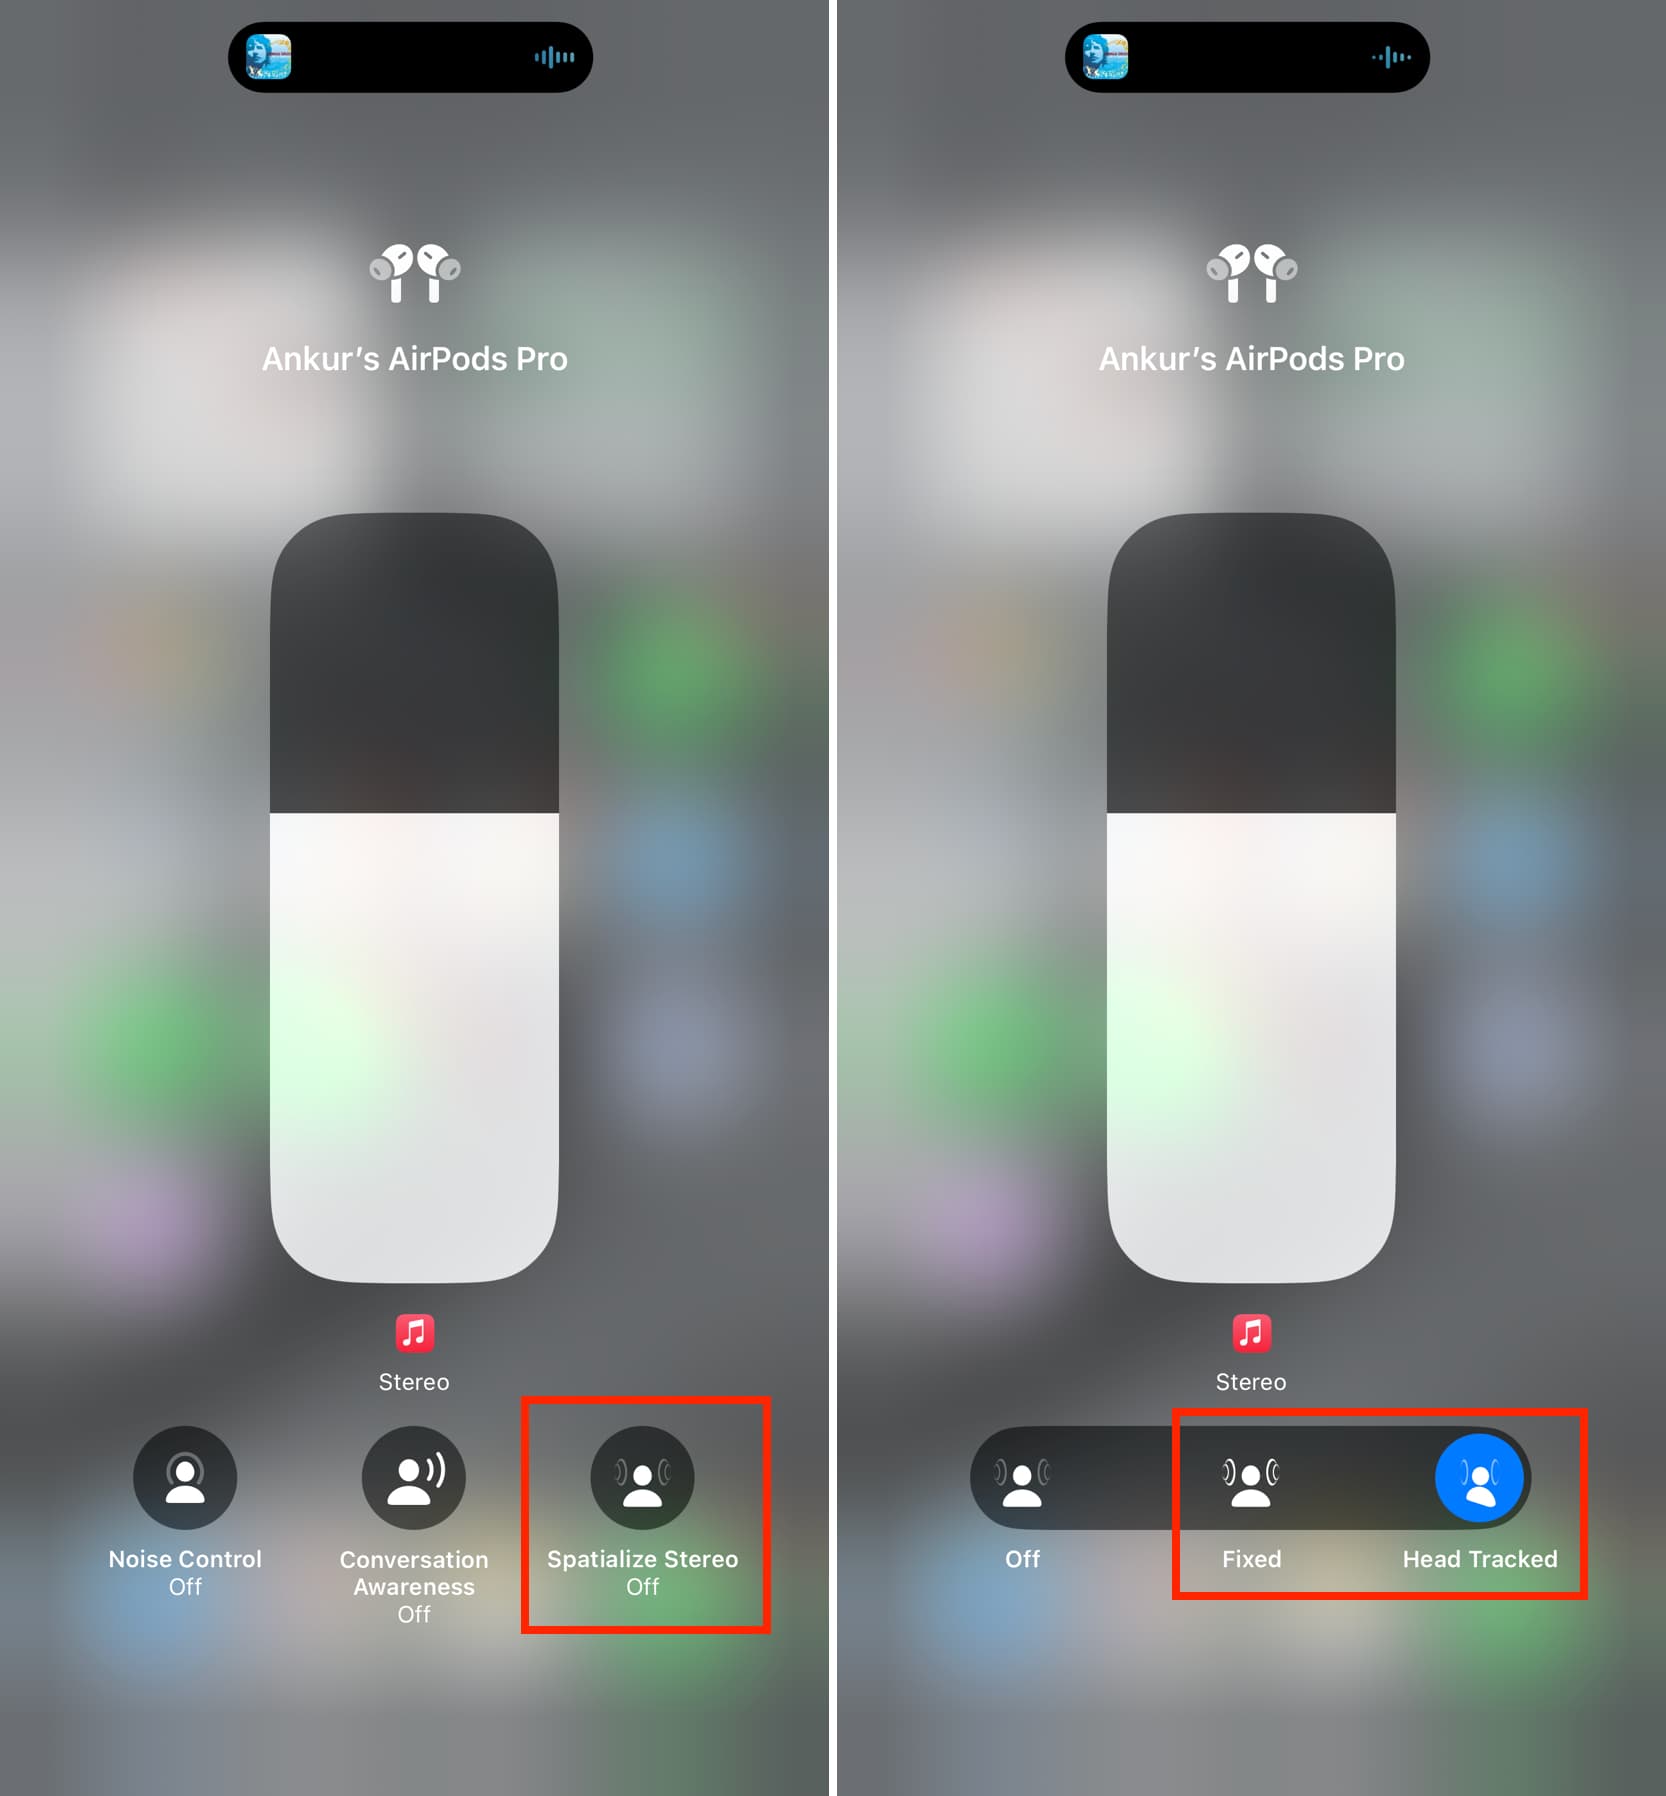
If Spatialize Stereo is un-tappable or doesn’t work properly, go to your AirPods Settings > Personalized Spatial Audio > Personalize Spatial Audio and finish the setup.
9. Activate Siri or Noise Control modes directly from AirPods
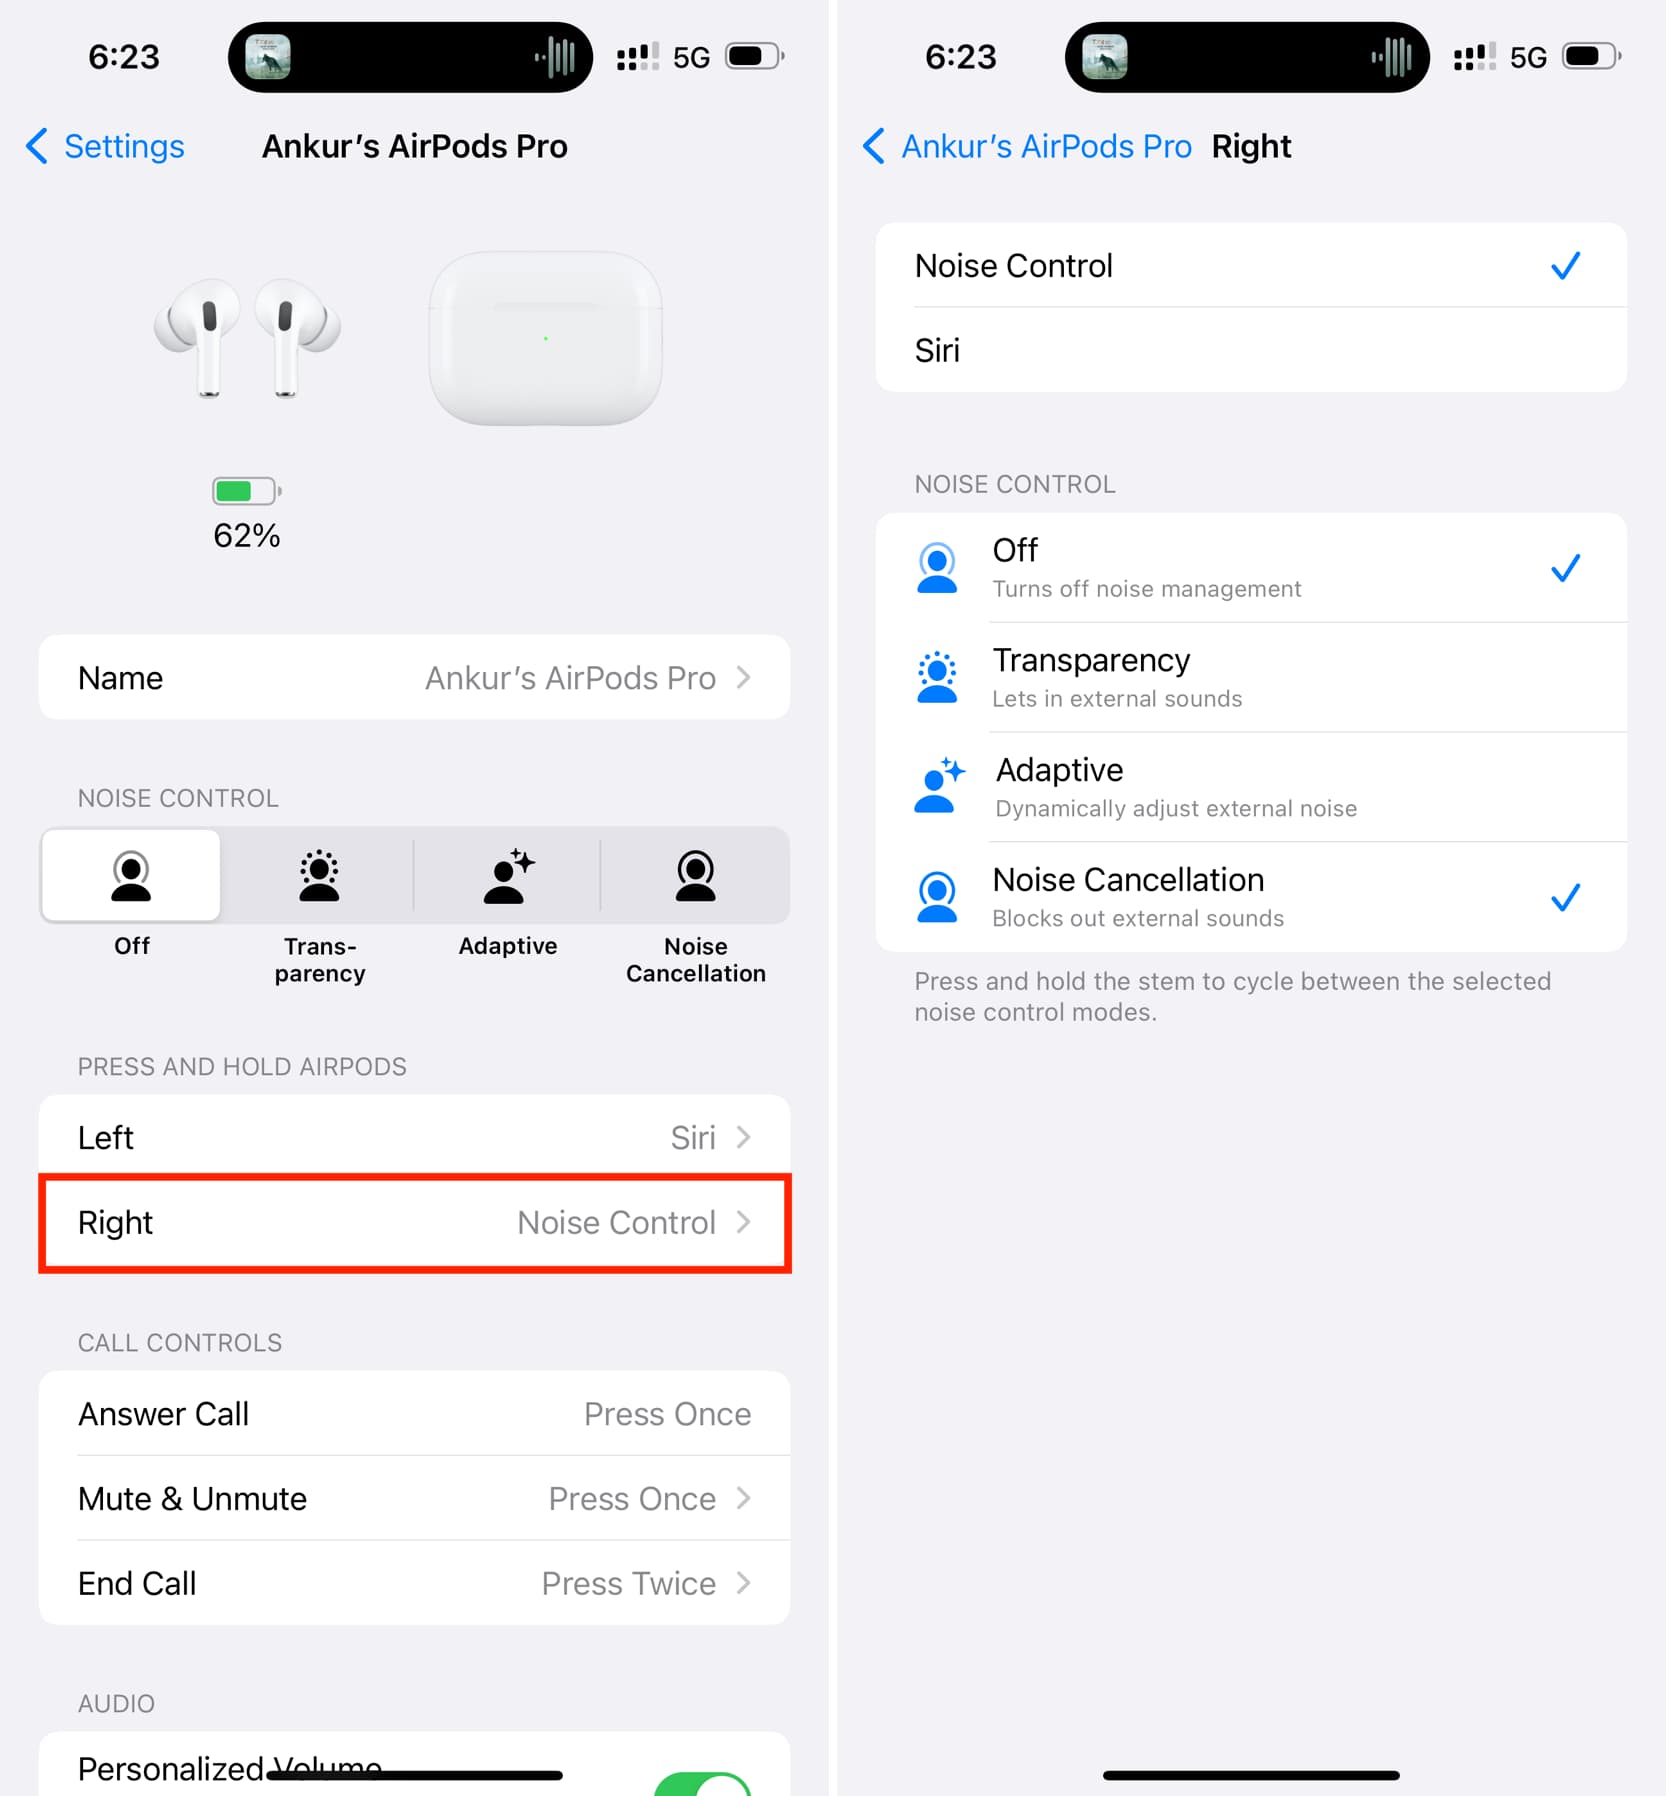
Out of the box, when you press and hold the left AirPod stem, it will invoke Siri, and the right one will let you activate Noise Control.
10. Pick which Noise Control modes to cycle on the AirPod stem press
You can go to your AirPods Settings > Left or Right that’s set to Noise Control, and check or uncheck which features you want to cycle through when you press and hold that AirPod stem. I have set my right AirPod to just turn on Noise Cancellation or turn it off when I press and hold it.
11. Share audio with two pairs of AirPods
You can connect two AirPods (except AirPods 1st gen) or supported Beats headphones to your iPhone or iPad and share the same audio on both.
12. Make AirPods environment aware
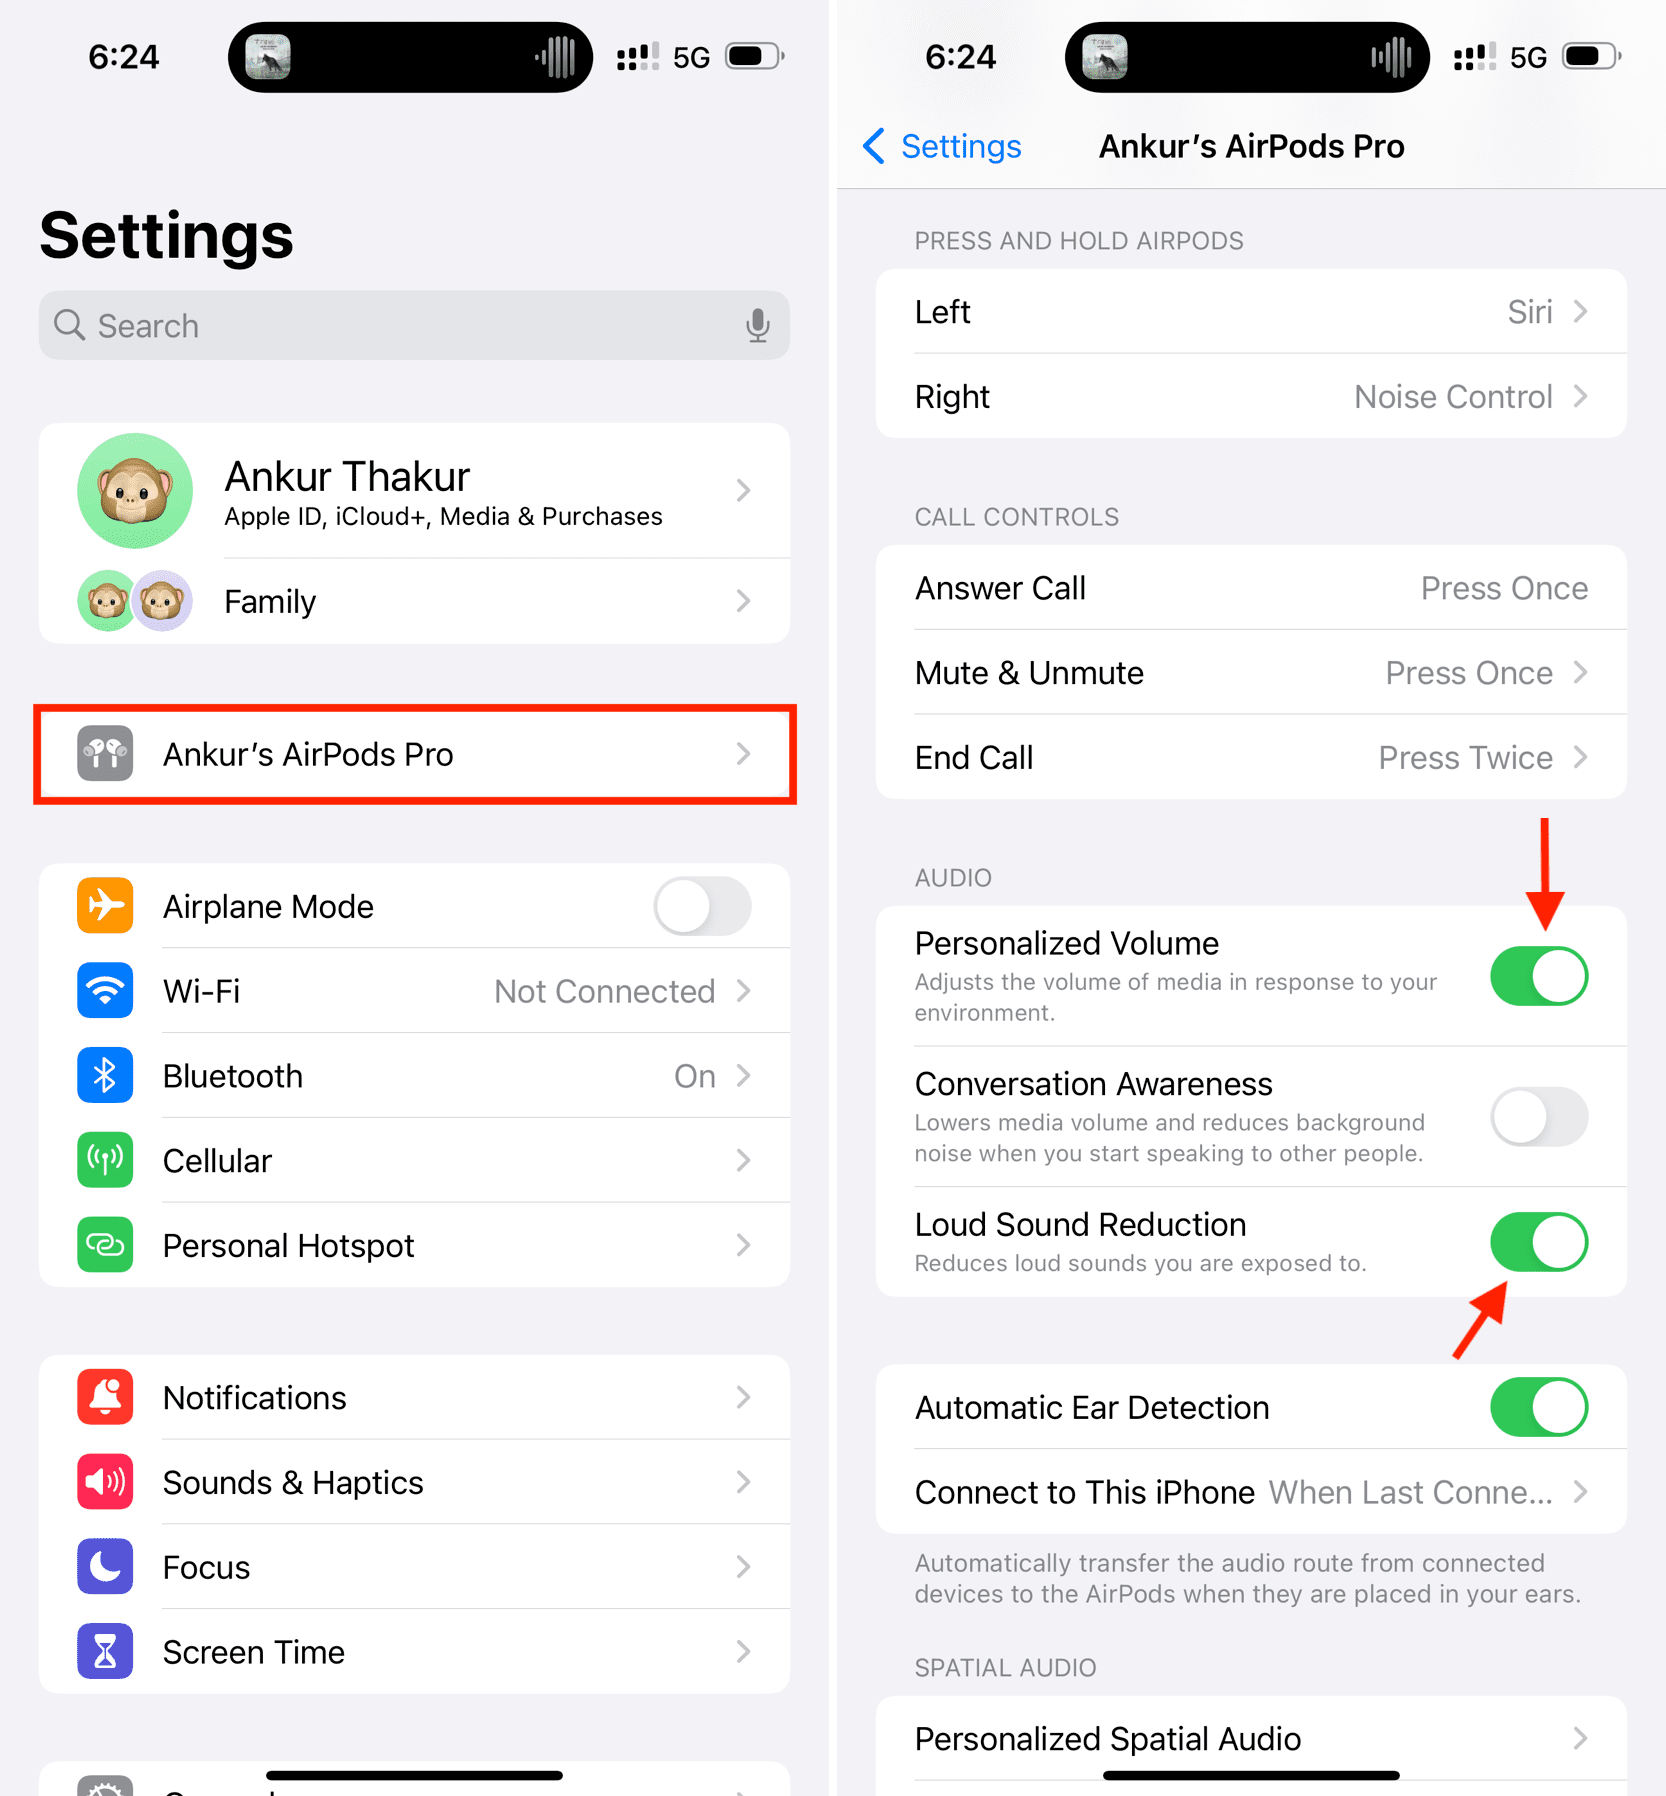
Go to iPhone AirPods Pro settings and turn on Personalized Volume to make your AirPods learn your listening preferences over time and adjust your media volume according to your surrounding environment. From here, you can also enable Loud Sound Reduction to protect your hearing.
13. Automatic Ear Detection
Out of the box, all AirPods come with ear detection that pauses playback when you take one AirPod out of your ear, and resumes the playback when you put it back in. If you dislike this, turn it off from AirPods settings > Automatic Ear Detection.
14. Stop AirPods from auto-switching between your devices
If you own a Mac, iPad, and iPhone, you might have noticed that AirPods automatically disconnect from the current device and connect to the other one where you play some media or receive a call. If it’s annoying for you, deactivate this feature from iOS or macOS AirPods Settings > Connect to This iPhone/iPad/Mac and select When Last Connected to This Device instead of Automatically.
15. Select either the left or right microphone
At one time, the microphone of any one AirPod (left or right) is used when you are on a call. But if you always use just one pod (like the right one) and keep your other ear free, you can go to AirPods Settings > Microphone and set it to always use the right AirPod.
16. Find your misplaced AirPods
If you lose your AirPods Pro around your house, you can use Precision Finding in Find My app on iPhone 11 or later to locate it. However, if it was stolen or left behind somewhere, you can use the Find My app to see its location.
17. Change the AirPods stem press speed
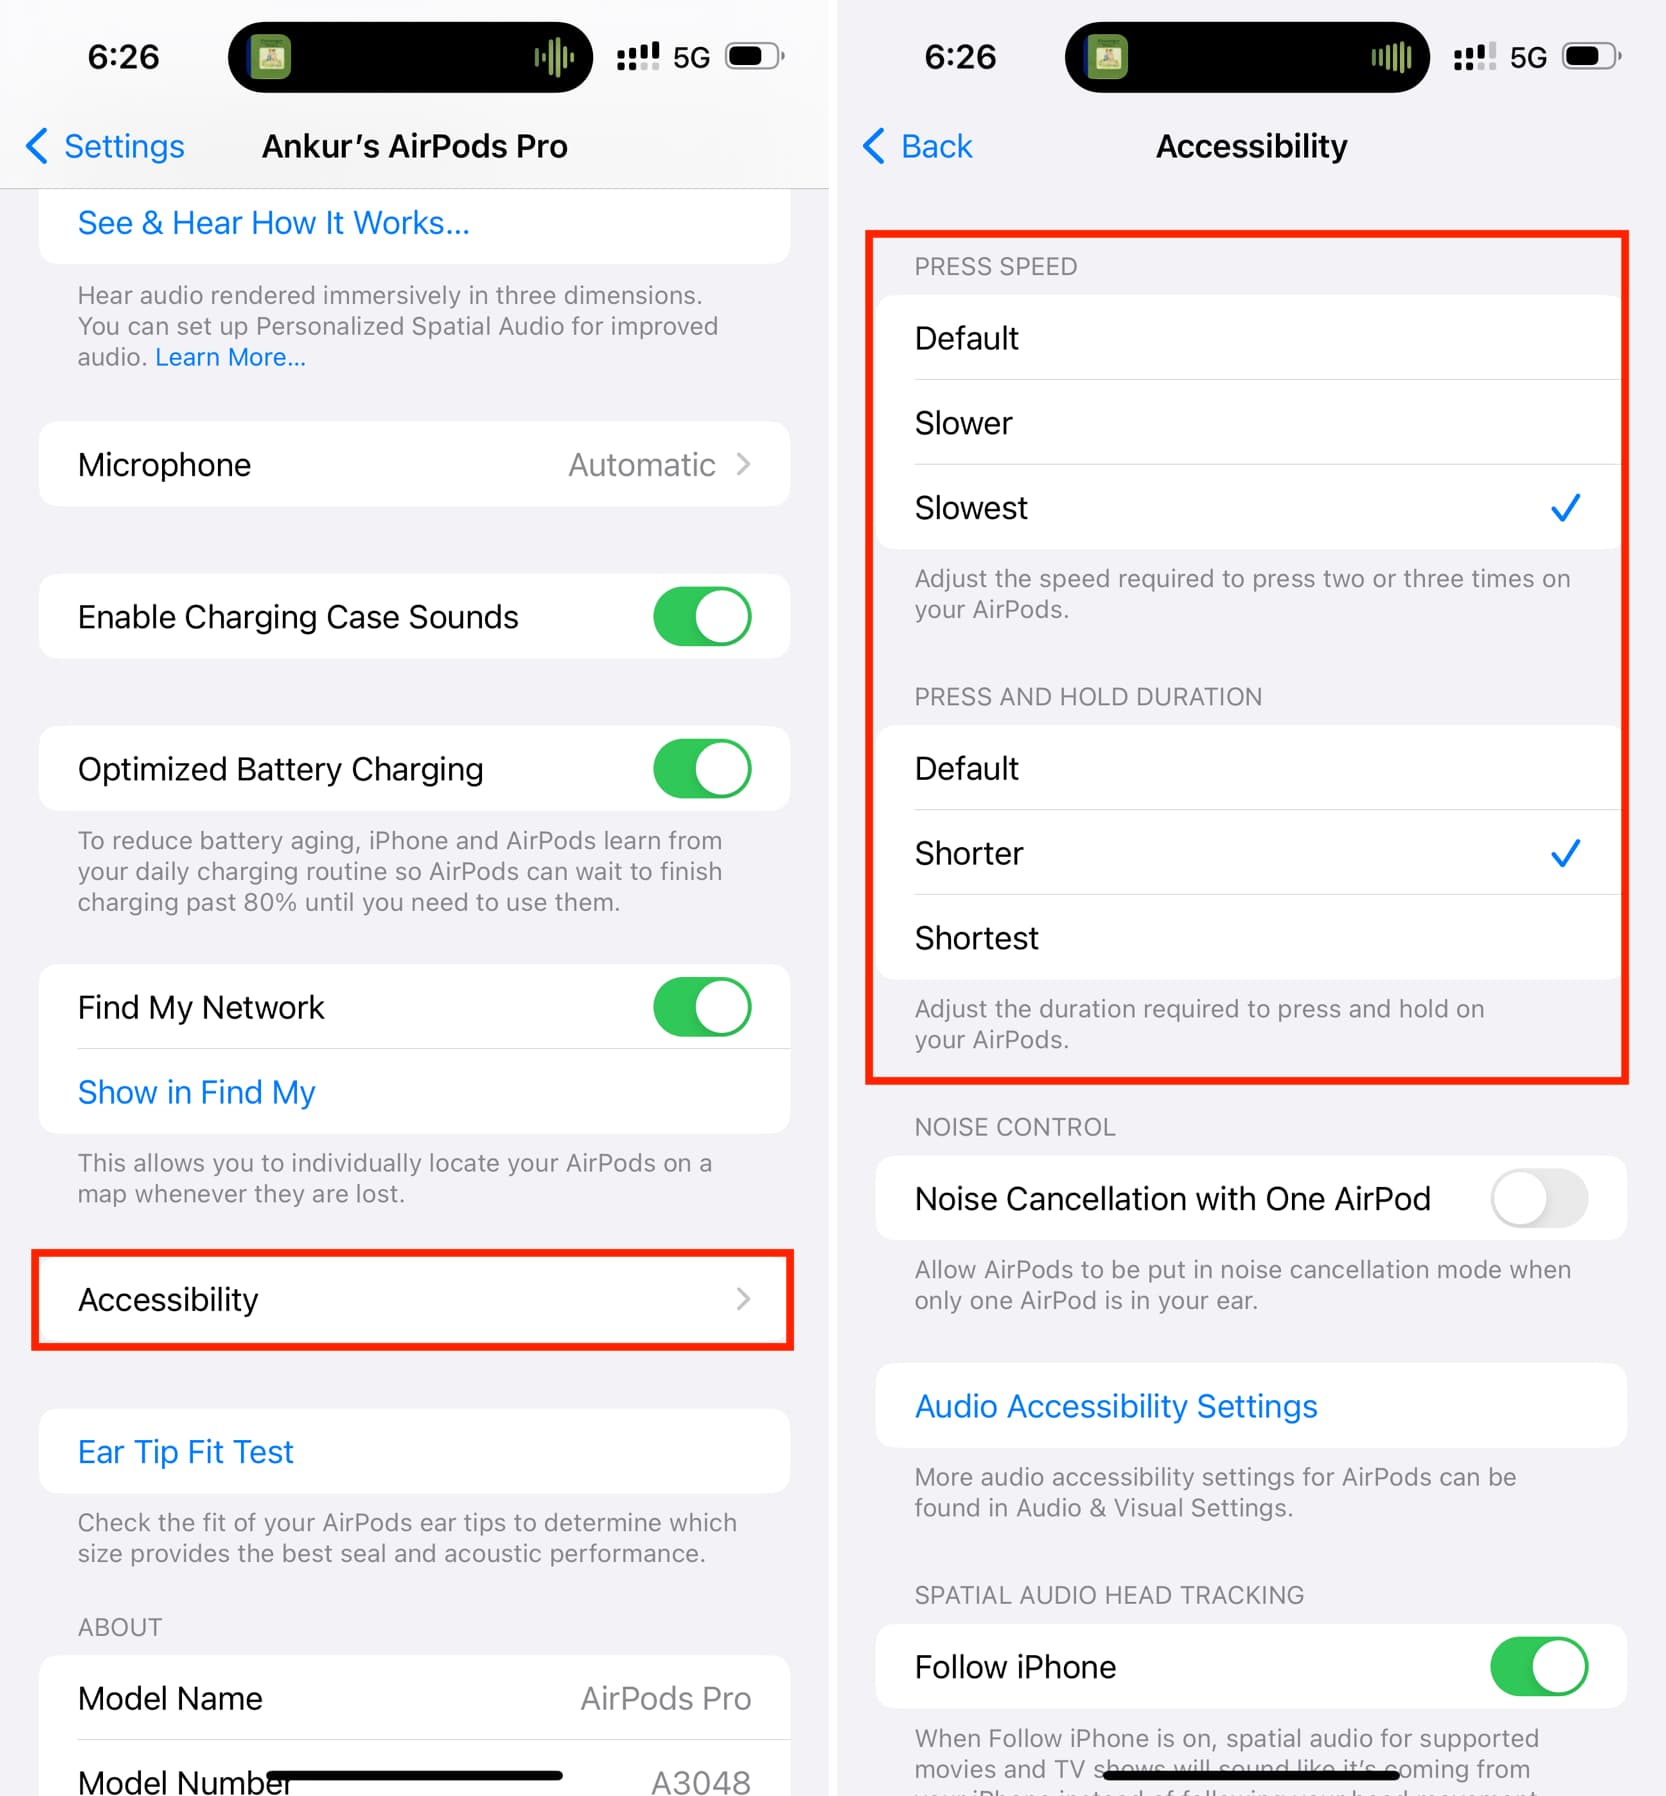
If you have fat fingers and are unable to double or triple-press the tiny AirPods Pro stem quickly, go to AirPods Settings > Accessibility and pick Slower or Slowest under the Press Speed heading.
18. Adjust the press and hold duration
Like the stem press speed, you can make your AirPods trigger the configured action quickly by choosing Shorter or Shortest as the Press and Hold Duration.
19. See AirPods case battery level at all times
Unlike older AirPods, you don’t need to put one AirPod in the Charging Case for its battery percentage to show up in the Batteries widget on your iPhone.
20. Charge it with MagSafe, wireless charger, or your iPhone 15
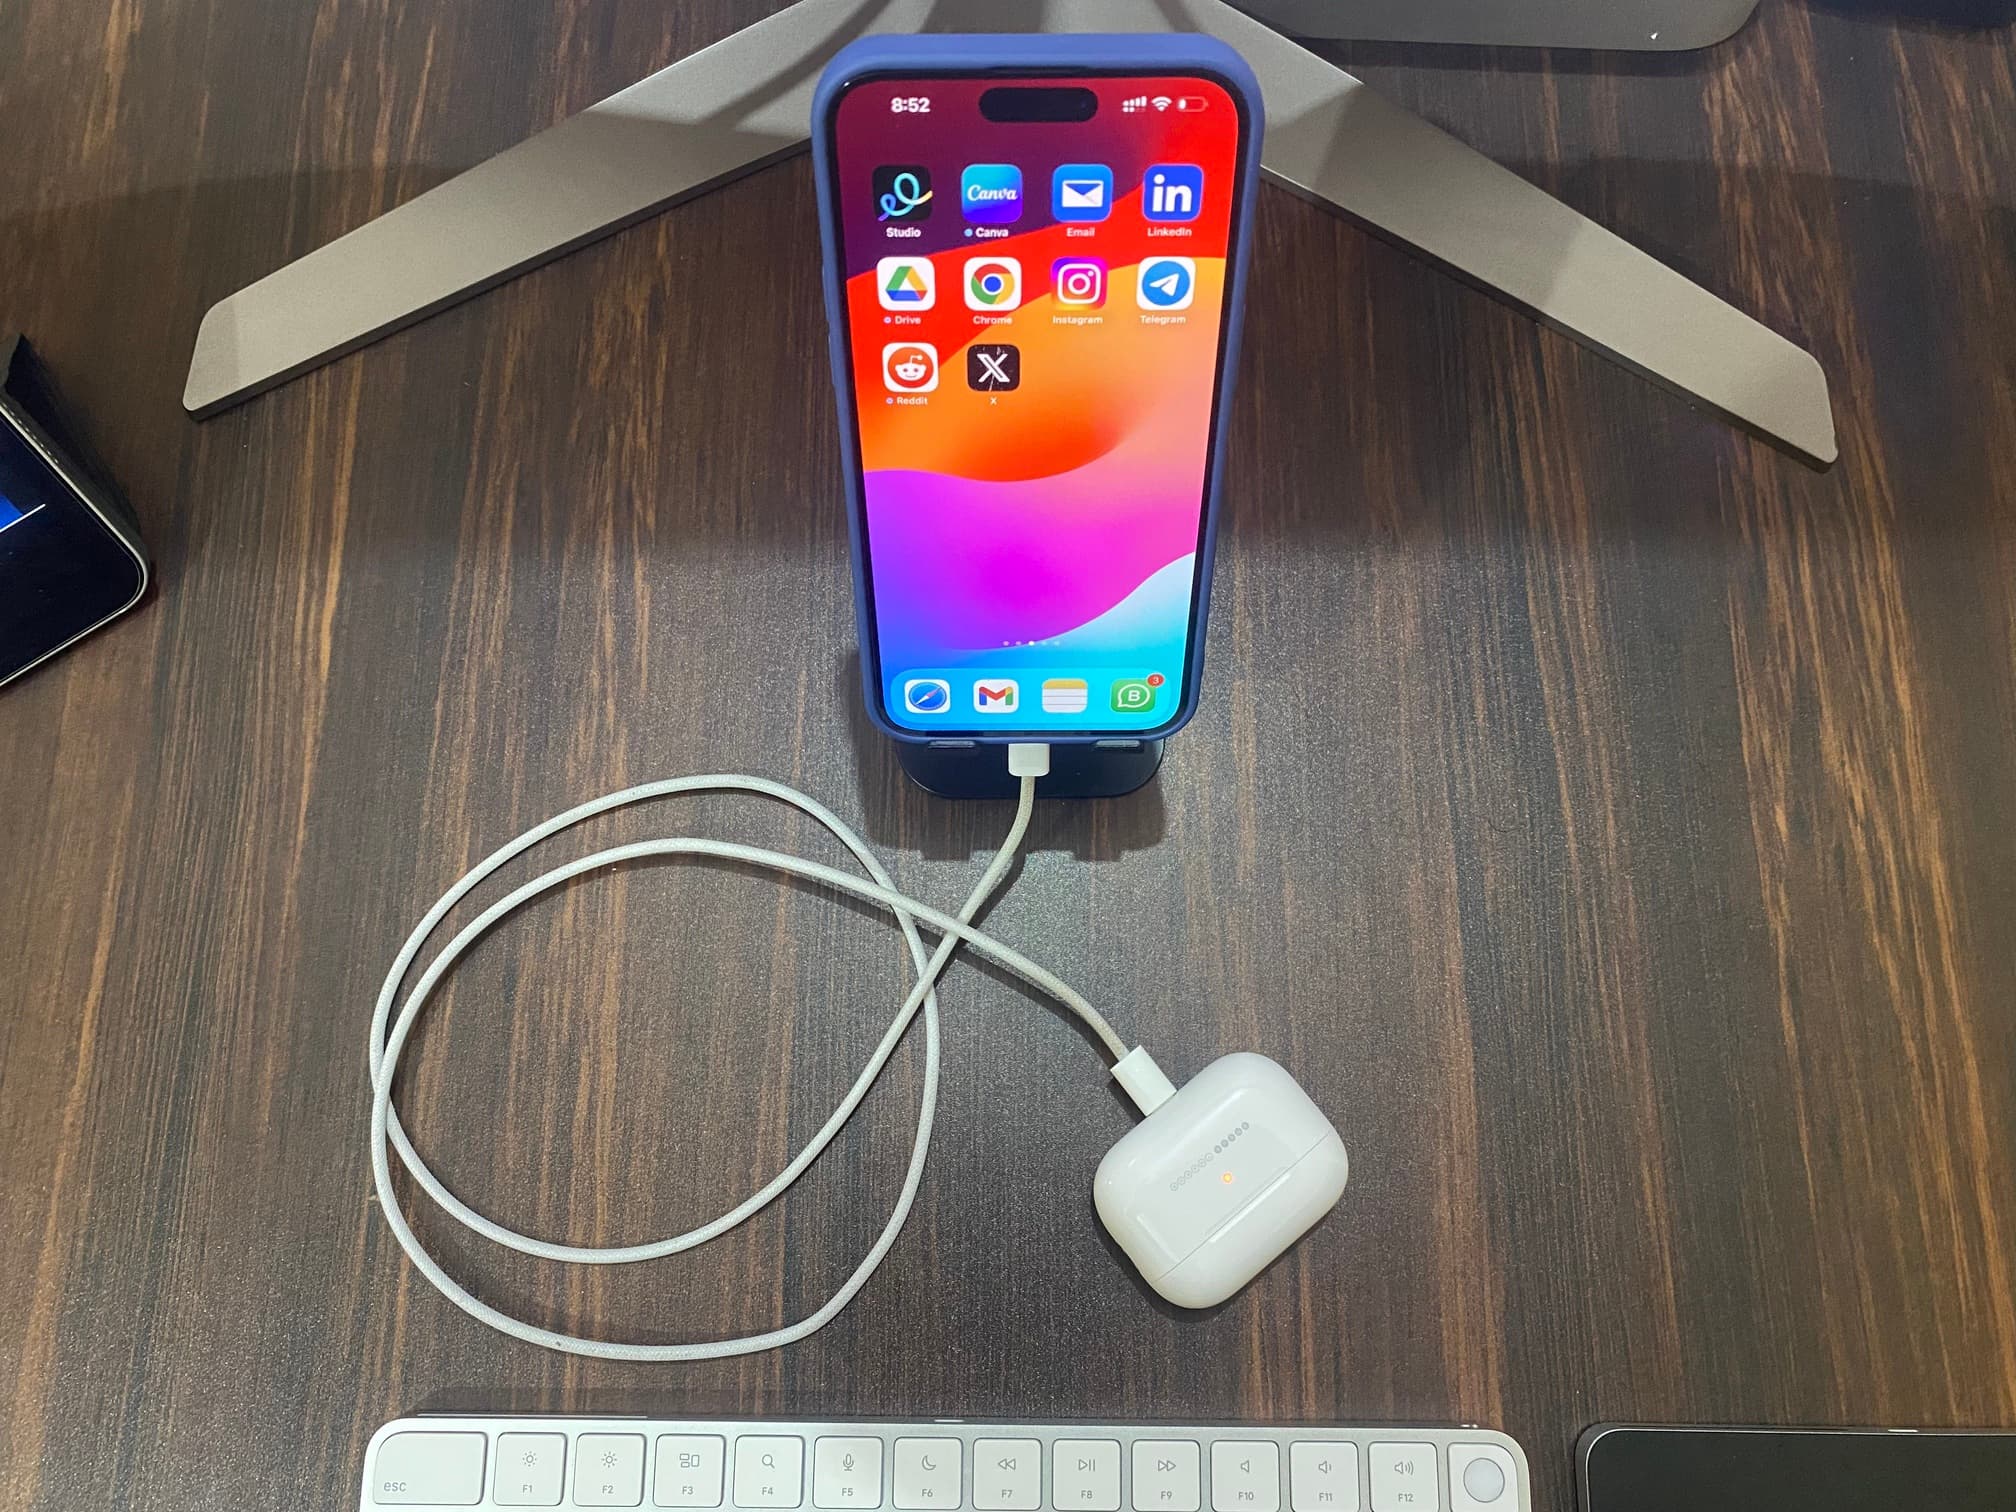
In addition to regular wired charging, you can place the AirPods on Apple’s MagSafe charger or other third-party MagSafe and wireless chargers. Secondly, in times of need, when you don’t have a power outlet nearby, your iPhone 15 can charge your AirPods using a cable.
21. Optimized Battery Charging
This feature reduces battery aging and is enabled by default. We recommend keeping it on.
22. Get alerted to protect your ears
AirPods Pro’s design and silicon tips seal off the outside sound and can get very loud, so much so that prolonged use on full blast can hurt your hearing capabilities. Learn how to set lower headphone volume limit to take care of your ears.
23. Set iPhone to speak caller’s name in AirPods
When you get a call on your iPhone, it can announce the caller’s name in your AirPods or other connected Bluetooth headset. To activate this feature, go to iPhone Settings > Phone > Announce Calls and select Headphones Only.
24. Conversation Boost
Conversation Boost is designed for people with hearing problems, but anyone can use it to focus on the voice of the person talking in front of you, making it easier to hear what they are saying.
25. Rename your AirPods
You can easily change the name of your AirPods and call it something else.
26. See warranty left on your AirPods
Wondering how much coverage is still available for your AirPods? Here’s how to check the remaining warranty period of AirPods, iPhone, and all other Apple devices.
27. Do an Ear Tips fit test
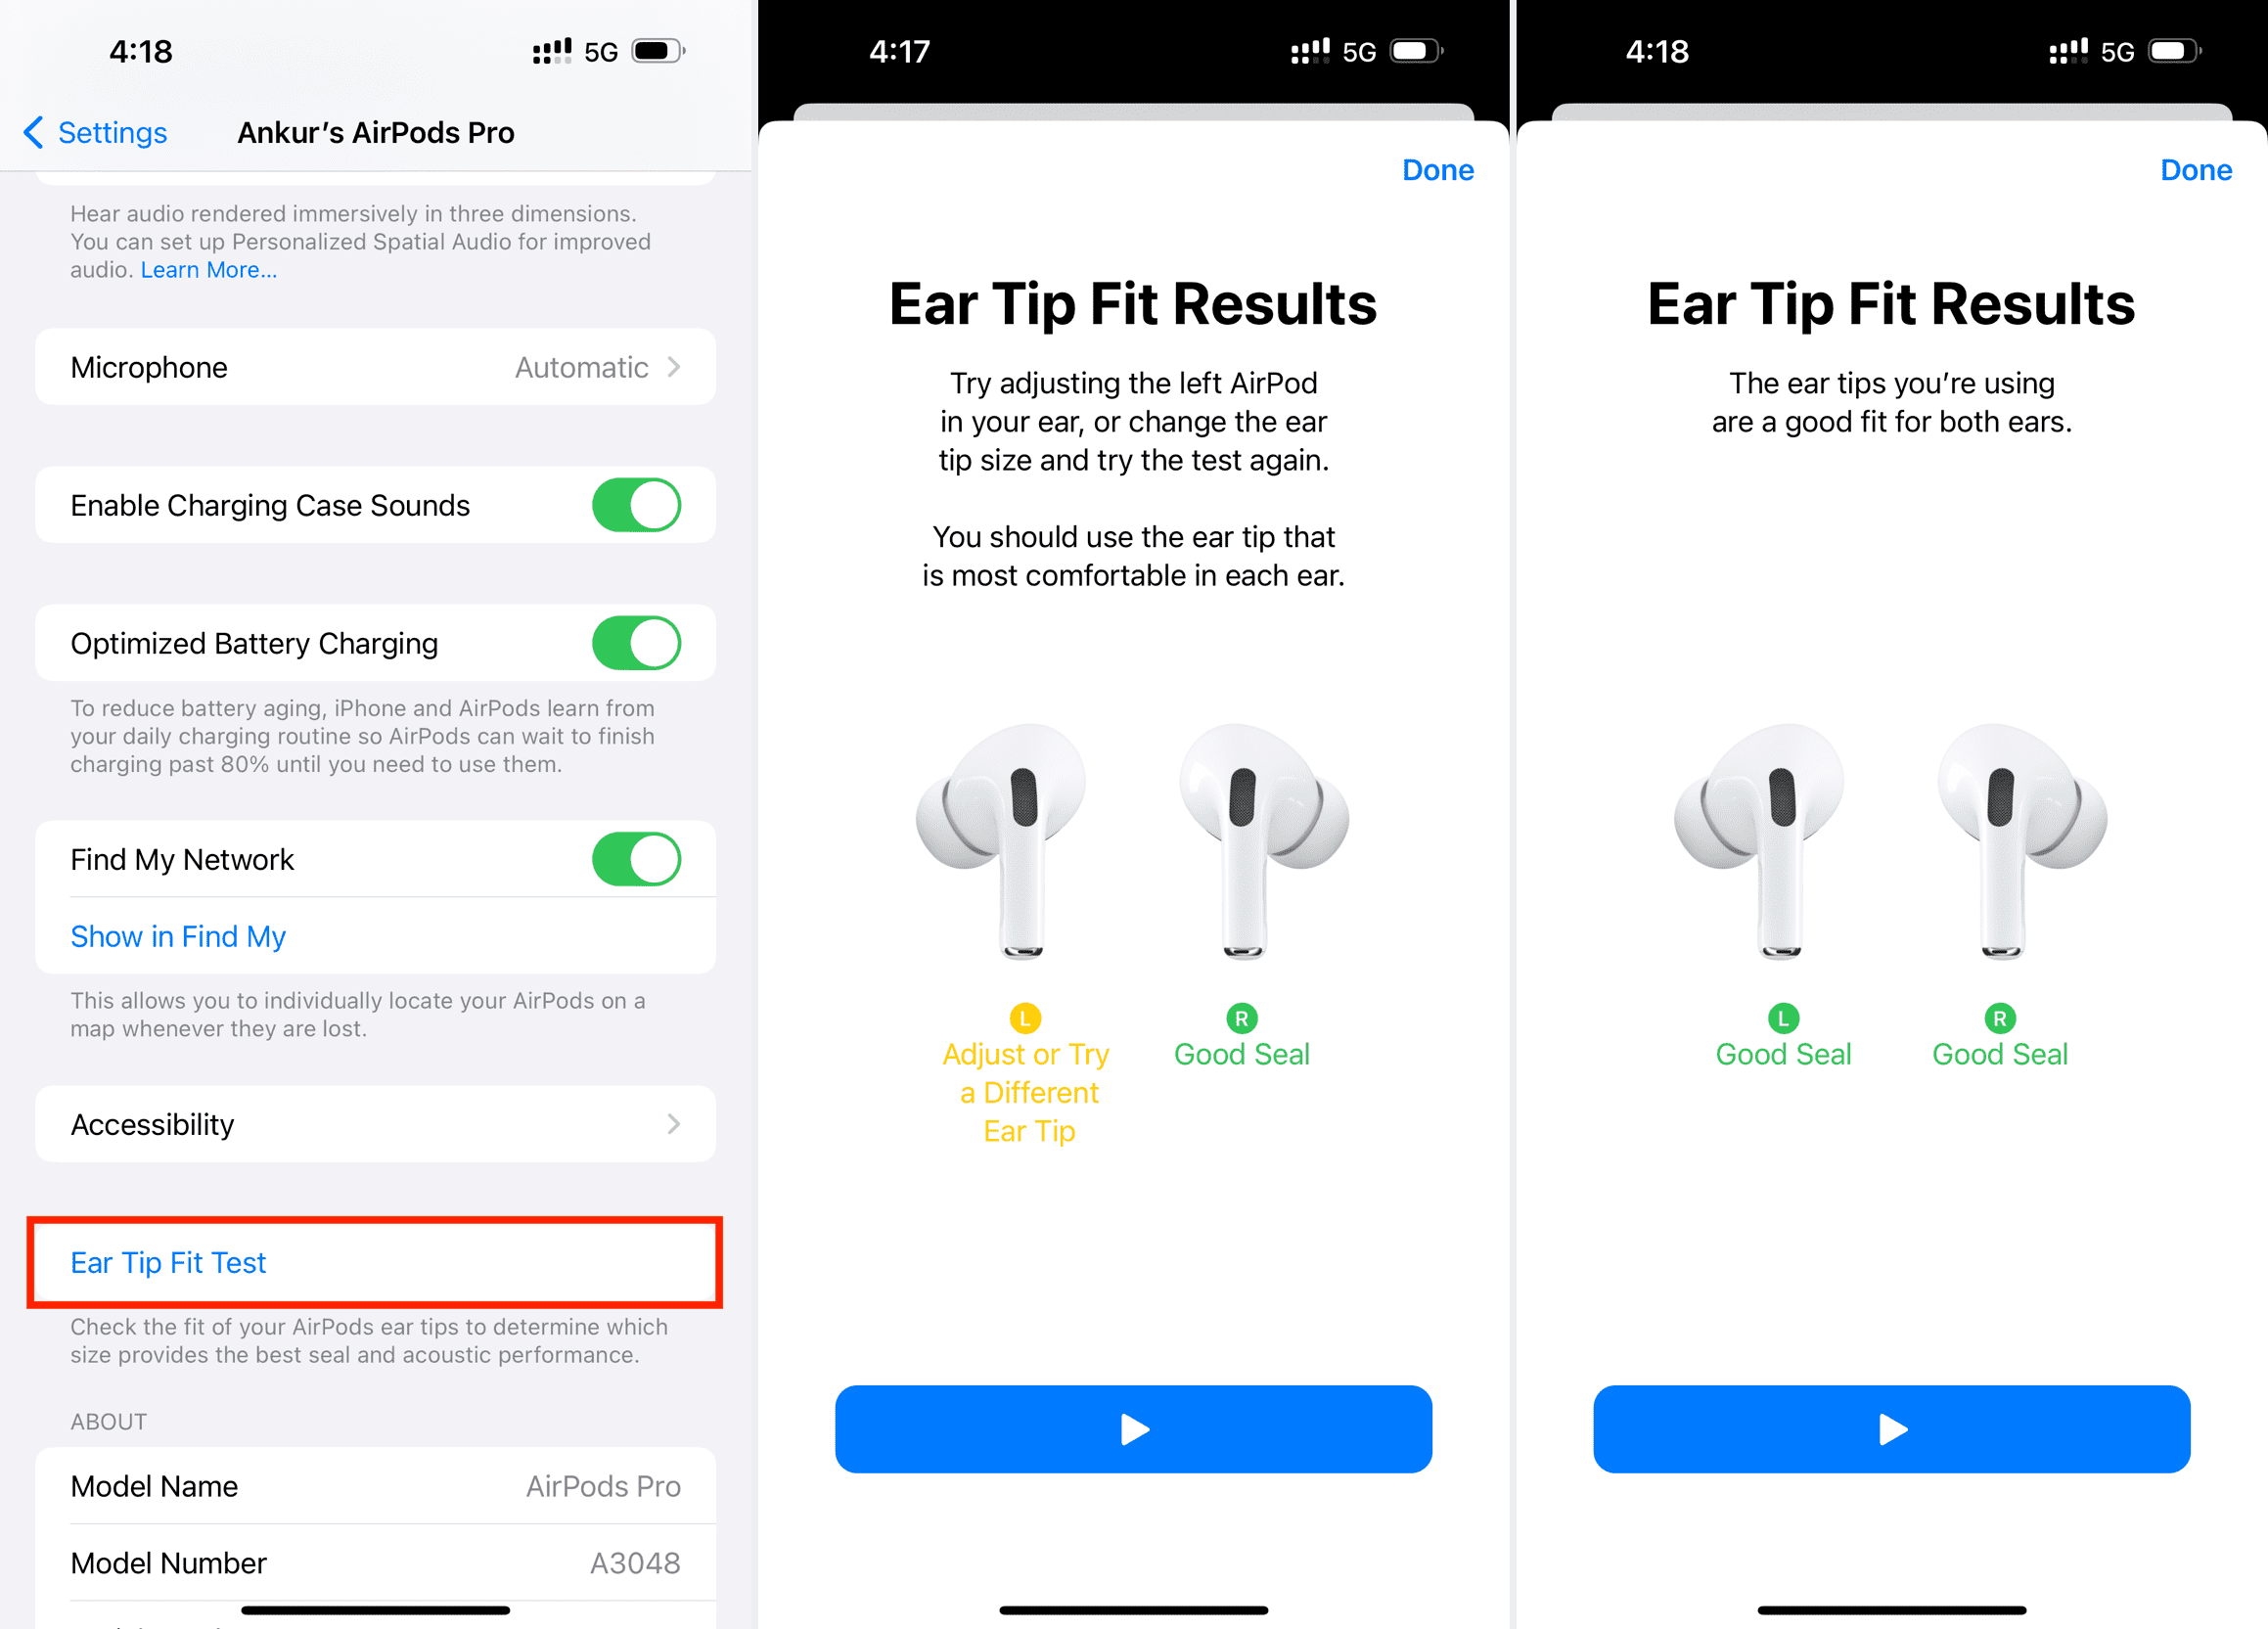
If Noise Cancellation doesn’t work well with AirPods Pro or you don’t get rich bass sound, it may be because of improper AirPods tip fitting. Go to AirPods Settings and perform an ear test to see if there is a problem.
28. Use silicon tips of other sizes
AirPods Pro comes with the medium-sized silicon ear tip already attached. In addition to that, you also get extra tips in the box:
- With AirPods Pro 1st generation, you get small (S) and large (L) tips.
- With AirPods Pro 2nd generation, you get extra small (XS), small (S), and large (L) tips.
If the Ear Tips Test suggests changing the ear tips, try a bigger size for a good seal. On the other hand, even if the test passes, but you feel uncomfortable, use a smaller tip, and it may reduce the ear pain. Here’s how to remove and attach AirPods Pro tips.
29. Learn what to do about AirPods allergy
AirPods allergy is a thing, and if you feel itching or other sensations in your ears, we have a detailed article to help.
Bonus tip: Pair it with Android or other non-Apple devices
While most AirPods features work when it’s connected to an iPhone or Mac, you can also use them as regular Bluetooth earphones and pair them with your Android phone, Smart TV, Nintendo Switch, etc. Just open the case and press & hold the button at the back to put the AirPods in pairing mode.
Lastly, if you love using your AirPods Pro and want to buy a pair for your parents, siblings, or close friend, here are the best offers available on all AirPods models.