You love your family—you really do—but trying to capture a good group photo for your annual greeting card can be enough to squelch anyone’s holiday spirit. Is everyone looking at the camera? Are they all smiling? Are their eyes open? Is the camera even focused? Before you ditch the whole endeavor, learn how to get a good shot then improve on it with Adobe Photoshop Elements 6 ($90; ). The program’s new Photomerge Group Shot feature lets you quickly merge the best parts of multiple photos to work around these common issues.
Set Up the Shot
Elements can do a lot to improve a bad photo. However, you’ll cut down on post-production time by getting as good a photo as possible at the outset. You may have little control over certain aspects, such as the weather or the attention span of your subjects (especially if you’re wrangling kids into the picture), but a little bit of forethought goes a long way.
Consider Your Light Source First, find a location with good light. If you’re outdoors, avoid shooting in the middle of the day when the sun creates dark shadows or causes people to squint. One way to work around bright outdoor light is to shoot in the shade where the light is less harsh. If you’re indoors, position the group near windows that let in plenty of natural light. You might even consider adding an inexpensive thin white curtain on a spring-loaded curtain rod to diffuse the incoming light.
Part of the goal is to avoid relying on the flash built into your camera, which often throws harsh light and gives photos a slapdash, snapshot look. If you have an advanced camera, a much better choice is to use an external flash that attaches to your camera’s hot shoe. When indoors, for example, aiming an external flash upward, to bounce light off the ceiling, creates far more pleasing light. (Check out Strobist.com for more information about shooting with an off-camera flash.) If the built-in flash is your only option, see if your camera lets you reduce its flash output.
Check for Distractions When setting up the shot, be mindful of the background and anything else that may disrupt the composition. Plants and tree branches are easy to overlook at the time, but become all too clear when it appears that vegetation is growing out of someone’s ear.
Choose the Right Settings Now, turn to the camera itself. Check that the ISO and white balance settings are correct. All too often these are left unchanged from a previous shoot. Then turn on your camera’s burst mode—which lets you shoot several frames in quick succession—to capture as much material as possible. People, especially kids, rarely stand still: they fidget, sway, blink, and nod, and you never know which frame will be the best one.
If your camera has a telephoto lens, take advantage of it by placing the camera far away from the group and zooming in. This technique makes the subjects stand out by blurring the background. I also highly recommend using a tripod. Because you’ll be merging multiple images later, you’ll want to make sure the camera doesn’t move between takes. The tripod will also ensure that your photos are sharp and make it easier for you to set your camera’s timer so you can jump into the photo yourself.
Merge Photos in Elements
If you have a lot of people in your group, it’s unlikely that you’ll find one image where everyone is looking his or her best. To compensate, Adobe has included some image-processing magic called Photomerge Group Shot into Photoshop Elements 6. The feature lets you cherry-pick the best parts from several similar photos to create one perfect photo.
Get Set Up To get started, open two or more pictures from your shoot in Photoshop Elements. Each image will appear in the Project Bin at the bottom (if you don’t see it, select Window: Project Bin). Now shift-click on each image in the Project Bin you want to use, and then select File: New: Photomerge Group Shot.
Elements will take a moment to align each of the images. When it’s done, you’re presented with the Group Shot workarea. The first thing you’ll need to do is select a base image. This should be the photo that is closest to what you want, because it’ll serve as the foundation for your final photo. Drag your base image from the Project Bin to the right pane to set it as the Final image.
Pick and Choose Next, click on a photo that contains an area you want to merge into the base image. That image will appear at the left as the Source. Using the Pencil tool, draw over the area of the source that you want to copy—don’t worry about being precise at first; Elements will calculate which pixels to use and transfer those to the base image. If you have three or more images, repeat this process with each image, penciling in areas you want to merge. Each source image is assigned a separate color to avoid confusion.
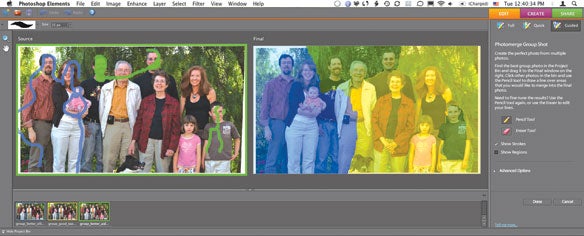
Move back and forth between your images until you’re happy with the results in the base image. Unfortunately, making selections isn’t an exact science: adding a small pencil-mark can cause Elements to co-opt a large swath of pixels if it thinks that will provide better results. If you’re having trouble, experiment with using smaller and larger pencil sizes. For example, if you made a quick scribble on someone’s face, filling in the entire head area may yield a better selection. You can also use the eraser tool to remove your pencil marks to further refine the area. If the merged areas seem wildly off the mark, use the Alignment Tool under Advanced options to pinpoint identical areas of each photo.
If you’re having trouble merging several photos, consider working in pairs: merge the areas of two images, then, using the new file as the base, merge another image. If the Group Shot feature keeps selecting larger areas than you want, you may have better luck with the Photomerge Face tool.
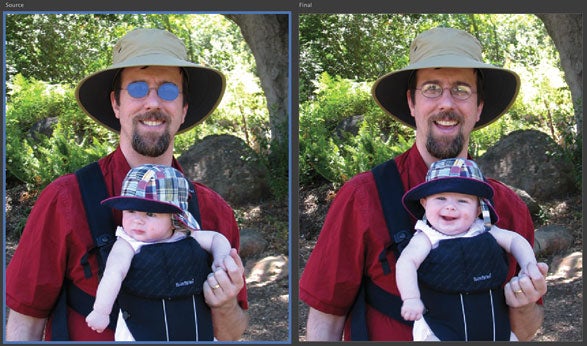
Tip: Focus on the Face If all you need to do is fix someone’s closed eyes or if you want to merge a small area of the image, try the Photomerge Faces tool. With two images selected, choose New: Photomerge Faces from the File menu. Use the Alignment tool to specify identical features in each image (such as both eyes and the tip of the nose), then draw on the source image with the Pencil tool. Click Done when you’re through.
Wrapping Up When you’re finished, click on the Pixel Blending check box under Advanced Options. This softens the areas where different regions join. Then click on Done to see the final image.
Elements places your merged image on a new layer in a new untitled document. The bottom layer contains the base image you selected. (To see the Layers palette, click on the Full button under the Edit tab.) If you find that you need to do touchup work—for example, fixing some overlap in the background where Elements didn’t get a perfect merge—you can use these two layers to fix the problem. In the Full editing mode, use the Eraser tool to eliminate the incorrect pixels from the top layer (exposing the source image below).
Final Touchups
Now that you have your merged photo, you can apply last-minute touchups and prepare for printing. Perform any minor corrections and sharpen the image if needed (choose Adjust Sharpness from the Enhance menu). Depending on the size of the greeting card, you’ll probably need to crop the image so the edges aren’t cut off by the printing service. Choose Crop from the Image menu, and then select a preset size from the Aspect Ratio pop-up menu in the options bar at the top of the screen. Lastly, save the image as a Photoshop (.psd) file. This retains all of your edits so you can go back and make changes later if needed. Then choose File: Save As and save a separate JPEG version (set the Quality slider all the way to the right to compress the image as little as possible). This is the version you’ll send to the printer.
Now, with your annual family photo in good shape and everyone smiling, you can turn your attention to the other holiday planning on your list.
Jeff Carlson is managing editor of TidBits and author of The Adobe Photoshop Express Beta Pocket Guide (Peachpit Press; 2008).