Last week we joined together to begin exploring Mountain Lion’s System Preferences. This is a journey that will absorb our interest for several weeks to come. But it’s also one that requires us to venture out of System Preferences in order to illustrate what a particular feature does and why you might find it useful. Today’s discussion of Mission Control is exactly that kind of lesson.
One upon a time…
…there were features called Exposé (introduced with Mac OS X 10.3) and Spaces (included with Mac OS X 10.5). They were created to help you unclutter your desktop. While useful for anyone who used a Mac, these features particularly benefited those sitting in front of a small-screen laptop, where desktop real estate is limited.
Exposé was designed so that you could temporarily clear away the junk on your Mac’s desktop and focus on a particular interface element. Specifically, you could reduce all open windows to tiny representations of those windows, move your pointer to the one you wanted to activate, and click on it to bring it to the fore in its full size. Or you could view just a particular application’s open windows in their diminished size and select the one you wanted to work with. Or you could choose to temporarily banish all open windows from the screen in order to interact with a file on the desktop.
Spaces was a feature that allowed you to create multiple virtual desktops that acted as individual workspaces. The idea was that you’d organize each workspace by the kind of work you were doing. So, you’d put the applications you needed for organizing your life in one place (Mail, Address Book and iCal, for example). In another space, you’d open iPhoto and Photoshop Elements to work with your images. And in yet another, you’d open a word processor or spreadsheet application to get “serious” work done. To switch tasks, you’d simply move to a different workspace.
With Mac OS X Lion, Apple combined these two features into one and named it Mission Control. Longtime Mac users may grumpily hint that not every feature found in Exposé and Spaces made it into Mission Control. And they’re right. But for our purposes, that’s water under the bridge. My job is to explain how these Mission Control features now work.
Exposing Exposé
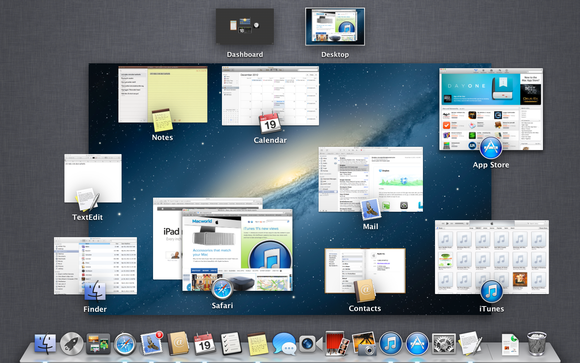
The easiest way to get a grip on Mission Control’s Exposé-like features is to click the Mission Control icon in the Dock, or to press either the F3 key (or Control and the up arrow key) on your Mac’s keyboard. Suddenly, you’re viewing your Mac’s desktop in a smaller view, with two even smaller windows above—one titled Dashboard and the other, Desktop. (If you have a Mac with a trackpad, you can get to this same view by swiping up on the trackpad with three fingers.) To leave this view, just click the larger of the three windows (or swipe down with three fingers on a trackpad).
What you see once you do this depends on the applications and windows you have open. If you have no applications open—as would be the case if you’ve just started your Mac—you’ll see nothing in the larger window but the Finder’s desktop pattern and then the Dashboard and Desktop windows above. Open a single application and then open a window within that application, and you’ll see that window along with an icon representing the application. Open another application (and a window within that application) and you’ll spy each application’s windows and accompanying icons. If you have multiple windows open in a single application, those windows will, by default, be grouped together in a kind of stack.
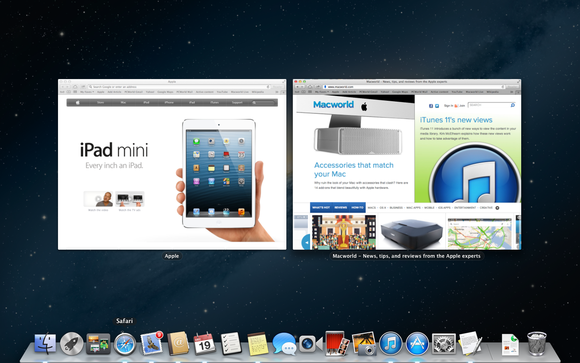
For example, open Safari and Calendar and engage Mission Control, and Safari’s windows will appear in one area and Calendar’s windows in another. To navigate to one of the open windows, just move your pointer over it and click. Mission Control will disappear, and the window you selected will become active. Other than this being a cool effect, it provides an easy way to navigate to exactly the window you wish to work with. This is akin to Exposé’s All Windows view.
And what about those other Exposé options? Leave Mission Control and move to an application where you have a few windows open—TextEdit, for example. Press Control-Down Arrow, and you’ll view each open window within that application as a smaller window. Any visible windows from other applications will be hidden. To make a particular window active, just click on it. This is the Application view.
And to clear the screen so you can see the desktop free of clutter? Press F11. (On a Mac with an fn (function) key, press the fn key along with F11.)
Making Spaces
But, as I mentioned, Mission Control is about more than Exposé. Let’s now look at the Spaces features.
Once again, engage Mission Control. The two small windows—Dashboard and Desktop—represent workspaces (also called spaces or environments). Click on Dashboard and you’ll see the Dashboard space. To move back to the Desktop space, click the right-pointing arrow on the bottom left of the Dashboard space, swipe three fingers to the right on a trackpad, or press Control-Right Arrow on your Mac’s keyboard. (Or invoke Mission Control again and click on the Desktop space.)
That’s Mission Control’s Spaces feature at its most basic. Now let’s go beyond the basics. In the Desktop space, open a new Finder window by pressing Command-N.
Engage Mission Control and move your pointer to the top-right corner of your Mac’s display. When you do this, a box appears that includes a plus (+) button. (Alternatively, you can hold down the Option key while in Mission Control to make the box appear.) Clicking on this box creates a new space. It will be called Desktop 2. Click on that space to make it active. Notice that the new window you created is absent. That’s because you’re now in a new space, free of the windows that remain in the original Desktop space.
Using one of the techniques I just described, move back to the original Desktop space (use Control-Left Arrow or swipe three fingers to the left rather than to the right). There’s the Desktop space along with its open Finder window.
Now move back to the Desktop 2 space and open two Finder windows. Invoke Mission Control, hover your pointer over the Desktop 2 space, and click the small X that appears in the top-left corner of the small window. The Desktop 2 space disappears. Click on the Desktop space and notice that the Finder windows you created in Desktop 2 now appear in the original Desktop space. Why? Because OS X would be very sad if, when you closed a space, you lost the work in it. Instead, that work will shift to the original Desktop space.
Here’s another trick: Launch Calendar and, in the top-right corner of the Calendar window, click on the icon that looks like two diagonally pointing arrows. This enlarges the window to full-screen view. Within this view, the window takes up the entire screen and hides the menu bar. If you want to see the menu bar, just drag your pointer to the top of the screen and it will appear.
Invoke Mission Control and you’ll discover that Calendar is now its own space. And it is because any time you push an application into full-screen view, it becomes a space. If you change it back to window view by clicking on the two-arrow icon, the space disappears.
One more trick: You can move windows between spaces. To do that, just click and hold on a window’s title bar (the top, gray portion of the window) and drag it so that it goes off to the left or right side of the screen (dragging to the right works only if you have a space open there). Wait a second, and the space to that side appears. Just finish dragging the window into it.
Good gosh, y’all, what is it good for?
You understand that you can create and delete spaces. Now to the big picture: So what?
The real power of Mission Control is the ability to attach applications to specific spaces. Like so:

Assuming we’re back to square one and you have just the Dashboard and Desktop spaces, create another space. Then click on this space to enter it. To help us identify it, press the Control key, click the desktop, and choose Change Desktop Background in the resulting contextual menu. In System Preferences’ Desktop & Screen Saver preference, choose a different desktop pattern and close System Preferences. If you now invoke Mission Control, you’ll see that Desktop 1 and Desktop 2 have different patterns, making it easier for you to identify the various spaces you’ve created.
Return to the Desktop 2 space. Click and hold on the Dock’s Mail icon, choose Options from the menu that appears, and from the Options submenu choose Assign To This Desktop. Do the same thing with the Calendar and Contacts applications.
Move back to Desktop 1 and click on Calendar in the Dock. Marvel in amazement when you’re moved swiftly to the Desktop 2 environment. Go back to Desktop 1 and click on Contacts. Again, you’re transported to Desktop 2. And you are because you’ve assigned these applications to appear only in Desktop 2. Regardless of which space you’re currently working with, when you launch or switch to an application assigned to a specific space, you’ll move to that space.

Again, so what? As I said when we embarked on this adventure, this means that you can create spaces devoted to tasks rather than applications. In this case, we’ve created one space where you organize your electronic correspondence, contacts, and calendars, without the clutter of other tasks and applications getting in the way. If you then want to work on a company project, you can switch to Desktop 3 where you’ve assigned Pages and Numbers for your word processing and spreadsheet chores.
About Mission Control’s preferences
But this is about Mission Control’s preferences, right? Let’s take a look.
Launch System Preferences and select Mission Control from the top row of preferences. In the top portion of the window, you’ll see these options:
Show Dashboard as a space: If you don’t care to have Dashboard displayed as a space, you don’t have to. Just disable this option, and you’ll invoke Dashboard by pressing F12 (or fn-F12) or by launching the Dashboard application, which is found in the Applications folder at the root level of your hard drive. (We’ll discuss all that is Dashboard another time.)
Automatically arrange spaces based on most recent use: Suppose you’ve created six different spaces. It’s a little inconvenient to swipe through five of them to get to the one you used most recently. With this option on, you needn’t. When you use a space with this option on, its position changes so that it moves after Desktop 1. This makes it easier to move between spaces with just a single swipe.
This behavior can be confusing, however. Let’s say you’ve assigned Mail to Desktop 2, iTunes to Desktop 3, and Pages to Desktop 4. From Desktop 1 you launch Pages. When you do, you switch to Desktop 4. But if you then invoke Mission Control, you’ll find that not only has this space moved closer to Desktop 1, its name has also changed. Where it was once Desktop 4, it’s now Desktop 2. Apple could help clear up some confusion by allowing you to rename spaces. In the meantime, the easiest way to help identify the spaces you’re working with is to change the desktop pattern of each one.
When switching to an application, switch to a space with open windows for the application: Let’s say that you’re working with Mail in Desktop 2, and you have TextEdit open in Desktop 4. With this option on, when you switch to TextEdit by clicking its Dock icon or by pressing Command-Tab and selecting it, you move to Desktop 4. Turn this option off, however, and TextEdit becomes active but you don’t switch spaces; you remain in Desktop 2.
What’s the point? Turn it off and you can launch applications assigned to specific spaces without then switching to those spaces.
Group windows by application: When talking about Exposé, I said that an application that had multiple windows open would appear in a group or stack. Turn this option off, and that doesn’t happen. Instead, each window is completely visible, though windows from the same application are placed next to each other. This is a view that was also found in the original Exposé.
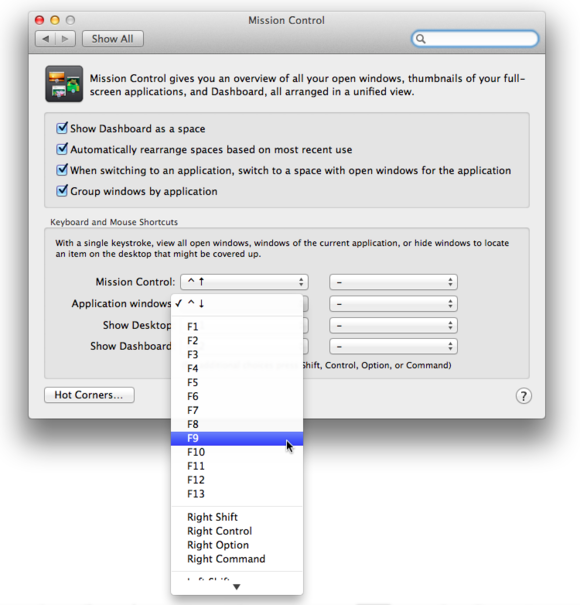
The section in the lower part of the preference window offers keyboard and mouse shortcuts for the Mission Control, Application Windows, Show Desktop, and Show Dashboard commands. If you don’t care for the default Control-Up Arrow, Control-Down Arrow, Show Desktop, and Show Dashboard shortcuts, respectively, you can choose from a list of other shortcuts by clicking the shortcut’s pop-up menu. If you have a multibutton mouse, you can assign one of those buttons to these commands using the pop-up menus to the right. You can additionally assign modifier keys such as Shift, Control, Option, and Command to these commands by holding down the modifier key you want to use and then choosing one of the shortcuts from the pop-up menu.
Finally, there’s the Hot Corners button. I mentioned Hot Corners last week, and it works the same way with Mission Control. Click this button and a sheet appears where you can assign functions to each of the desktop’s four corners. For instance, you can invoke Mission Control by dragging the pointer to the bottom-left corner.
And that’s the gist of Mission Control. It’s not an entirely necessary feature—I know many seasoned Mac users who never touch it. But it can be helpful for those who like to stay organized, as well as for people who find their small laptop displays cluttered with countless windows.
Next week: The Mac’s linguistic tricks