
Congratulations: You’ve unwrapped, purchased, or otherwise braved wait times to pick yourself up a brand-new iPad or iPad mini this holiday.
But before you get to playing with your new device, you’ll probably want to set it up. Thanks to iOS’s step-by-step activation process, Apple’s made it pretty simple to get started; but just in case you need some extra help, we’ve put together a comprehensive guide to your new iPad, activating it, transferring data from an older tablet or your computer, and some suggestions for exploring its new features.
Meet your iPad and iPad mini
Welcome to your iPad. Apple’s tablet packs in all sorts of magic depending on what model you’ve received: If you have an iPad with Retina display, you’re looking at a device with a 3.1 million pixel screen, dual-core A6X chip with quad-core graphics, a Lightning connector, LTE service, two cameras, and up to 64GB of storage; if you have an iPad mini, your device also has a Lightning connector, LTE service, cameras, and up to 64 GB of storage—but it runs a dual-core A5 chip.
Though the iPad mini is smaller and lighter than the iPad—weighing .7 pounds to the iPad’s 1.5—they both sport the same buttons and ports. We’ll walk you through these buttons, calling out differences where they appear.
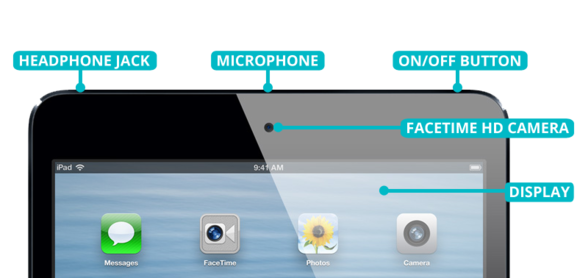
Headphone Jack
The iPad and iPad mini both have a standard 3.5mm audio jack on the top of their casing to let you listen to music. You can use several types of headphones with the iPad, including the Apple earbuds, or alternatively you can use Bluetooth headphones. If you plug in headphones that have a built-in microphone, the iPad senses the mic and allows you to use it with apps that have audio-recor¬ding capabilities. Otherwise the iPad uses its built-in microphone to record sound.
Microphone
The iPad and iPad mini’s internal microphone is on the top center edge of the device, right above the front-facing camera. You can use it to record audio in any app that supports audio recording. Unless you’re using an external microphone, you’ll use this mic for video chatting, recording voice memos, talking to Siri, and more.
On/Off Button
Press the On/Off button to turn the iPad’s screen on or off. You can still receive email and notifications with it turned off, but the screen stays blank until you wake it by pressing this button or the Home button. To turn the device off, hold the On/Off button down until the screen dims and the red “slide to power off” slider appears. Slide your finger across the switch, and the iPad mini powers down. (To turn your device back on, press and hold this button again until the Apple logo appears.)
You can also decline or silence alerts and alarms with the On/Off button; press it once to silence an incoming alert.
Front-Facing FaceTime HD Camera
This 1.2-megapixel camera can shoot 1280-by-960-pixel stills and 720p HD video (1280 by 720 pixels). Apple designed the front-facing camera primarily for using FaceTime and snapping quick self-portraits.
Touchscreen Display
The iPad and iPad mini don’t have a tactile keyboard or many hardware buttons; instead, you use its LED-backlit Multi-Touch glass display to read books, surf the Web, compose email messages, navigate apps, and change settings. The screen is made from optical-quality glass, which makes it highly scratch resistant. It also has an oil-resistant oleophobic coating that makes it easy to wipe off smudges.
The iPad’s screen is 9.7 inches with a resolution of 2048 by 1536 pixels—at 246 pixels per inch, Apple describes it as a Retina display, meaning that the pixels are too small to distinguish with the human eye. If you have an iPad mini, you’re looking at a 7.9-inch screen with a resolution of 1024 by 768 pixels (163 pixels per inch).
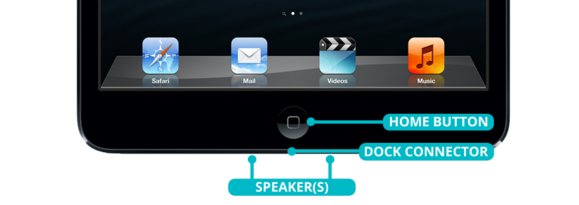
Home Button
The only physical button on the face of the iPad and iPad mini, the Home button provides a variety of shortcuts for accessing apps and operating system features.
SINGLE-PRESS A single-press of the Home button can have several results, depending on what you’re using the iPad mini for at the time: If the iPad is in sleep mode, pressing the Home button wakes it; if you’re in an app, it returns you to the home screen; if you’re on a subsequent home screen page, it returns you to the first page; and if you’re on the first home screen page, it brings you into the iPad’s Spotlight search mode.
SINGLE-PRESS AND HOLD Press and hold the Home button for at least two seconds to activate Siri.
DOUBLE-PRESS When the device is locked or in sleep mode, a double-press of the Home button wakes your device and brings up the Music controls. In active use, it brings up the multitasking bar, showcasing your active apps.
Speaker(s)
Speakers line the bottom edge of the iPad and iPad mini. The iPad has a single mono speaker to the right of the dock connector, while the iPad mini contains two small stereo speakers. They play anything that makes noise on your iPad, including music, video, or app sounds. You can also hook up the iPad mini to third-party speakers using the headphone jack, via Bluetooth, or via AirPlay, Apple’s wireless audio and video feature.
Dock Connector
The iPad and iPad mini use Apple’s new Lightning dock connector to connect to your computer and other accessories. The connector is reversible, so you can plug it into your device in either direction. Unfortunately, if you have older iOS device accessories that sport a 30-pin dock connector, your iPad won’t work with those times unless you get an adapter.
When plugged into its included power adapter, the iPad can charge while awake or asleep. Your device will also charge when plugged into newer Macs and PCs, though charging will take longer. Older computers without high-powered USB ports will only charge the iPad mini when it’s in sleep mode; when awake, it displays a “Not charging” message in the status bar at the top of the screen.
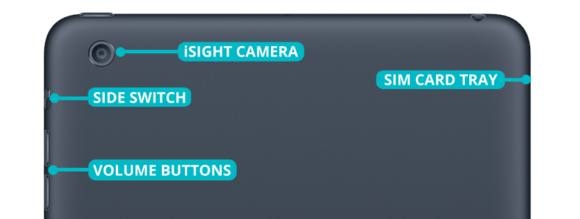
iSight Camera
The second of the iPad and iPad mini’s two cameras is located along the back of the device, in the upper left corner. This 5-megapixel camera features a five-element lens, backside illumination, a hybrid IR filter, and an f/2.4 aperture; it shoots 1080p HD video and 2592-by-1936-pixel stills. You can use this camera for quick moviemaking and showing your FaceTime companion a wider view of your surroundings. (While you can certainly also take stills, we suggest using a smaller device—like your mobile phone or a portable camera—for such matters.)
SIM Card Tray (iPad and iPad mini Wi-Fi + Cellular models only)
Apple offers the iPad and iPad mini in two different colors, white and black, as well as in two different models: Wi-Fi and Wi-Fi + Cellular. If you want to be able to connect to the Internet via cellular networks, you need to buy the latter. (You can tell them apart visually: The Wi-Fi + Cellular model has a black plastic stripe along the top back.)
The iPad and iPad mini’s Wi-Fi + Cellular model can operate on multiple cellular Internet bands: various bands of the LTE cellular data standard, HSPA+, DC-HSDPA, GPRS, EDGE, CDMA-EvDO, and HSPA. Major U.S. partners for the iPad and iPad mini include AT&T, Sprint, and Verizon. When purchasing a Wi-Fi + Cellular model, you must choose which provider you want, though you don’t have to sign up for a contract plan. The iPad comes contract free, allowing you to pay for service month to month.
The iPad needs a micro-SIM card (the iPad mini needs a nano-SIM) to connect to a cellular provider. Without it, you won’t be able to access cellular Internet, only Wi-Fi. This SIM card comes preinstalled, though if you go abroad you can also pick up a SIM from a supported cellular carrier.
If you need to install a SIM, or access your current SIM card, you can remove it by sticking one end of a paper clip into the hole next to the SIM card slot, visible on the left side of the device.
Side Switch
You can set the iPad and iPad mini’s Side Switch—located on the right side of the tablet near the top—to lock the screen orientation or to act as a mute switch, depending on your preference.
To set this, go to Settings > General, and then tap Lock Rotation or Mute in the “Use Side Switch to” section. If you choose Lock Rotation, toggle the screen-rotation switch on the side of the iPad to expose the orange dot, and your iPad stays in either landscape or portrait view, regardless of how you’re handling it. When the rotation lock is engaged, a small icon showing a lock with an arrow around it appears on the right side of the status bar near the battery icon. If you select Mute in the settings screen, the switch controls the iPad’s Silent mode, which mutes alert noises. Be advised that you can still hear the audio from music and videos from the device’s speaker when the iPad is in Silent mode.
Volume Up and Volume Down Buttons
Directly below the Side Switch is a rocker button for volume. Press the top of the rocker to increase volume and the bottom rocker to decrease volume. (In the Camera app, the top rocker also functions as a physical camera shutter button.) In the Settings app, you can choose whether these buttons affect only noises from an app, or whether they control systemwide sounds as well.
Transfer your data
Whether this is your first iPad or you’ve had tablets that came before, chances are you’re going to want to load it up with some data. Here are the various ways to do so, depending on whether you’re moving from an old iPad or your computer.
If you’re upgrading from an older iPad

You’re moving on up to the latest and greatest in the iOS world, and to do so, you’re leaving your old device behind. But before you send it off on its last voyage, you have to decide if you want to transfer its apps, data, and settings to your new iPad. If you do, you’ll need to make a backup (via iTunes or, if your old iPad is running iOS 5 or 6, via iCloud) of your information.
Make a backup using iTunes: If your old device is running iOS 4 or earlier, an iTunes backup is the way to go. To update your backup (or to create a new one) connect your old device to the computer you normally sync it with via USB, open iTunes, select the device from the Devices menu, and in the Summary field, click Back Up Now.
Make a backup using iCloud: If you’re running iOS 5 or 6 on your old iPad, and you’ve set up iCloud on it, you can also take advantage of iCloud Backups to save your data. Your device will automatically make an iCloud backup once a day while locked, plugged in, and connected to a Wi-Fi network, but you can manually force a backup whenever you’re on Wi-Fi by opening the Settings app on your iPad. Navigate to iCloud > Storage & Backup, and make sure the iCloud Backup switch is toggled on. From there, you just have to tap on Back Up Now to start the process. (You should note that iCloud backups can sometimes take significantly longer than iTunes backups, so it may not be the best option if you’re in a hurry to set up your new device.)
If this is your first iPad (or you’re upgrading from another tablet)

Whether this is your very first iPad or you’re moving from an Android, BlackBerry, or Windows tablet, it should be relatively painless to transfer information to your new device. Here are some suggestions for moving over mail, contacts, calendars, music, videos, and photos, as well as finding replacement apps for your currently used programs.
Mail, contacts, and calendars: If you’re using a Gmail account or other POP or IMAP-based account for mail, it’s already syncing to a central server, and you should be able to add that account to your new iPad with few issues. Apple’s iOS has automatic setup for those using Microsoft Exchange, Gmail, Yahoo, Aol, or Hotmail; you’ll also be able to manually set up a POP or IMAP account for mail, LDAP or CardDAV for contacts, or CalDAV for calendars. If you don’t have an email account but want to make one, you can also create an iCloud account from the Mail, Contacts, Calendars screen in the Settings app.
Music, videos, and photos: Your new iPad uses iTunes to sync any music, TV, and movies from the program to your device; photos can also be synced from iPhoto, Aperture, or a photos folder. To sync any music or video you have on your computer, add it to iTunes; to sync your photos, add them to iPhoto or Aperture (on a Mac) or place them in your Pictures folder (on a PC).
If you’ve purchased things from the iTunes Store before, you can redownload those for free after you set up your new iPad by going to the Purchased tab in the iTunes app.
If you’ve purchased content that hasn’t been copied to your computer (say, if you’re using Amazon Cloud Drive), you should be able to download it to your desktop system, or, at the very least, install an app on the iPad (like the Kindle app for book purchases) that lets you access the information.
Apps and miscellany: If you’re moving from another tablet with a different OS, you unfortunately can’t port any of those apps to your iPad. On the upside, you may be able to find parallel versions on Apple’s App Store (for instance, if you’re using Dropbox on your smartphone or Android tablet, you can download the company’s iOS app and continue to access your Dropbox data). If you have apps with valuable information you don’t want to lose (notes apps, to-do lists, and so on), you can poke around to see if there’s any way of exporting that information; otherwise, you’ll be out of luck.
Activate your iPad
If you purchased your iPad in the Apple Store, you may have already activated it with a Specialist by your side. But if you’ve received your new gadget as a gift, or you opted not to activate immediately, here’s a guide on how to do so.

Once you’ve unboxed your iPad, turn it on by pressing the On/Off switch. A welcome screen greets you, displaying a Slide To Set Up slider in a variety of different languages. (If you need quick access to your device’s IMEI or ICCID number without setting up the device, you can tap the information button [represented by a lowercase i] located directly above the slider.)
Users with visual impairment can also take advantage of iOS’s VoiceOver screen-reading system during the setup process by triple-clicking the Home button.
To begin the activation process, slide the switch to the right, where you’re asked to pick your language, country, and if you’d like to enable Location Services. This allows Apple apps (and third-party apps) to access your location via Wi-Fi networks and your Global Positioning System (GPS) location.
Your iPad will check for any Wi-Fi networks in the area that you can connect to; unfortunately, if it doesn’t find any, you’ll have to set up your iPad via iTunes and the computer.
Restoring old data to a new iPad

If you’re upgrading from an older iPad, you’ve hopefully made a backup of that information, either via iCloud or iTunes. Choose one of these options to copy that information to your new device.
Restore from iCloud backup: If you have an iCloud account and have backed up a previous iPad incarnation using iCloud’s Backup feature, you can use this backup to restore your device (though you’ll need to be on a Wi-Fi network to do so). To restore, sign in to your iCloud account, agree to Apple’s terms and conditions, and then choose which backup file you’d like to use and tap the blue Restore button in the top right corner of the screen. (Depending on the speed of your Wi-Fi connection, this process can take anywhere from a few minutes to a few hours.)
Restore from iTunes backup: If you tap Restore From iTunes Backup, you’re brought to the Connect To iTunes screen. Connect your iPad to your computer and open iTunes; after clicking on your device in the Source list, you see the Set Up Your iPad screen, which asks if you’d like to set it up as a new iPad or restore from a specific backup. Choose the correct backup, and then click the Continue button to proceed. This process is significantly faster than restoring from iCloud because you’re transferring data over USB, not over Wi-Fi.
Once you choose either option, your device will activate and begin the restore process.
Setting up as a brand-new iPad

Don’t have a backup of an older device, or don’t want to use one? It’s easy to start fresh. The first thing you need to decide is whether to supply an Apple ID (or create one, if you don’t have one). You use your Apple ID to buy music from iTunes, apps from the App Store, books from the iBookstore, and for iCloud.
What’s an Apple ID?: If you’ve ever purchased something from the iTunes Store, you’ll have signed up for an Apple ID—it’s usually your primary email address. Your login information for Apple’s MobileMe or iCloud service should also work when signing in.
Use your current Apple ID: Already have an Apple ID? Tap the Sign In With An Apple ID button and enter your username (usually your email address) and password. Apple will then spend a few moments linking your device to your Apple ID.
Sign up for a new Apple ID: If you don’t have an Apple ID, it’s easy enough to create one by tapping the Create A Free Apple ID button. You’ll need to enter your birthday, name, your email address (or create a new iCloud email address), a password, a security question (in case you forget your password), and whether you’d like to receive email updates from Apple.
No Apple ID for me: If you’d rather not set up an Apple ID, you can tap the Skip This Step link in the lower right corner. You can always add or create one from the Settings app later, but note that you won’t be able to buy anything on the iTunes Store or set up iCloud until you do.

If you’ve chosen to set up or register an Apple ID, you can also enable iCloud on your device. iCloud is an umbrella term for Apple’s collection of sync services, and allows you to sync your photos, apps, contacts, calendars, and mail across multiple devices. (You can read more about iCloud in our Getting Started with iCloud primer.)
Choose to set up iCloud, and you’ll first be asked whether you’d like to enable iCloud backups for your device. If you do so, you can have your iPad back up all essential settings to your iCloud account; if you ever need to restore, you can do so over Wi-Fi without an additional computer. You can also elect to have your iPad back up to your computer using iTunes. Additionally, you’ll be asked whether you’d like to opt in to iCloud’s Find My iPhone service. This will enable location monitoring for your iPad, allowing you to find it using your Apple ID and the Find My iPhone app from another iOS device, or by logging into your iCloud account online, should it go missing.
Finishing Touches
One of the iPad’s nice features is Apple’s personal voice assistant, Siri. If you want to take advantage of Siri, you can enable it here. Then, once you finish the setup process, you’re asked if you’d like to send Apple anonymous diagnostics and usage information (similar to a desktop crash report). After you answer that question, your iPad will be all set and ready for you to begin using.
Get started with your iPad or iPad mini
Those of you who have purchased an iOS device before know the drill, but for those first-timers, here are a few quick pointers for getting acquainted with your device.

Learn how to tap, drag, and multitask: If you’ve never used an iOS device before, check out our primer on Multi-Touch gestures and using the multitasking bar.
Tweak your settings: Most of the underlying system information for your new iPad—network settings, Mail, sounds, messages, restrictions, wallpaper, and more—is kept in the Settings app. As such, it’s a good place to start when you’re first getting acquainted with your device.
Get a data plan: If you purchased an iPad with a cellular connection and plan on using it to browse the internet, you need to sign up for a data plan. You can do so by launching the Settings app and tapping Cellular Data.
Set up iTunes sync: If you didn’t restore from an iOS backup, you won’t have any music, video, podcasts, photos, or books on your iPad. You can remedy that by connecting to your iTunes library: Just plug your device into your computer via its included USB cable. (Once you’ve completed this initial sync, you can also set up wireless local syncing; check out our guide for more information.)
Explore the App Store: Your iPad comes with a bunch of cool built-in apps, but you may want to reach to third-party programs for more interesting fare. The App Store, which you can access on your device or via iTunes on your computer, features more than 250,000 downloadable apps customized for your iPad, and more than 750,000 other apps meant to run on an iPhone but that can work on your iPad, too.
And don’t forget to download your free copy of iBooks, Apple’s ebook reader, either. You can do so by going to the App Store and searching for “iBooks.”
Talk to Siri: If you chose to set up Siri on your iPad during the activation process, you’re just one Home button press away from having your first conversation. Siri can help you book appointments, find restaurants, look up the weather, talk sports, and occasionally whip out snarky quips about robotic AI. To start, press and hold your Home button; the Siri interface will appear, along with a few suggested phrases to get going.
Read more about your iPad Want to learn more about your iPad and its apps, get third-party program suggestions, and get some great troubleshooting tips? Check out Macworld’s iPad Starter Guide and iPad Mini Starter Guide: They’re both ebooks available on the iBookstore, Kindle Store, and Nook Store, and as a PDF.
What to do with your old device
Now that you’ve managed to transfer your old information, set up your new iPad, and start using it, it’s time to figure out what you’d like to do with your old device. If you’re interested in selling, recycling, or passing it along to a friend or family member, Macworld senior writer Lex Friedman whipped up a handy guide that contains the steps you’ll need to take.
Author: Serenity Caldwell, Associate Editor

Serenity has been writing and talking and tinkering with Apple products since she was old enough to double-click. In her spare time, she sketches, writes, acts, sings, and wears an assortment of hats.