In the seven years since Adobe first launched Lightroom, it's established a devout fanbase of professional and amateur photographers alike. It promised, and delivered, an end-to-end digital imaging workshop that prioritized speed, efficiency, and ease of use. Today, Adobe is launching a free public beta for Lightroom 5, and thankfully, that original vision hasn't gone out of focus. There are a few genuinely new and useful editing features, like an improved spot removal tool (now a healing brush), and a new automated way to straighten your images, but the core editing functionality has been left untouched since Adobe’s big processing engine update last year. But editing isn't everything. This time around, Adobe is adding a new workflow-related feature called Smart Previews, and if your main computer in the field is a MacBook Air, ultrabook, or anything else with a low-capacity SSD, it could totally change how you work with RAW images.
Optimized to provide as much RAW-like flexibility as possible
First, a quick diversion. RAW image formats like Nikon’s NEF, Canon’s CR2, and dozens of others contain the unprocessed (or minimally processed) data coming straight off your camera’s sensor. Many pros and amateurs prefer to work with them over JPEGs because even though they take up an obscene amount of disk space, all of that extra image data gives you a lot more flexibility to make changes. As RAW grew in popularity in the early 2000s, Adobe realized that all these different proprietary formats might not be the best choice for archiving images, so in 2004 it announced an open, uncompressed format called DNG, short for "digital negative." It offered most of the benefits of RAW formats, but since it wasn’t tied to any one manufacturer, there were supposed to be fewer worries about it becoming obsolete. Adobe then expanded on the idea with lossy DNG — a compressed format related to JPEG, but optimized to provide as much RAW-like flexibility as possible. So long as you didn’t venture out into extreme regions of the tonal curve (plus or minus four or five stops), it gave you most of the benefit of RAW or uncompressed DNG for a fraction of the disk space.
That brings us back to Smart Previews. While Lightroom 4 added support for the lossy DNG format, Lightroom 5 gives you the option to create 2540-pixel lossy DNG copies of your RAW images either on import or after they’re already on your disk. These copies stick around even if you move the RAWs off to an external drive, augmenting rather than replace your original files. And unlike the JPEG previews available in every previous version of Lightroom, they’re real, usable images. You can change exposure, contrast, and tone mapping, clone out distracting elements, apply gradient filters, and critically, export for the web or make prints — in many cases with no visible loss in quality.
There's no syncing or waiting — everything just shows up
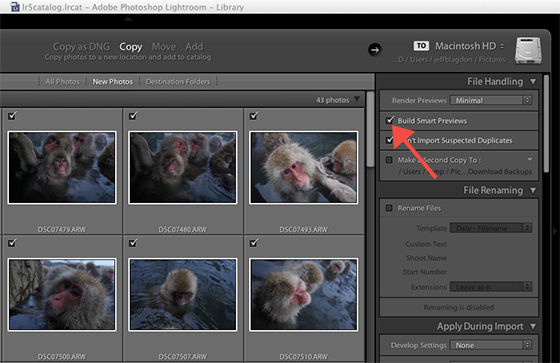
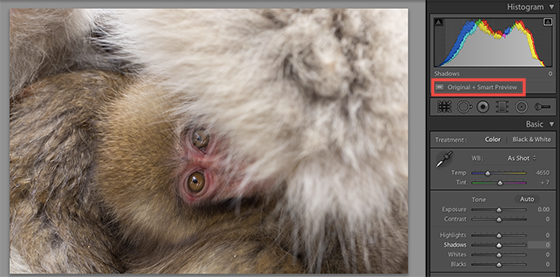
You can still keep your big, dense RAW images on an archival disk, so if you decide you really need all the data that’s in the originals, say to make the highest quality prints possible, you can just plug back in when you get home. When you do, all of the edits you've applied to your Smart Previews are simply, instantly applied to your RAW images. There’s no syncing or waiting — everything just shows up. It’s the best of both worlds, and there’s absolutely nothing to manage, other than checking "build smart previews" (above) when you’re importing from your camera. From then on, an indicator just below the histogram in the Develop module (below) lets you know whether you currently have access to the original file.
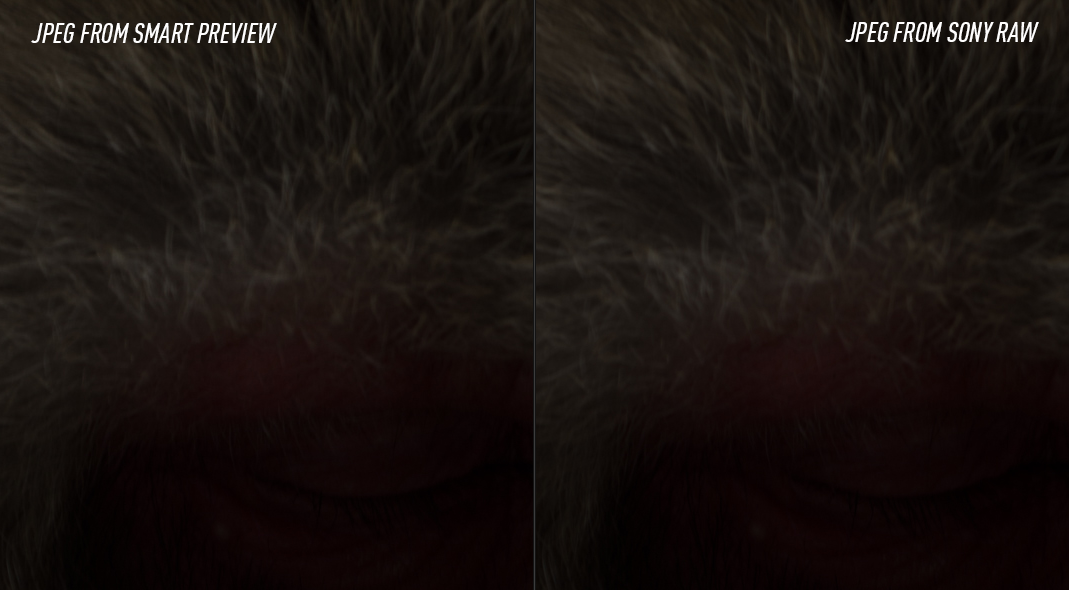
So how well does it work? I’ve only had a few days to play with the software ahead of the public beta release, but my answer so far is "very well." 24-megapixel RAW files from Sony’s NEX–7 average around 25 MB, while in comparison, the equivalent lossy DNG Smart Preview weighs in around 1.3 MB. A collection of 94 RAW images from multiple cameras that I took on a recent photo trip totaled 1.84GB of space on my internal drive, but Smart Previews shrank that down to under 275MB — less than 15 percent of the original size. As far as what you give up in the trade-off, take a look at the comparison below (click to enlarge).

On the left is a 100 percent crop from a full-sized (2540px) JPEG converted from a Smart Preview, on the right is the same thing converted from the original RAW file. Even at 100 percent, the difference between the two is negligible. For a more detailed comparison, take a look at this difference mask — pixel values that are identical in both images show up as pure black, transitioning to pure white as the difference between them increases. Again, even viewed at 100 percent, the difference is hardly noticeable. And keep in mind that these are exaggerated comparisons — when you’re creating even large-sized JPEGs for the web with ordinary adjustments to the shadows and highlights, you simply don't need to worry about a loss in quality from basing them on lossy DNG Smart Previews instead of your original RAWs.
The only potential snag is sharpening
Just to see what effect a major adjustment would have for comparison, I took down the exposure on a badly-overexposed image by 4.5 stops (pictured below), and the distinction between the two images is only really noticeable when it’s viewed as a difference mask. The only potential snag in the editing process when moving back and forth between the two image formats is sharpening, which is applied at the pixel level, and Lightroom product manager Sharad Mangalick advises doing it separately when working from RAW and Smart Preview versions of the same image.
The Spot Removal tool now works as a healing brush
Of course, Smart Previews aren't the only thing that’s new in Lightroom 5. The Spot Removal Tool now works as a healing brush instead of just a circular selector — previously an odd limitation compared to the more powerful implementation in Photoshop. Now you can paint over what you want to remove from your images, and an opacity slider lets you blend the effect smoothly, even after you’ve applied it. That makes it great for retouching portraits, say when you don’t want to completely remove wrinkles but just make them less noticeable.
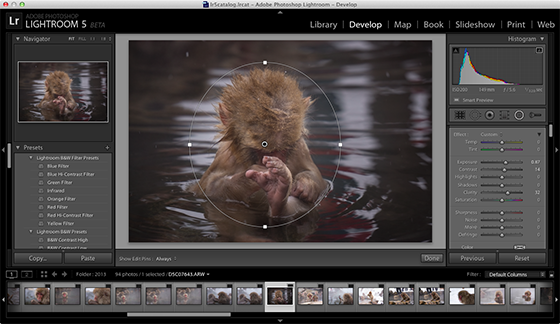
There’s also a new radial gradient tool (pictured below) that makes it easier to add local adjustments like off-center vignettes if you aren’t familiar with (or don’t want to screw around with) the adjustment brush and masking. Just click the tool, drag out an oval, and make your adjustments. The size and shape of the oval can be edited afterward, and you can toggle whether you want your effect applied inside or outside your selection with the Invert Mask checkbox. Just like with the Adjustment Brush, the transition between affected and unaffected areas can be adjusted with the Feather slider, letting you control the effect’s falloff.
Finally, there’s a new feature called Upright that automatically straightens horizontal or vertical lines by rotating and warping your images. For fine-grain control you’ll probably still want to edit things manually, but in our limited testing, we found that Upright gave a good first approximation of what we wanted things to look like. Just like everything else in Lightroom, Upright edits are applied non-destructively, stored as translations of the original image’s pixels, which makes it safer than doing the same thing in Photoshop, for example.
Some kind of Dropbox-like syncing would be a great solution
This is the shortest product cycle yet for Adobe’s Lightroom team — version 4 was released just over a year ago — but even though there aren’t as many big headline features this time around, there’s still a lot to like here. It’s great to see Adobe resisting the temptation to add every conceivable feature into the mix, although, to be fair, there are dozens of smaller changes that I haven’t mentioned, like the long-awaited addition of PNG file support, custom page settings for photo books (still no way to flow text between multiple fields, though), and new video slideshows. That doesn't mean Adobe checked every box on everyone's wishlist, though. There's still no way to easily keep a single catalog file in sync between multiple computers, and Adobe still recommends copying the entire file back and forth each time you make edits, which complicates things if you keep your RAW images on a desktop but want to be able to edit the Smart Previews on your laptop, for example. Some kind of Dropbox-like syncing would be a great solution, but so far Adobe has maintained that the catalog is simply too fragile to reliably keep it up-to-date over a network.
Adobe is known to limit support for additional cameras
Whether it’s worth paying to upgrade from Lightroom 4 is going to depend a lot on your individual use case and whether your system has the specs (no Snow Leopard support this time around) needed to run it. If you work with a lot of images for the web, or have a large RAW library that you want be able to edit on the road, the addition of Smart Previews alone could be worth the price of admission. You'll also likely have to upgrade if you buy a new camera down the road — Adobe is known to limit support for additional cameras to its most recent version of Lightroom. And of course, the exact value proposition depends on what the retail price of the app ends up being, and so far Adobe hasn’t indicated if it plans to price more aggressively to compete with Apple’s $79.99 Aperture. But that's a discussion to revisit after the app's retail launch. For now, as long as you have a Mac or PC running at least Lion or Windows 7, you're free to download the Lightroom 5 beta and try out the new features all you want until the program ends on June 30th.
:format(webp)/cdn.vox-cdn.com/uploads/chorus_asset/file/24049860/226292_Apple_Watch_SE_PHO_akrales_0047.jpg)
:format(webp)/cdn.vox-cdn.com/uploads/chorus_asset/file/19336098/cwelch_191031_3763_0002.jpg)
:format(webp)/cdn.vox-cdn.com/uploads/chorus_asset/file/25289245/VST_0216_Site_post.jpg)
:format(webp)/cdn.vox-cdn.com/uploads/chorus_asset/file/23932923/acastro_STK108__01.jpg)