

Earlier this year, Microsoft rebranded their Hotmail email service as Outlook.com. If you wanted to use their new service within Apple Mail, however, you were limited to using the ancient method of accessing your emails via POP3. This is because Outlook.com only supported the more advanced features, that you've come to expect from an email provider, on mobile devices that supported Microsoft Exchange ActiveSync or Microsoft's own Outlook mail app for Windows.
Thankfully, Outlook.com has finally introduced IMAP support so our preferred desktop mail client can be used. As you might guess, it's not as straightforward as you'd expect. In this tutorial, I'll show you how to set up Outlook.com in both Apple Mail and Microsoft Outlook.
Why IMAP?
POP3 (Post Office Protocol 3) was never designed for multiple devices and its primary purpose was for infrequent access of a mail server via a single computer. Instead of a constant connection, which is the norm nowadays, POP was from a time when there was no such thing as broadband and would connect to download all the messages from the server before disconnecting.
Because of this, POP3 doesn't support messages being marked as read or unread, since these changes weren't reflected on the server. With POP, you could read 20 messages on your Mac and your iPhone would either show them as unread or, depending upon how POP3 had been configured, not show them at all.
Although Outlook.com has supported Microsoft's own Exchange ActiveSync service on devices such as the iPhone and Windows Mobile, it's only supported on a desktop within recent versions of Microsoft Outlook for Windows, even Microsoft Outlook 2011 for Mac isn't supported.
Now that Outlook.com supports IMAP (Internet Message Access Protocol), I can now configure both Apple Mail and Microsoft Outlook for Mac to access Outlook.com via more modern standards. Well, modern when compared to POP!
1. Apple Mail
I'll set up Apple Mail to use our Outlook.com email address using IMAP. As you'll find out shortly, this isn't simply the case of entering your email address and password. Since Outlook.com has supported only POP, until recently, Apple Mail's automatic configuration of email accounts will default to setting up any Outlook.com email address as a POP3 account. First, I have to trick Mail so that it allows us to set up an account manually, allowing us to specify the new details.
Step 1
To set up Apple Mail to use Outlook.com, launch Mail and then, using the menu, select Mail > Preferences. Select the + icon to add a new account.


If you don't already have an account set up in Apple Mail, this will appear automatically.
Step 2
Mail will provide a step-by-step guide to adding a new mail account. Enter your name and then your Outlook.com email address but make sure to change the .com to .mac. The reason for this is that as soon as Mail notices you're attempting to use an Outlook.com email address, it will automatically configure it for POP access.


I don't want that so I have to trick Mail into using a wrong email address so it doesn't attempt to set it up automatically.
Once you've entered your email address in the format @outlook.mac, Mail should then attempt (and fail) to verify.
Step 3
I can now configure the Incoming Mail Server. Enter a suitable description and the IMAP serve setting for Outlook.com is:
imap-mail.outlook.com
Change the User Name from outlook.mac to outlook.com.


Step 4
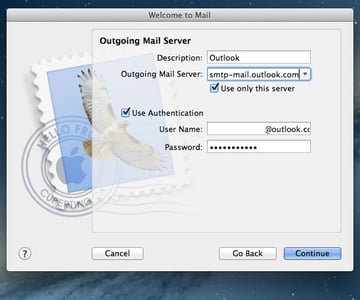
I can now configure the Outgoing Mail Server. Just as before, enter a descriptive account name and the mail server setting to use this time, is:
smtp-mail.outlook.com
The outgoing mail server requires authentication, so make sure this option is checked and ensure the User Name is your full Outlook.com email address and that it is changed from outlook.mac to outlook.com.

Step 5


The final step of this process will provide an overview for all the mail settings. As Outlook.com's IMAP supports secure connections, I don't need to change anything else. What I do need to change, however, is our incorrect email address that I used at the beginning. Click *Create* to finish the setup and then select *Mail > Preferences* from the menu bar.


Head to the Accounts tab and change the email address from outlook.mac to outlook.com. This will ensure that emails you send appear from the correct account and recipients can reply correctly.
Step 6
Now that I have my account set up, I'll ensure that Apple Mail uses the existing folders that Outlook.com has been using.
Apple Mail prefers to store messages such as sent and deleted items in its own default folders, but that doesn't mean I have to use them. Outlook.com already sets up these folders for us so it makes sense to use them. For example, if I use both the web interface and the Mac but don't update the settings in Apple Mail, emails sent via the web interface will be stored the Sent folder whilst Apple Mail puts them in a folder called Sent Messages.


As soon as you've added your Outlook.com account to Apple Mail, you'll likely see the following folders: Deleted, Junk and Sent.
Select the Deleted folder first and then, using the menu, select Mailbox > Use This Mailbox For… and choose the option Trash.
Repeat the process for the Junk and Sent folders. Drafts isn't required as, coincidentally, Outlook.com and Apple Mail already use a folder of the same name.
2. Microsoft Outlook for Mac 2011
Ironically, Outlook for Mac 2011 didn't support Outlook.com accounts as well, having to also fall back on using POP. With the addition of IMAP, I can finally set up Microsoft's free email service with Microsoft's mail app for the Mac.
Step 1
Launch Microsoft Outlook and select Tools > Accounts… from the menu bar. If you don't already have an account set up in Outlook, this will appear automatically. Select E-Mail Account under the account type that you can add.


Step 2
Enter your full Outlook.com email address and password. Similar to how Apple Mail automatically attempts to set up your Outlook.com email address using POP, Outlook will attempt to do the same. To override this, un-check Configure Automatically. This will allow us to enter all of the mail server details manually.


As you can see, Outlook still populates the POP server settings for us automatically but at least I can now change them.
Step 3


Your Outlook.com email address will be your user name so it can remain unchanged.
Change the account type from POP to IMAP and change the incoming server to:
imap-mail.outlook.com
Leave the remaining incoming settings unchanged.
Step 4
For our outgoing server, change the server name to:
smtp-mail.outlook.com
Again, leave the remaining outgoing settings unchanged.
Click Add Account and your Outlook.com email address will be configured for IMAP access, allowing it to be used and kept in sync with other devices and computers you use it with, as well as the Outlook.com web interface.
Wrapping Up
Using the above methods, you've been able to set up an Outlook.com email address in both Apple Mail and Microsoft Outlook for Mac 2011. I recommend sending a test email to yourself to a non-Outlook.com email address to ensure your account is working fully.


