
Apple’s consumer filmmaking software, iMovie, has gotten its fair share of both praise and scorn over the years. It broke new ground in its initial release by giving families and budding filmmakers a way to edit films that didn’t cost thousands of dollars. It reinvented itself and how to make films in 2008—though some would argue it didn’t actually make it to the “usability” stage until the next year.
Now it’s reinvented itself all over again; thankfully, this time it left out that awkward, gangly in-between year. Apple’s new version of iMovie is sleek and sophisticated both on the Mac and on iOS devices. It retains a lot of advanced features from prior versions, but keeps its interface clutter- and confusion-free for newer users. And it’s added a new avenue for easily sharing movies to your computer and Apple TV. I could go on like this for awhile, but instead of writing a whole review here, I’m going to cut to the juicy parts and focus on twenty new and improved features in iMovie for the Mac and on iOS.
1. The interface is wonderful—and it’s seamless across operating systems (Mac and iOS)
iMovie has always been a bit of an odd sibling to its big brother, Final Cut, in terms of both features and appearance. It never quite had the same timeline handling, or the right look; sometimes it would be ahead of Final Cut’s development curve, sometimes far behind. This version of iMovie, however, can stand proudly alongside its big brother. It has the same “space gray” coloration and timeline handling, and though it pales in comparison to Final Cut’s feature-set, it still has a decent number of tools in its toolbox.
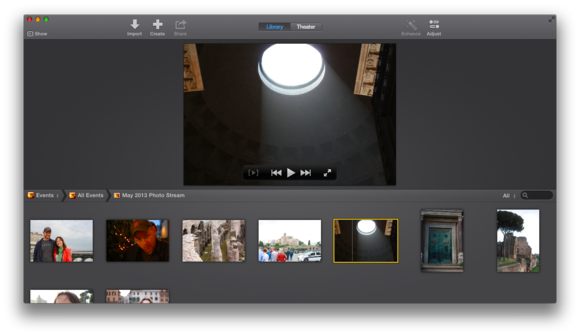
But unlike previous versions of iMovie, those tools aren’t out in the open—they’re instead secreted away behind simplistic-looking buttons that won’t scare off casual filmmakers or beginners. The first thing you see upon launching the program is a collection of your event clips and a big viewing screen—you don’t even have to make a project if all you want to do is find and share a particular clip. Its initial treatment reminds me far more of iPhoto’s management options than of a piece of video-editing software. But once you open up a project, it becomes clear that those editing chops are still there.
On the Mac, iMovie’s myriad buttons and shiny aluminum textures are all gone, replaced with a few distinct sections: a sidebar for accessing your photos, video, projects, and content library; buttons for importing video, creating new projects, and sharing clips/projects; a tab switch between iMovie’s Library screen and iMovie Theater; and two editing buttons: Enhance and Adjust. That’s it. There are zoom sliders here and there, and a search bar, but the dozens of unlabeled buttons and confusing sections have gone the way of the dodo.
iOS gets a slightly less revolutionary take, as by nature the mobile app is more simplified than its Mac counterpart. But its iOS 7 overhaul is well-done nonetheless, splitting the app into three main categories: Video, Projects, and Theater. The Video screen is your Library equivalent, showing you mini timelines of the clips in your camera roll. For the first time on iOS, you can organize these with the new Favorite button (shaped like a heart), and there are even buttons to quickly speed something up or slow it down and share the clip on the spot.
Decide to combine it with other clips, however, and you enter the Projects screen. Projects look much like events at first; tap one to get a brief informational overview and options to share or export it, as well as a button to enter editing mode. And once you’re finished, you can send the final version to iMovie Theater, where it can be viewed by other iOS devices, Macs, and even your Apple TV.
2. Hello, undo button (Mac and iOS)
The undo button is hyper-prominent in iMovie, both on the Mac and iOS. It’s shaped like a small backwards arrow on the Mac, and a U-turn arrow on iOS devices.
On iOS, the button appears right next to your timeline, and is exceedingly useful at removing whatever multi-touch mistake you may have made. (My favorite: swiping up on a clip cuts it and creates a freeze frame. Swiping down creates a standard cut. Remembering which one is which is a super-fun game.)
On the Mac, the undo button primarily exists to remove any effects from a given section. It’s similar to Final Cut Pro X’s interface in that regard, and I’m very thankful to see it brought over to the consumer side.
3. Multi-layer editing exists, and it’s easy (Mac and iOS)
I almost didn’t have this on my list because I was sure that iMovie ’11 on the Mac had progressed far enough to allow dragging clips on top of each other. But no: You can drop clips on top of each other in ’11 with Advanced Tools enabled, but easy dragging is out of the question.

Forget any notion of “Advanced Tools” in this version of iMovie: You don’t need to go find a checkbox to make any complicated changes. Want to drag one clip on top of another, so they stack? No problem. Change the styling from a straight cutaway to a picture-in-picture, side-by-side, or green screen matte? You got it—just move your playhead to the point where the two clips intersect and open the Adjust menu. You can even add keyframes to picture-in-picture to get the box to move around the screen.
Even cooler, if you drag a clip below another clip, it instantly converts to an audio-only soundtrack.

On iOS, this is slightly more difficult, as you can’t drag clips on top of each other (though you can move them around in the timeline). But you can still get picture-in-picture or overlay options for clips—you just have to import them. On the iPad, just select the clip you want and tap the ellipses button, then choose the overlay icon, picture-in-picture icon, or side-by-side icon. (On the iPhone or iPod touch, you have to first tap the clips-and-music icon to view your video library.)
Once that clip is imported, you can move it anywhere on that second line—but there’s sadly no way currently to drop it back into the main timeline. Something for Apple to improve upon in its next update, with any luck.
4. Trailers continue to be wicked fun (Mac and iOS)
Making an iMovie trailer is more fun than it really ought to be. It’s one of those activities that starts fun, wraps around to corny, then pops right back to fun again. On the Mac, the app has made these even more prominent—when starting a new project, you have the option to make either a movie or a trailer, and there are now 29 trailer templates for your editing pleasure. I suspect half the fun of picking a template is first watching the Apple-created default, though—some of the stock trailers are funnier than I suspect I could ever make my videos.

On iOS, trailers are just as fun to make as they were at launch, though I find the interface changes make them even better to edit on an iPhone than before.
5. Your new one-stop sharing station (Mac and iOS)
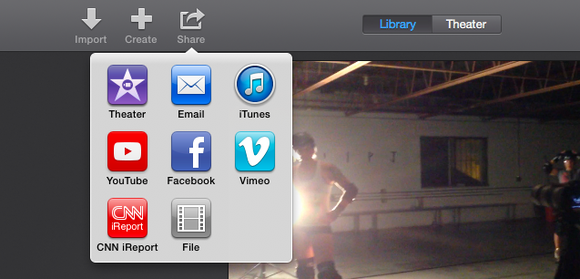
Past versions of iMovie were great for many things, but quickly sharing clips was not one of them. The export process in iMovie got easier over the years, but it still involved twisting and pulling a variety of virtual knobs and levers to get a video you were happy with. Those export controls have been dramatically simplified on the Mac, offering you eight types of sharing (including iMovie Theater, email, YouTube, and to your Desktop), each with its own painless menu.
Those who like to fiddle and tweak their export settings may cry foul at the relatively limited options—among other things, export to Final Cut XML is gone on the Mac—but I think that these settings will be enough for the majority of iMovie users. (And for those who need more, Final Cut isn’t as much of an expensive step up as it used to be.)
The nicest thing about the ever-present Share button, though, is its flexibility. You can send an original or altered clip straight from your library, a final project video, or even the project itself. And this carries over to iMovie on iOS—the Video section of the app offers easy sharing, and you can even apply speed modulation on the spot.
6. iMovie Theater is a great gimmick (Mac and iOS)
When iMovie was announced, Apple made a big show of its flashiest feature: iMovie Theater. This allows you to share a clip or final project from any of your devices and have it show up on any other Mac or iOS device that has iMovie installed and is linked to your Apple ID. Think of it sort of like Photo Stream for your edited videos.
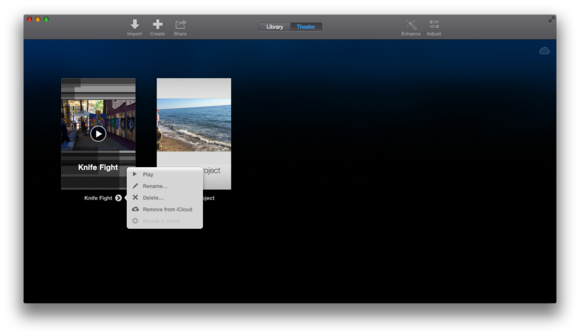
As a quick way to share video on your TV or other devices, it’s stellar: You can cut something on your Mac and push it to your iOS device, which you can then take with you and show off wherever you want. You don’t even have to download it to your device—iMovie Theater stores everything on its server by default, so you can stream it if you have a data connection or download it ahead of time, your choice.
iMovie Theater does have a few limitations, unfortunately. Unlike Photo Stream, any video you share counts toward your iCloud storage limit; those with the default 5GB of storage may find themselves quickly running out of room. If you re-export a project video, it appears as a duplicate, rather than replace the old version. And perhaps most annoyingly, you can’t share projects—only final videos. Project sharing can still be done from iOS device to iOS device, but you appear to no longer be able to transfer projects to the Mac.
7. You can keep speed from changing pitch (Mac and iOS)
Speed modulation is a powerful thing, and Apple seems to have gone whole-hog on the feature with the latest version of iMovie. But if you want to keep your clip’s audio from sounding like it’s underwater, there’s a preference in both versions of iMovie—Mac and iOS—for keeping your audio from changing pitch when modulating a clip’s video speed. After playing with both, I tend to prefer the pitch change, as iMovie has to do wacky things to your audio to keep it at the original pitch, but it’s an option.
8. Simplified (and speedy) clip import (Mac)
In comparison to the new version, iMovie ’11 feels positively archaic in its speed optimization. iMovie is downright speedy in comparison to its predecessor, and nowhere is that more evident than in clip import. In my tests, the camera import screen launched and imported video twice as fast as ’11.
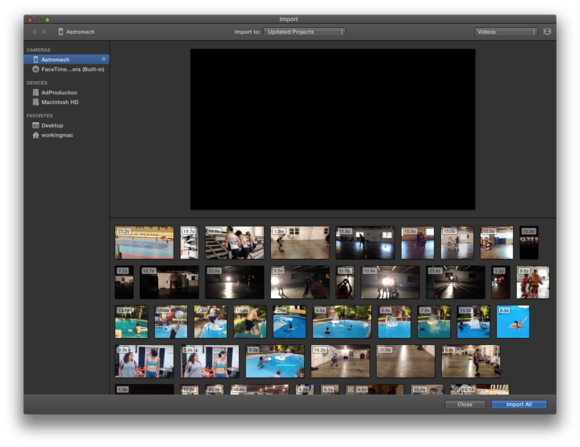
And oh, I could write an ode to the revised import process. Gone are the “import selected” checkboxes, the “analyze for stabilization” and “optimize video size” options, and any extra nonsense you might have had to first click through before getting to what you wanted to do in the first place—edit your clips. The new version of iMovie treats you with respect. Do you want to import all your clips? Great. Want to just import some of them? Highlight the ones you want, press import. The app’s fast enough now that it doesn’t need you to downscale your HD clips so that you can edit them.
Once you’ve imported your clips, you can search through them by name or date, tag your favorites, and sort by favorites or rejected clips. It’s not nearly as complex as Final Cut’s tagging options, but organizing feels easy and simple.
9. All in the background (Mac)

iMovie takes yet another card from Final Cut X with background tasks. Say goodbye to progress bars for import, rendering, and sharing—they’re not your problem any more. Nowhere is this more apparent than in the import process: There’s no waiting eternally in front of the import screen, watching a progress bar slowly tick down. Once you select clips for import, they’re are available in your library almost immediately, with clock icons on those still importing. I was even able to scrub through those still importing—I suspect they must load an immediate low-res version to accomplish this, but I’m not really sure.
When you’re importing or rendering a clip, there’s a new background tasks icon in the shape of a clock that pops up in the upper right hand corner of the menu bar. It displays any and all currently rendering background tasks, along with a time estimation of when they’re complete.
10. The great settings purge (Mac)

The preferences section of iMovie ’11 was a little terrifying for new users: the nebulous “Show Advanced Tools” option, lots of viewing options for the media browser, font choices, a video import dropdown… in short, a lot of unnecessary controls shoved into the preferences screen because there was really nowhere else to put them. (I’m sure there are people out there who love the “Always show clip badges” preference option, but even as a former editor, most of these settings seemed ridiculous and redundant to me.)
Apple seemingly agrees with me: The new iMovie has just two preference options. Not preference tabs, or preference screens—two preference options, period. Those are “Apply slow-motion automatically” (which automatically turns your iPhone 5s 120fps clips into slow-motion), and “Automatically upload content to iCloud” (any iMovie Theater film you export). That’s it. Most other features formerly found in settings have been moved to more appropriate locations.
11. All your adjustments and effects in one place (Mac)
Goodbye, clip inspector; hello Enhance and Adjust buttons. In another iPhoto/Final Cut-esque move, all possible clip and audio adjustments have now been hidden inside these two icons. Those who care little for green-screen options and color correction can ignore the Adjust menu altogether—they can still brighten up their video with one click from the Enhance button, or slow down their video from the new slow-motion scrubber.
12. The slo-mo scrubber (Mac)
Given the iPhone 5s’s emphasis on slow-motion video, it’s no shock to see enhanced slow-motion controls come to iMovie, and have them do so in a way that’s incredibly easy to apply. iPhone 5s clips at 120fps are slowed down automatically by default, and once in the timeline, the new speed bar lets you speed up or slow down a clip with the drag of a handle. You can also click on the speed bar to get inline information about what speed modulations you can perform, or click on iMovie’s modify menu.
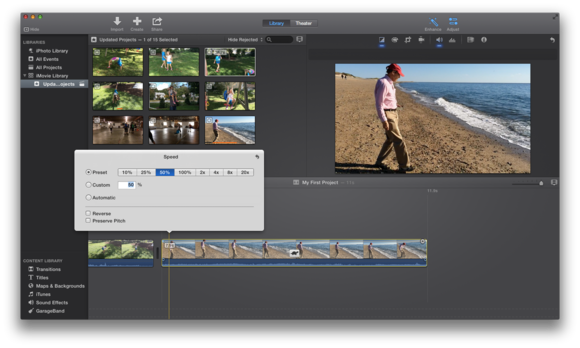
Given how easy it is to drag the speed bar, I’m a little disappointed that there’s no way to set in and out points on the speed, à la the Camera app on the 5s; instead, you have to manually slice up a single slow motion clip, then speed up either side to get a similar effect. Even with this, you don’t quite get the same ramping effect found in the Camera Roll on iOS.
13. Advanced color correction (Mac)
Preview’s color correction inspector is gone in this version of iMovie, replaced instead by a color correction tool that very much resembles iPhoto for iOS. You can alter your white balance, contrast, color, and more with the single tool, and all of it is non-destructive in case you change your mind.
There’s also a new tool for easily matching the color of a scene—very useful if you’ve shot multiple angles of the same area and you want them all to match up.
14. Panorama, meet Ken Burns (Mac)
Panorama images weren’t the easiest items to work with in iMovie ’11, but this new version of iMovie plugs them properly into the Ken Burns effect. Insert a panorama into your timeline and apply the Ken Burns effect, and you can easily pan across the scene.
15. Quick clips view (iOS)
As I mentioned earlier, one of iMovie’s big changes in this version seems to be focused around easy clip viewing and sharing—making the app more video library-friendly, like iPhoto, and less like a stand-alone video editor. On iOS, this seems especially true: The dedicated Video mode displays a row of filmstrip clips, with one clip highlighted and presented as a large video in the center.

You can tap any other filmstrip to make it large, instantly slow down or speed up the clip (on the iPhone, you’ll need to switch to landscape mode for those controls), and send it out to iMovie Theater or another sharing option.
16. Record slo-mo video in iMovie (iOS)
If your device supports 120fps video, iMovie has an in-app camera available that lets you toggle between 1080p at 30fps video and 720p at 120fps (or 60fps, if you’re on an older device like an iPad mini or iPhone 5). It’s a nice option for inserting clips into trailers or other places in your timeline, for sure.
17. Pinch-to-crop video (iOS)
The iMovie app for iOS gets another great multi-touch gesture feature in this update: Pinch to crop video. Tap on a clip, and a magnifying glass appears, tap the magnifying glass to pinch and pan around the clip until you have it framed how you like.
18. New iMovie for iOS transitions (iOS)
If you were getting bored of simple cross dissolves and straight cuts, iMovie for iOS now has a bunch of new transition options, including push, slide, and fade to white. Push and slide are available from the top, sides, or bottom, giving you further flexibility.
19. Audio options galore (iOS)
The first version of iMovie for iOS lacked any sort of major audio adjustments beyond setting a background track; this version acknowledges that shortcoming and adds a whole host of options, including detaching audio, splitting audio clips, changing the speed and pitch, fading clips, duplicating them, and sending them to the background. Though working with audio can be a little tricky on the iPhone, it’s still surprisingly doable.
20. Projects can be transferred via AirDrop (iOS)
This may be my favorite iMovie for iOS feature of the bunch: If you start a project on your iPhone, you can send it over to your iPad with a tap of the Share button.
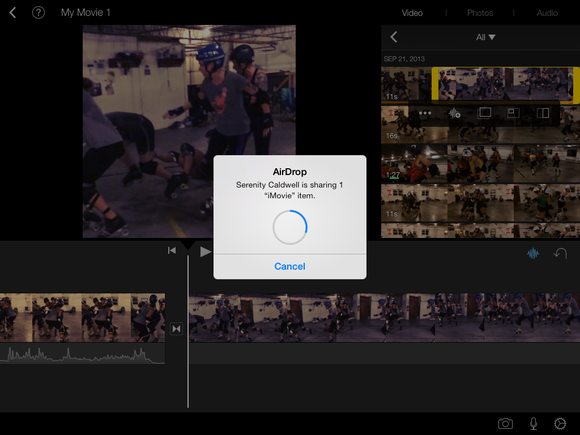
AirDrop is the sole wireless option for sending projects from one iOS device to another, and it works so perfectly that it almost makes me mad there’s no way to similarly send projects to the Mac. I’m hoping this appears in a later update, because such a feature would be wonderfully useful.
Updated at 4:16 p.m. ET to note that the Mac can no longer open projects created on iOS.
Author: Serenity Caldwell, Associate Editor

Serenity has been writing and talking and tinkering with Apple products since she was old enough to double-click. In her spare time, she sketches, writes, acts, sings, and wears an assortment of hats.