Mavericks’s Finder tags feature gives you the ability to assign labels and keywords to your files and folders, which is a mighty fine thing if you’re organizationally inclined. However, regardless of how keen you are on the idea of tagging your files, the process requires time and effort, particularly if you intend to tag the nearly countless files already on your Mac.
That doesn’t mean that Finder tags should become Mavericks’s “Mission Control”—a feature that can be helpful, but that few people touch. Rather, tagging requires a measure of will and some tools and techniques to make it as easy as possible. Let’s begin.
Use Smart Folders to find old files worth tagging
If you have thousands of files on your Mac and the idea of tagging them all makes you queasy, take a deep breath. You just need to be a little smarter about the task. Focus only on those files that really matter, because you want to more easily retrieve them at a later time. Smart folders can help you find the content you’re after.
In the Finder, choose File > New Smart Folder. In the resulting window, click the plus-sign (+) button next to the Save button near the top of the window. This creates your first condition. How you configure that condition depends on the kind of content you seek. You can, for example, specify a file type, documents that contain certain words, files created on a specific day or within a period of time, or files you’ve placed in a particular location.
For example, twice a week I create entries for my Mac 911 column. Each of those entries is saved in some kind of text format—SimpleText, Plain Text, or BBEdit text. Each contains the words he writes: or she writes:. So, I create a smart folder that contains files that match these conditions.
To do that, I click the plus-sign (+) button and configure the condition to read Kind is Other and then type text document in the field to the right of the condition. I then hold down the Option key as I click the plus-sign (+) button again to create a conditional condition—one that allows any of the following conditions to work (but doesn’t demand that all of them must be met for the folder to function). The next line reads Any of the following are true. The first of these conditions reads Contents contain “she writes:” (with the quotes, please, as the quotes tell the condition to search for those specific words). I then click this condition’s plus-sign (+) button to create a second condition, which reads Contents contains “he writes:” (also with the quotes).

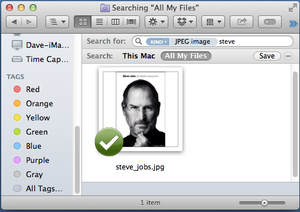
The resulting window fills with my Mac 911 files. I now select them all, click the Tags button in the window’s toolbar, enter Mac 911, and press Return. In a short while, all the files are tagged as I’ve directed. I can now close that smart folder window without saving it, click the Mac 911 entry that appears under the Tags heading in a Finder window’s sidebar, and see a list of all my Mac 911 files.
To make spotting those files even easier it behooves me to assign a colored tag to them. To do that I can simply Control-click or right-click the Mac 911 tag that now appears in a Finder window’s sidebar and, from the contextual menu that appears, select a color other than None—red, for instance. A red dot will be appended to each of these files regardless of which view I choose—icon, list, column, or Cover Flow. And should I wish to rename that tag at a later time, it’s just as easily done. Again, Control-click or right-click the tag in the sidebar, choose Rename “Mac 911”, and enter a new name in the now-highlighted field.
The trick to this trick is finding elements common to documents for which you wish to assign a common tag. In some cases you may need to take a broad approach. For example, the majority of the Excel documents you create might be for work. Create a search for just those kinds of documents and then, in the resulting list, select only those files that are related to your work and apply the appropriate tag.
Use Mavericks’s many built-in tagging options
Assigning tags to old files is enough of a chore that you may not be keen to do it every few weeks. A better approach is to develop the habit of tagging as you go. There are several ways to do that as you work.
Tag when you save: For example, when you save a file, take advantage of the Tags field that appears in Mavericks’s Save dialog boxes.
Drag to tag: If you neglect to add the tag when you save, locate the file in the Finder and drag it on top of the appropriate tag in a Finder window’s sidebar. It will adopt that tag.
Use an iCloud shortcut: In an application that supports iCloud, such as Apple’s TextEdit, click the small triangle that appears next to the document’s name in the window’s title bar and from the window that appears, add the tag in the Tags field.
Control-click (or right-click) to tag: You can also Control-click (right-click) an item in the Finder and choose a tag from the resulting contextual menu.
Tag from the File menu: Select one file or more in the Finder and choose File > Tags and apply the tag in the window that appears.
Create a tag shortcut: One thing that can make that last tip a bit easier is assigning a keyboard shortcut to the Finder’s Tags command. To do that, launch System Preferences, choose the Keyboard preference, click the Shortcuts tab, click the App Shortcuts entry, and then click the plus-sign (+) button near the bottom of the window.

In the sheet that appears choose Finder from the Application pop-up menu, enter Tags… in the Menu Title field. (You must use an ellipses character by pressing Option-semicolon rather than typing three periods.) Enter a keyboard shortcut in the field of the same name—something like Shift-Control-T—and click Add. Now when you select an item in the Finder and press this keyboard shortcut, the Tags window will appear.
Turn to a third-party
Mavericks’s tagging features are accessible to third-parties and as the weeks roll past, we’ll see greater numbers of applications taking advantage of them. As I write this, Noodlesoft’s $28 Hazel can add tags to files as part of a rule. I’ll explain.
Hazel works a little bit like Automator’s folder actions. Meaning that when you add an item to a folder, Hazel can do things to that item. In this specific case, you can configure a rule that adds particular tags to items added to the folder. Here’s an example of a simple rule that will tag any future Mac 911 columns I write.
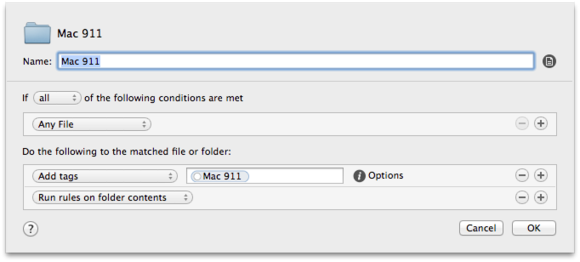
I create a new folder on my Mac’s desktop and call it Mac 911. I launch Hazel, click the Folders tab, click the plus-sign button at the bottom of the Folders list, and then click the plus-sign button below the Rules area. In the sheet that appears I create a rule that reads:
If all of the following conditions are met:
Any File
Add tags Mac 911
Click OK and the rule is attached to the Mac 911 folder I’ve created. Now, just as with a folder action, when I drag any item to this folder, that item will adopt the Mac 911 tag. If I happen to drag a folder full of items to a folder like this, I can tag everything within that folder by adding a Run rules on folder contents action to my rule.
This Hazel approach helps with two issues. The first is that it compels you to organize your work into folders if you don’t already. And the second is that, in the process, you can tag your files. It’s a winner all around.
The future of Finder tags
Ultimately the solution for better Finder tagging will come in the form of a tool that can examine a file’s existing metadata—the information Spotlight uses to help you locate files—and make educated guesses about tagging your files based on the metadata they hold. For example, If file X holds metadata Y then assign it tag Z.
Until that solution comes in a form that doesn’t wildly mis-tag your files, these tips should help.