A calendar made from old family photos is a great gift for parents, grandparents, and similarly sentimental family members. And by old photos, we mean printed from film and trapped in an album, envelope, or shoebox. It’s very easy to upload newer, digital images to an online service to make all sorts of personalized gifts. But to do the same with truly old-fashioned photos, you’ll need to scan them.

Epson Perfection V550 scanner
Flatbed photo scanners (as opposed to sheetfed document scanners) are incredibly sophisticated these days. Not only do they digitize photos, but they come with software that can often assist with editing tasks such as sharpening, lighting, and cropping. What’s more, a moderately priced scanner like the Epson Perfection V550 ($149), which we used for this how-to, can also scan transparencies such as negatives or slides with included special attachments. For scanning prints, a general-purpose scanner, such as one you might find on a multifunction printer, will suffice.
A good rule of thumb as you embark upon this project is to stay calm. Memories are powerful, and even families that don’t consider themselves photo nuts likely have tons of old prints lying around. Focus on a select few albums and boxes, and limit the number of pictures to between 30 to 50 photos for your calendar. From that group, pick the best of the lot: The brightest, clearest, sharpest, most colorful, and best-composed shots will make the most successful journey from paper to electronic file and back.
Scanner and image setup

Make sure to clean off your photos, negatives, and your scanner bed bed for a dust- and lint-free scan.
It’s pretty simple to get your scanner in gear. If your hardware has been sitting around for awhile, be sure to clean the glass bed to get rid of streaks and dust that will ruin your images. Glass or a specialty cleaner on a soft cloth—not directly on the glass—works well.
Similarly, prep your photos and negatives. Clean everything off with lint-free photo cloth such as PEC-12 ($22) to remove dust, even from prints and negatives that have been sitting safely in an album or negative/slide sleeves. Or use a soft brush. Now you’re ready to scan.
Scanner software

Epson scanner interface for the Mac in Home mode.
The most popular consumer scanning software comes from photo-oriented printer companies such as Epson, HP, and Canon.
Epson Scan: Scanner companies typically release analogous PC and Mac versions of their scanner software. Epson’s scanning package, which we used for this example, gives you a choice of four modes: Full Auto, Home, Office, and Professional.
Full Auto literally gives you a one-click scan, but it also lets you specify resolution, file name, format, compression, color settings, and more. Home Mode lets you choose among a number of image types, resolution, and edits such as color restoration, dust removal, and brightness. Office mode includes more options for specifying size and orientation, adding adjustments like sharpening, and text and color enhancement.
Professional Mode edges into image editing territory to make major adjustments to your image as you scan. The terminology is more advanced because pro mode assumes you understand controls like histogram adjustment, tone correction, brightness, contrast, saturation, and color balance. If you’re using Epson software, consider its Digital ICE mode to clean up dust and scratches.

Load negatives into the tray and the Epson software automatically recognizes that they are color transparencies. Use the Professional mode to tweak the photo while scanning, if you want to, but you can also use an image editor to fix photos later.
VueScan: If you have an older scanner, its vendor may have long ago ceased to update its drivers, possibly compromising functionality. That’s where a program like Hambrick’s VueScan ($40, standard; $80, professional) can step in. VueScan offers updated drivers for a wide selection of scanners and brands.

Use VueScan for Mac with older scanners whose companies no longer update the drivers for specific models.
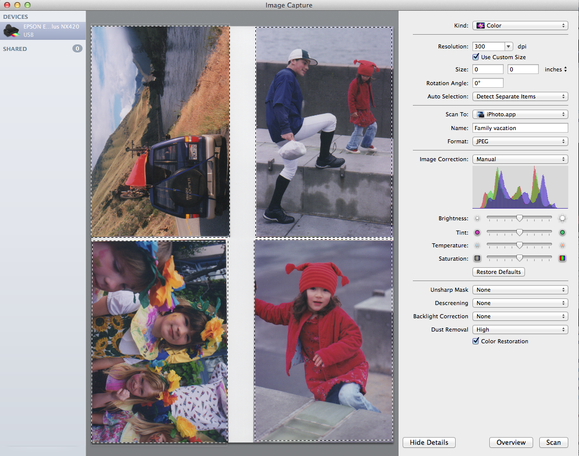
Image Capture on the Mac: Regardless of when you bought your scanner, excellent scanner software actually ships with your Mac. Image Capture has an easy-to-use interface that hooks right into your scanner or multifunction printer.
Most Mac users find ImageCapture an excellent utility for most scanning jobs, easily substituting for dedicated vendor software.
1. Load images on to the scanner bed.
2. Click the Overview button to get a preview of your images.
3. Select the image, or if you’re scanning multiple images, choose Detect Separate Items from the Auto Selection pop-up menu.
4. If the scanner doesn’t select every image on the scanner bed, select them yourself with the mouse.
5. Decide where the scanned photos will be saved—either into an editing program, a folder, or sent via email. Image Capture will automatically capture to iPhoto, Aperture, Preview, or Mail, into your own Pictures or Documents folders, or to the desktop.
6. Because you’re scanning this photo to be printed on a calendar, you want to have it at print resolution—300 ppi nearly always works. And if you want super high quality, Image Capture lets you scan up to 2400 ppi, but be aware that the higher the resolution, the larger the file size. Look for guidance on resolution from the vendor who will print your calendar.
7. Image format depends on the preferences of the publisher. With Apple’s printing service, you can scan large, non-compressed TIFF files, however with most online calendar services, you will have to stick with Web formats such as JPEG or PNG. High resolution JPEGs and PNGs look great, though.
8. You can choose to correct your image while scanning, or you can leave image correction to your image editing software. Because, you’ll be gathering all the images into a calendar, you may want to save your edits for after the scan. There are numerous choices for editing in advance of the scan, such as Color Restoration and Dust Removal.
9. Click Scan. Slowly, as the scanner completes each image, a listing will appear of the finished scans, and iPhoto (or Aperture) will automatically open, import the new images, and display them, if you chose to save there.

ImageScan on the Mac provides a native interface that always works with the OS.
Scanning tips
1. If your photo is black and white or sepia toned, use the grayscale or color setting for more flexibility.
2. Scan at a resolution of at least 300 dpi, higher than what you’d use for email or Facebook. If you have a good shot, and you’re reproducing it larger than the original, then you may want to go as high as 600 dpi.
3. Check the preview before hitting then Scan button—that will reveal flaws in positioning that you can quickly correct.
4. Scan in batches. Load as many images as will fit on the scanner bed. The software will break out each image into a separate file.
5. Some scanning software will automatically enhance your photos as you scan, unless you choose the option not to. If you’re going to enhance photos in your own image editor, make sure the scanning software is not duplicating the job. The same goes for the calendar software you choose.
Making the calendar
This is the fun part.
Now that you have all your images scanned, you will organize them into a calendar. For this, you can employ some of the popular online photo sharing apps from Shutterfly or others such as CafePress, SnapFish, MixBook, and more. We use Shutterfly as our example below.
Shutterfly calendar: The best way to get started is to create a free account where you can upload and store the images you want for your calendar.
1. From the tab menu at the top of the home page, choose from three types of calendars: Wall, desk, and poster. We chose the wall calendar, and with that, you can pick from a choice of 12×12- or 8×11-inch calendars. Then set the number of months to include (12 or 18), the starting month, and year.
Printed on heavy card stock, Shutterfly calendars let you also personalize special dates during the year with a photo and text, and can include up to 16 photos on the main calendar page. Styles range from cutesy to hip to minimalist, so it’s fairly certain you’ll find something to suit your taste.

Shutterfly lets you experiment with your page backgrounds and themes until you’re happy with the result. It’s hard to judge beforehand what’s going to look best.
1. Click the Make a Calendar button to get started.
2. Choose your calendar style. I chose the 12×12 wall calendar, from which I had 14 style choices. Textured patterns seemed like a nice backdrop for my previously scanned family photos.
3. The Next button takes you to the Edit screen, where you add images and customize the background and layout. The first page is actually the calendar cover, but you can go in any order you want. Alternately, you can upload all the photos you want to use and let the service auto fill the pages—with quick and pleasing results.
3. From the left sidebar, use the two tabs to choose the page background and the number of photos you want on the page. Each choice gives you several design patterns. This pane also lets you set and preview your text. With text, always go as big as you can because this thing is hanging on the wall.

The Shutterfly storyboard tool lets you visualize beforehand where your images will go and how many will be on the page in each month.
4. Shutterfly lets you add photos as you go, after you create your free account and sign in. Just click the Get Pictures button, navigate to the photos you scanned on your hard drive, and upload the images you want. Use the upload button on the Albums page, if you want to get started quickly, and as soon as you choose them, you’ll be prompted to create an album or add to an existing album. Either method works.
5. As you place images, you can edit them by rotating, cropping, and adding effects like color tone. You can make changes to your pages at any time, such as changing the number and layout of images on the page, or the background. Note that Shutterfly enhances your images automatically, so if you’ve already done corrections in another program like iPhoto, you may want to check the box that tells Shutterfly not to enhance your photos.
6. Place your order and go to the shopping cart.
iPhoto calendar: If you’re prepping your calendar on a Mac, it’s almost certain that you have a copy of iPhoto. With that, you can make a beautiful calendar right from your desktop.

Create an iPhoto calendar on your desktop with uncompressed TIFF files.
1. Launch iPhoto, assemble the photos you scanned into an album.
2. Under the Share menu, choose Calendar. You’ll see a tabletop motif with a carousel of calendar styles to choose from: Picture Calendar, Big Date, Colored Paper, Modern Lines, Classic, Travel, Vintage, Formal, Kids, and Seasons. Within each choice, you get a default preview of the actual pages. If you decide against the theme you chose, you can use the button on the upper left to go back. Navigate through the months with the arrow keys. Use the Navigator at the bottom left to adjust the size of the template in the canvas so you see exactly what you want to work on.

iPhoto lets you fix your photos, craft your holiday calendar, and then order it from Apple for delivery within 36 hours.
3. Once you’re settled on a theme, use the Layout, Options, or Photos tabs to make adjustments to each page. For example, you can scale the size of the photo within the frame, change the background color or pattern, write a caption, change the number of images on a page, apply special effects to one or more photos, and view photos that did not get placed in the layout. Just drag and drop any unused photos into the slot you want and remove photos you’ve changed your mind about.
When you’re done, click Buy Calendar. The total price will be $26 and will ship between 1 and 3 business days. Just in time for holiday cheer.
Author: Jackie Dove

Jackie Dove is an insomniac tech writer and editor in northern California. A wildlife advocate, cat fan, and photo app fanatic, her specialties include Mac hardware and software, art, design, photography, video, and a wide range of creative and productivity apps and systems. Jackie now writes for a variety of consumer tech publications.