
Apple is known for introducing new paradigms in personal computing. They were the first to bring graphical user interfaces to the masses, and after establishing the file-and-folder based organization scheme we all know so well, they’ve taken the next step in the form of tags in Mavericks’ updated Finder app.
With tags, Mavericks allows for a radically different system of managing your files, one that takes advantage of the increased power and connectivity of today’s Macs. In this tutorial, I’ll show you how to get started with tags to help organize, find, and work with your files.
Screencast
Tags vs. Labels
If you’ve been using OS X for a while, you’ll remember labels. First introduced way back in System 7 (that was 23 years ago!), labels were intended as a way to visually distinguish certain files by applying a colourful background to their name.


Many users of OS X have never touched the label functionality, while others found it crucial to their workflow as it allowed them to segregate and find the files they needed without interfering with the established folder hierarchy.
Tags are an evolution of this capability, with the most notable difference being that multiple tags can be applied to a file or folder, whereas labels could only be applied individually.
Whether you’re an established labels junkie or a curious newcomer to this expanded system of managing your files, you’ll leave this tutorial understanding how they work and why you might want to use them.
Applying & Removing Tags
The simplest way to get familiar with tags is to jump right in and start using them. Applying tags to a file is as simple as secondary-clicking it in Finder and using the options in the Tags... area of the contextual menu.


You’ll notice that there are seven coloured dots by default, each of which is a tag. Click one or several to apply those tags to the file, and click a second time to remove them. As soon as a tag is applied, you’ll see it as a coloured dot in front of the file name. Multiple tags show up as stacked dots.
Some have complained that this is less visually distinctive than the old labels, and they’re right, but tags serve a greater purpose than simple visual marking, as we’ll soon see.
Right above the coloured dots in the contextual menu is an entry called Tags…, which you can click to unveil the true depth of the tagging system. The seven colours appear, and underneath them you can reveal the full list of tags on the system.
More importantly, the text area at the top allows you to quickly create and apply your own custom tags, just like you would in Evernote or similar apps.


Custom Tags, Favourites and Colours
Naturally, you’ll want to make some modifications to the tags to better suit your needs. Instead of sticking to the default labels like Red and Green, you can assign custom labels to tags like Rejected and Approved, for example.
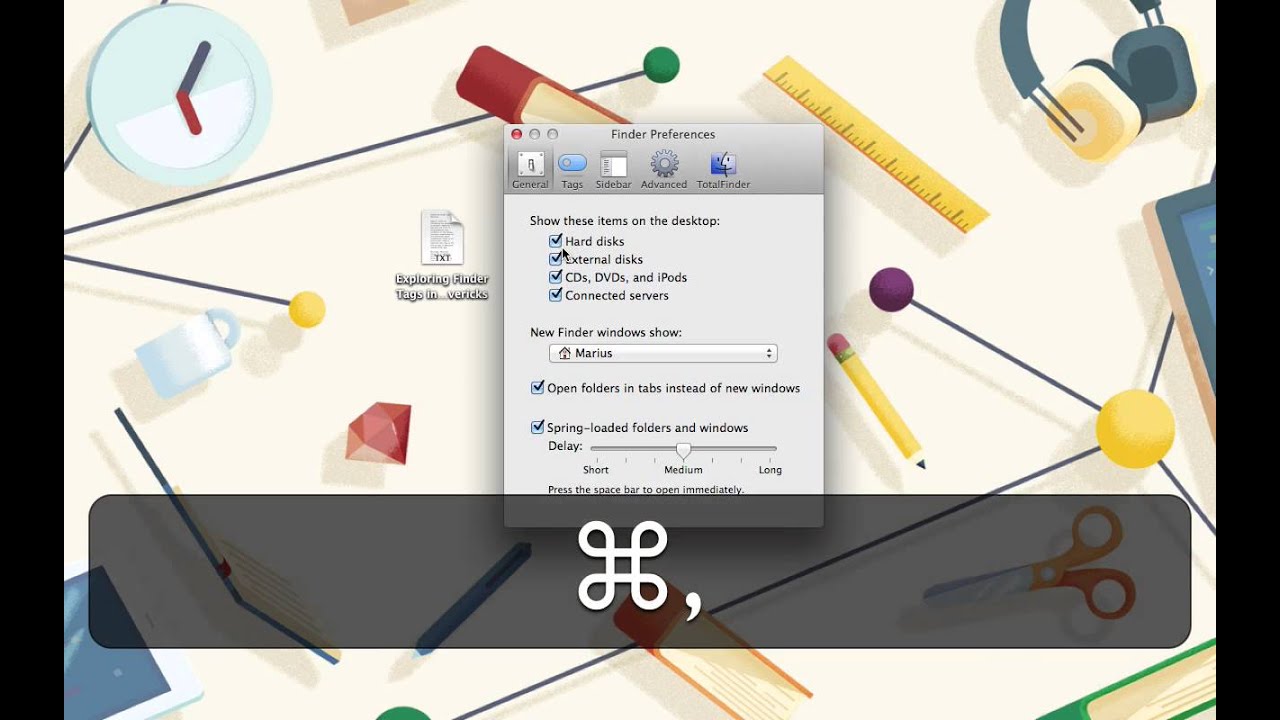
To do so, open Finder > Preferences... or by typing Cmd + , on your keyboard while you’re in Finder. From there, navigate to the Tags... tab and you’ll see the full list of tags on your system, as well as an area at the bottom where you can designate the ones you use most—your favourites.


Right-clicking any tag will allow you to change its text label, and clicking the dot gives you the option to choose a colour for the tag, or to remove colours entirely. One of the unfortunate limitations of the tag system is that you’re not able to use custom colours, so you’re stuck choosing between the seven defaults.
Tags can also be dragged and dropped to change the order in which they appear, and dragging a tag into the favourites area at the bottom of the window will ensure that you always have your most-used tags available in Finder’s sidebar and in the secondary-click menu explored earlier.
The checkmarks along the side of the window denote the visibility of that tag in the Finder. Unchecked tags can still be used, but they won’t appear in the sidebar or tag lists. This can be helpful if you have many tags and want to avoid unnecessary clutter in the Finder windows.
If you want to delete a tag that you’re not using anymore, simply secondary-click it and choose Delete Tag. If you have files that still have that tag applied, the tag will be removed from them but the files themselves remain untouched.
Different Ways to Tag Files
Besides the right-click method we tried, there are a number of different ways to apply tags to files. The most evident is by using the tag area of the Finder sidebar. Simply drag & drop a file or folder onto a tag to instantly tag it.


Likewise, the dedicated tags button in Finder opens the same dialog you’d see if you secondary-clicked a file and chose the Tags… option, meaning you can easily create new tags on the fly. Needless to say, you can highlight multiple files or folders and use the button to simultaneously tag them all.


In any application that makes use of Apple’s new document model and iCloud saving, you’ll also be able to tag files from the menu that appears when you click the title bar. Underneath the text box for naming the file, you’ll see one for adding tags, and you can easily input existing tags or create new ones from here.


Making Use of Tags
Once you understand how to create, add and modify tags, you can put them to work.
With some files tagged, you can begin to appreciate their power by going to retrieve tagged files. Open a Finder window and use the sidebar tags area to select a tag. Any file with that tag instantly appears, regardless of what folder or drive it’s on.
If you’re wondering how this improves upon putting files in folders, consider a situation where you have multiple file types you’re working on for a project. The documents are likely filed away in the Documents folder under the appropriate subfolders, while pictures might be in their own spot, perhaps on an external drive. By tagging all of the files, regardless of where they live on your harddrive, you can easily call up everything related to a project by using its tag.
Even if you reverse the system, tags are still useful. If you have all files for a project consolidated into a project folder already, then you can use tags to quickly call up only the documents, or only the audio files, without having to set up a search query that takes into account all the possible file types. Just tag every document—spreadsheet, text, or PDF—and they’ll be available immediately when you call up that tag.


Create a tag for invoices and you’ll be able to quickly pull up invoices for all clients, even if they are all stored in different folders per client or per project. Similarly, tagging time-sensitive documents can help you maintain a grasp on what needs your attention.
If your workflow involves approvals from clients, tagging files with their current status—In Progress, Delivered, Approved, Rejected, etc.—can be tremendously helpful and requires no moving of files from one virtual bin to the next.
All of the examples above can be accomplished with only one tag per file, so imagine how powerful the system can get when you start making use of the ability to apply multiple tags.
Limitations and Third Party Help
Returning for a second to the approval-based workflow example I gave above, imagine that you’re on a team where the files actually do need to be moved from one place to another based on their status; for example, from a local machine to a cloud drive once they’re ready for scrutiny.
In this case, you can use tags to designate the file’s status, and then turn to a third party app like Hazel to keep an eye on the files and automatically move them to the appropriate location when their tags change.
Or, if you’re a die-hard fan of the old labels and how they spread the colour across the entire file name, you could appeal to a plugin like TotalFinder to regain access to that appearance while maintaining the new tag functionality.


As you can see, the tag system is robust and flexible, so much so that you might think their is a downside. Besides the small things like not being able to choose custom colours and not being able to assign colours to tags outside of Finder’s preferences, there are more significant concerns.
Tip: there’s actually a good reason for why you cannot choose custom colours for your tags, and it has to do with the backward compatibility to tags to labels. You can read more about this (complicated) issue about Tags implementation if you’re interested in digging deeper.
Specifically, while you can tag files on network drives, those files will not show up in searches, which is a strange and potentially very confusing issue that Apple will hopefully address in a future OS update. Similarly, because tags are a kind of file metadata, you can’t use them on drives that aren’t indexed and formatted as Mac OS Extended.
One final limitation is the unpredictable compatibility with cloud services. Outside of iCloud, which naturally implements tags by default, other services, including Dropbox and OneDrive, do not reliably sync file tags. Depending on the version of the client that you’re running, tags are either ignored, sync one way only, or are removed entirely, so make sure to test your tags if you want to rely on cloud syncing services.
To Tag or Not to Tag
The hardest part about using tags is letting go of the very structured mentality of file management that we’ve grown accustomed to.
Realistically, tools like Spotlight and Alfred make it possible to keep your files strewn haphazardly across your drive with absolutely no sense of organization and still call them up instantly. But not many people are okay with doing things that way.
Tags provide a healthy middle ground, where files can be organized neatly but not obsessively, and tags can step in to provide easy access without the need for moving things around or performing complicated compound search queries.
The best way to get started with tags is judiciously, with a method that makes sense for how you manage files. Spend some time thinking about what files you access most, and you’ll be well on your way to crafting a tagging system that helps you work faster and smarter.
I’ve only just scratched the surface of what tags can do, so if you have cool ideas or want to share your experience with trying tags, drop into the comments and let me know!


