

In this series of tutorials, I am showing how to build a Hackintosh—a non-Apple computer that runs OS X. In the previous tutorial I showed how to pick OS X compatible parts and highlighted the components I had chosen.
In this tutorial, I’ll show you how to take the parts and assemble them into a functioning computer—albeit one without an operating system. If you buy different parts, this tutorial will still be extremely useful to you. You will just have to consider how what I describe applies to your components, rather than just follow them word for word.
The Component List
When assembling a Hackintosh, it’s important to gather all your components together before you start assembling them. The components I have are:
- Gigabyte Z87MX-D3H Motherboard.
- 3.4 GHz Intel Core i5–4670K Quad-Core CPU.
- 16GB of Corsair Vengance DDR3 RAM.
- 250GB Samsung 840 EVO SSD.
- 2TB Seagate Barracuda HDD.
- 600 Watt Corsair CX Modular PSU.
- 1GB ASUS GeForce GTX 650 Video Card.
- Fractal Design mid-tower case.
- Extra case screws.
General Guidelines
If this is the first time you have assembled a computer, there are a few things to bear in mind.
Computers are held together with screws. You’ll need at least a small flathead screwdriver and a small Phillips head screwdriver. If you have a few sizes of both, it only makes it easier.
When attaching components with screws, work to opposite corners. If you add a screw in the top left, the next one should be added to the bottom right. This is the best way to make sure that the load is spread evenly across all the screws.
You can never have too many case screws; buy a pack of spares.
Computer components can be damaged by static electricity. When building a computer, it is a good idea to have, at the minimum, an antistatic wrist strap. Put the wrist strap on and connect the other end to the computer case, or to something that is metal and grounded like a radiator.
Even better is to use an antistatic mat as well, however, simply assembling the computer on something that is a poor conductor of electricity like a cardboard box, wooden table or the motherboard’s antistatic wrapper is generally sufficient.
Computer components are precision engineered. The tolerances on many of the parts are very small. Inserting some components can require a surprising amount of pressure.
You should never have to force components together, but don’t be alarmed if you do have to push down on something for it to close. If in doubt, remove the component, carefully realign it and push down again. As long as you are careful not to bend any pins by inserting things at the wrong angle, you are unlikely to damage your computer.
When you’re picking up components, do it by their edges. In particular, try not to touch pins that get inserted.
Keep a bowl on hand. Add every screw and connector that you remove to it so you don’t lose anything.
With a lot of things, the manual isn’t very useful. The motherboard is not one of them. Read the motherboard manual; it contains important schematics that show you where all the different components and wires connect into the motherboard. Building the computer will be simple if you spend the time to look at these schematics carefully—if you don’t, it will be a whole bag of hurt.
Motherboard manuals are almost always available online. Just google the name of your motherboard and manual. The manual for the board I am using is on the Gigabyte website.
Computer components are designed to be assembled. This may seem like a strange point but it’s important. You should handle all the components with care, but not to the extent that you never open their boxes for fear of damaging them.
Try not to drop things, pour water on them or do anything else ridiculous. Other of that, so long as you stick to the guidelines above, you’re unlikely to do any harm to the computer just by putting it together.
You didn’t get the computer from Ikea (I hope). It’s normal to have a load of leftover components. Keep them as spares, or for expanding the Hackintosh with more components in the future.
Assembling the Hackintosh
There is no right order in which to build a computer. It all depends on personal choice, and how much adding a component limits the ability to add other components. What follows is the order I built this particular computer in.
Opening the Case
The case has two sliding panels, one on each side attached by two black screws on the back. Remove both panels. There is also a metal plate for mounting extra drives. It’s unnecessary for this build so remove it also.
Installing the PSU
The PSU sits above the motherboard in this case. It mounts on a slight lip, that when it is screwed in, provides all the support it needs. Slot it in ensuring that it is mounted in the correct direction. Attach it at the back with case screws.


Installing the Motherboard
Some people like to install some of the other components into the motherboard before they add it to the case. For this build, however, the motherboard and case fit together very tightly. I inserted the motherboard first because I didn’t want to deal with any more bits pointing out at odd angles than I had to.
Before adding the motherboard, add the I/O (input/output) shield to the slot at the back of the case. Carefully look at which way the ports will face, once you have added the motherboard, and insert the shield accordingly. It snaps into place from the inside of the case.


With the case comes small brass standoff screws. These screw into the mounting points on the case and are what the motherboard is attached to. Screw the standoff screws into the mounting holes on the case.
This case supports different motherboard sizes so you won’t end up using all of the attachment points; however, I find it is better to be over-cautious and add all the standoff screws than to miss one and have to remove the motherboard to fix the mistake.
Insert the motherboard and align its screw holes to the standoff screws. Inserting the motherboard will require a few tries and approaches from different angles. Once it’s aligned with the sockets, add the screws that hold it in place.
Installing the CPU and the Fan
Find and open the CPU socket on the motherboard. To open the socket, push the lever holding it closed to the side and then up. There will be a plastic shield to remove.
In one corner of the CPU there is a small gold arrow. On the socket you will find a matching arrow. Align the arrows and gently insert the CPU. Close the CPU socket—don’t force it but it will take a bit of pressure to fully close the lever.


All non-Xeon Intel CPU’s come with a cooling fan. Align the fan to its outline on the motherboard. It goes directly over the CPU. To attach it, push down on the pins in the four corners.


Installing the RAM
Using the motherboard schematic, find the RAM sockets. Open the tabs on either end of the socket. Align the RAM and push down. The tabs will close by themselves when the RAM is fully inserted.


Installing the Hard Drives
This build doesn’t use an optical drive so I used the bay where one would normally go for the hard drives. This bay is in the top right of the case, as you have it open in front of you.
In the bay is a metal mounting plate. Remove this. The mounting plate can hold two hard drives, one on either side.


Using the right screws, attach the HDD to the top side and the SSD to underside. The drives are different sizes so will each use different mounting holes. Make sure to align both drive’s port sockets to the back so they can easily be connected to the motherboard.


Stand the case up. When you add the drives, you will need to attach it on both sides. Insert the drive mounting plate with both drives attached back into the drive bay. Align it with the mounting holes on either side.
This will take some adjusting. With one hand hold the drive plate in place and with the other gently hand screw the mounting screws into place. Once the mounting plate is secured, tighten the screws with a screwdriver.
Attach a SATA lead to each hard drive. These are the L-shaped connectors. Attach the other end to the SATA slots on the motherboard. Use the schematic in the manual to find them.
Wiring (Almost) Everything Up
It is now time to attach all the wires to the motherboard. The only easy way to do this is to work through the schematics in the motherboard manual attaching all the wires. If you don’t have the manual to hand, you can get the manual online.
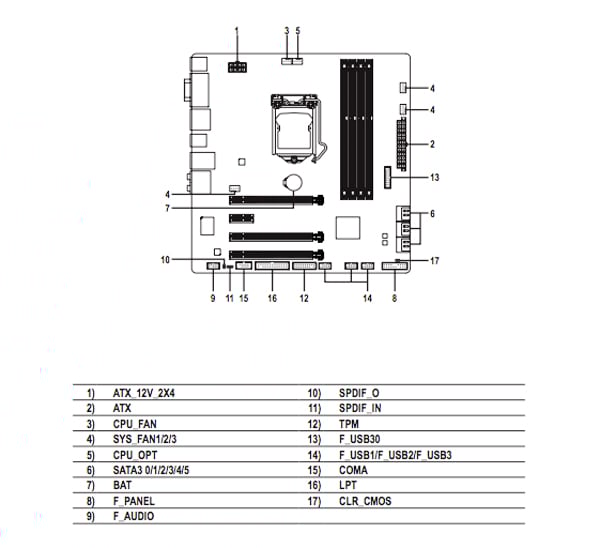

Start with the CPU fan. It attaches to a socket near where the fan is attached.


The PSU connects to the motherboard in two places. One near the CPU, the ATX 12V 2X4 socket, and the other on the far edge of the motherboard near the SATA connectors, the ATX socket.


The majority of the wires connect the case to the motherboard. These wires control things like the front USB ports, the power button and the case speaker. Find the F_Panel schematic in the manual and work through attaching the wires.
For some of them, the polarity matters. There is a little arrow on the positive terminal. Match this arrow to the pin marked with a + in the schematics.


The F_Audio connection is a wire with two connections. You only need to attach one of them, the other is a legacy connector. Find the F_Audio socket and attach the connector that fits the socket.
Attach the USB wires. One of the front USB sockets is USB 3.0, the other is not. Make sure to attach the right wire to the right port.
Attach the case fan to one of the SYS_FAN ports.


Tip: Sometimes a wire will only connect to some of the pins in a socket, rather than all—this is the case with the case fan. The case fan socket has four pins but the case fan wire only has three connectors. This is because the fourth pin is responsible for manual fan speed control. This case fan doesn’t allow manual control and so there’s no connector.
Installing the Video Card
I normally add the video card earlier in the build than this, however, when I did that, I had to remove it again to connect the case ports to the motherboard.
The video card goes in one of the PCI Express x16 slots, although because of its size, it blocks two. Unscrew two of the PCI shields from the case. Align the video card with one the slot. Be careful to clear the case wires so that they do not get caught under, or in, the video card.
Push down until the card is fully in the socket then screw it into the case using the screws that previously attached the PCI shields.


Tip: This is the same procedure for installing any PCI cards. You can get expansion cards that add almost any functionality you can think of to a computer. Before just buying a random PCI card however, check the resources from the previous tutorial to see if they are compatible with OS X.
Wiring Everything (Else) Up
All that remains to be done is to connect the PSU to the video card and hard drives. The PSU is modular so find the wire that matches the power socket on the video card and connect it to both the PSU and video card.
The power cable for the hard drives has multiple connectors. Connect one cable to both hard drives—you’ll have to twist it to get it to attach to both. Attach the other end of the cable to the PSU.


Finishing Touches
Following these instructions means you’ll now have a working computer. Close the case, and attach the power cable to the back of the PSU. You should also connect the video card to a monitor using a HDMI cable.
Turn on the power supply and then press the case power button. The computer should boot to the BIOS, or Basic Input Output System.


If it doesn’t, then something is wrong—this is pretty normal. Disconnect the computer from the power cable, reopen the case and recheck all the connections. You will often find that the motherboard power cable isn’t fully inserted or something equally simple.
I had forgotten to attach the video card to the power and so the computer powered up but nothing came on screen. It took 30 seconds to correct my mistake!
While I wouldn’t advise doing it yet, once you have followed the steps in the final tutorial, installed OS X and made sure everything is working, it is a good idea to get a bag of cable ties, reopen the case (after disconnecting from the power cable of course), disconnect and then neatly reconnect all the wires, using the cable ties, to make sure everything stays tidy.
Conclusion
In this tutorial I’ve shown you how to physically assemble a Hackintosh. If you’ve followed along, either with these exact components or similar ones, you will now have a working computer. All that remains is to install an operating system. This can be Windows, Linux, or as I will show in the next tutorial, OS X.


