If you’re like most Mac users, you probably don’t give your keyboard much thought: You press a key, it relays that key-press to your system, and that’s all there is to it. But there can, in fact, be much more to it, if you take avantage of OS X’s support for multiple keyboard layouts.
When you initially set up your Mac, the OS X Setup Assistant gives you the option of choosing a default keyboard layout. Many users never deviate from that initial choice. You can, however, choose a different keyboard layout any time you want. For instance, if you’re composing in French, you might be better off using AZERTY instead of the standard QWERTY. Same goes for composing in non-Roman alphabets, such as Chinese or Russian: You can switch your keyboard layout to any number of those. And many users prefer to use the Dvorak (or other alternative) layout for more efficient typing.
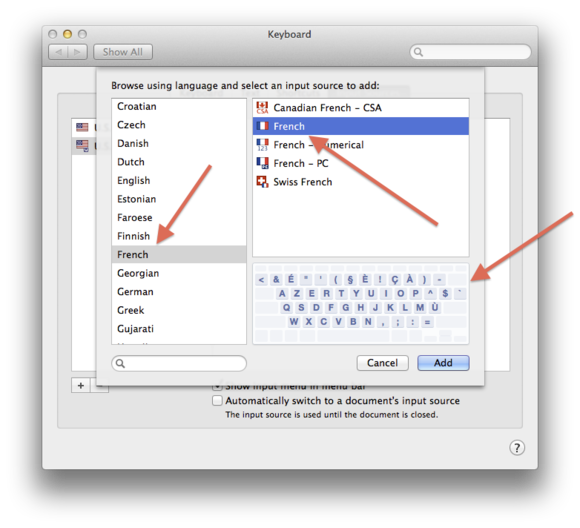
Select your desired language from the list on the left, then select the layout you want on the right. Note that Dvorak and Colemak layouts are under the English language.

Select your desired language from the list on the left, then select the layout you want on the right. Note that Dvorak and Colemak layouts are under the English language.

Select your desired language from the list on the left, then select the layout you want on the right. Note that Dvorak and Colemak layouts are under the English language.
Whatever your reason for using an alternative keyboard layout, you can do so by opening the Keyboard pane in System Preferences, choosing the Input Sources tab, then clicking the Plus button at the bottom of the left column. From there, you can search for and add whichever layout(s) you want.
While this process is fairly straightforward, it can get a bit cumbersome if you need to switch layouts regularly. To make the process faster, once you’ve added your desired keyboards, check the Show Input Menu In Menu Bar option in the Input Sources tab. That done, you should see a flag or input icon in your menu bar; clicking on that will let you select the keyboard layout you want.
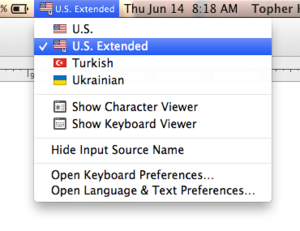
When properly set up, and with the input menu enabled, your keyboard layouts will be accessible from the menu bar.
When properly set up, and with the input menu enabled, your keyboard layouts will be accessible from the menu bar.
When properly set up, and with the input menu enabled, your keyboard layouts will be accessible from the menu bar.
You can also switch between these input sources using hotkeys: Go to the Shortcuts section of the Keyboard system preferences, select Input Sources (which only appears if you’ve enabled more than one keyboard layout) and then check the box next to the hotkeys. Note that those shortcuts may by default be set to Command-Space and Option-Command-Space—which are also the default hotkeys for Spotlight. So you might need to change them. (You could try Control-Space and Option-Control-Space, instead).
If you find yourself needing to switch between layouts regularly, then you might enable the option to Automatically Switch To A Document’s Input Source, which is also on the Input Sources tab. With this feature enabled, changing the keyboard layout will only do so for the currently active document. That means you can switch away from that layout when you switch away from that document, using your main layout on other documents and in other apps. But when you go back to the document, then the keyboard layout you were using with it will be re-activated.
An alternative login keyboard
Finally, you will notice layouts are applied on a per-account basis. That has its conveniences, but it also has the side-effect that the default system keyboard layout will be used at the login window when no account-specific settings are active.
If you don’t want to always use the default layout at login, you can enable the same input menu at the login window. To do so, go to the Users & Groups preference pane, open Login Options (under the list of user accounts), then select the option to Show Input Menu In Login Window. (You’ll need to unlock this preference pane first.)
This done, you can then access the input menu to change your keyboard layout when logging in. However, if you find that you’re always accessing this menu at the login window, you might consider changing the default keyboard layout itself. Unfortunately there is no specific setting for doing this; there is, however, an easy workaround.
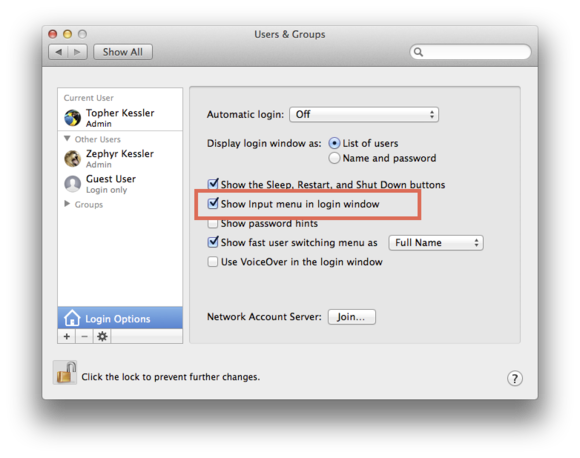
Check this option to show the input menu at the login window, so usernames and passwords can be entered correctly using whatever keyboard layout you want.
Check this option to show the input menu at the login window, so usernames and passwords can be entered correctly using whatever keyboard layout you want.
Check this option to show the input menu at the login window, so usernames and passwords can be entered correctly using whatever keyboard layout you want.
First, configure your user account to use the desired keyboard layout (as instructed above). Then in the Finder, hold the Option key down and choose Library from the Go menu. When the library window opens, go to the Preferences folder and locate the file com.apple.HIToolbox.plist. Select it and press Command-C to copy it.
Next, go to the Finder and navigate to the Macintosh HD > Library > Preferences folder. Locate the same file in this directory and rename it to something like com.apple.HIToolboix.plist-old to make it a backup. Then press Command-V to paste the copied file in this location.
After doing this, you will need to ensure the file is properly readable by the system, so open the Terminal and run the following two commands (you can copy both and paste them together at the Terminal command line:
sudo chown root:wheel /Library/Preferences/com.apple.HIToolbox.plist; sudo chmod 644 /Library/Preferences/com.apple.HIToolbox.plist
With these commands entered, restart your system. The keyboard layout preferences you set for your account will now be applied to the login window. If you would like to revert this setting, you can do so by deleting the copied file and then renaming the backup file you saved, removing the -old you appended to its name. Again, follow this by restarting your Mac.
While this may seem like a round-about way of doing things, it can be useful for a couple of reasons. First, if you primarily use an alternative keyboard layout like Dvorak or Colemak, then you can set this up to be used seamlessly between your login window and your account.
Additionally, you can use the alternative keyboard layout as an extra layer of security: If someone figures our your password and tries to log into your account, by simply having a non-standard keyboard layout like Dvorak configured for the login window will foil the miscreant. Granted, that’ll also mean you have to know the Dvorak layout to log in yourself. But it can be another way to thwart unwanted entry into your Mac account.