
If you’ve just bought a new iPhone 11, 11 Pro or 11 Pro Max, or received an older handset as a hand-me-down, you’ll be wanting to get it set up with your data and settings. In this article we walk you through the process of setting up a new iPhone.
If you’re moving from another iPhone and simply want to transfer your data and settings across, proceed to this section.
If you’re moving from a non-Apple phone (Android, Windows, BlackBerry), jump to this section.
And if this is your first smartphone, or if you’d simply like to set it up as a new device without transferring any old data, go to this section.

Move from an old iPhone to a new iPhone
If you’re upgrading from an old iPhone, you can transfer all of its apps, data and settings to your new iPhone so that your new phone is identical to your old model – just faster. But in order to do so, you’ll need to make a backup (via iTunes or via iCloud).
Step 1: Back up your old iPhone
We have an article about transferring everything from an old iPhone to a new iPhone, but in summary, there are two ways to back up.
iTunes (and Finder)
It’s worth checking that you’re running the latest version of iTunes before you start. Select iTunes from the menu, and Check for Updates.
To make a backup, or update an existing one using iTunes, connect your old device to the computer you normally sync it with via USB, open iTunes, select the device and press the Sync button.
If you’re running macOS Catalina, of course, you no longer have access to iTunes. In this case its duties are handled by Finder.
Connect your iPhone to your Mac as usual. In a Finder window, look under Locations in the lefthand bar, and you should see your phone. Click this (and select the General tab) to see the details and options you’d previously have seen in iTunes.
iCloud
Check that your iPhone has recently backed up: if you’re running a reasonably up-to-date version of iOS, your device will automatically make an iCloud backup once a day as long as it’s locked, plugged in, and connected to a Wi-Fi network, and as long as you have sufficient space available in your iCloud account.
You can find out when your iPhone’s last backup was completed by going to Settings and tapping on your Apple ID info at the top of the main menu, then tap on iCloud, scroll down to iCloud Backup and tap on that.
If the iPhone has been backed up to iCloud the slider beside iCloud Backup will show green. If it isn’t and you want to back up this way, tap the slider.
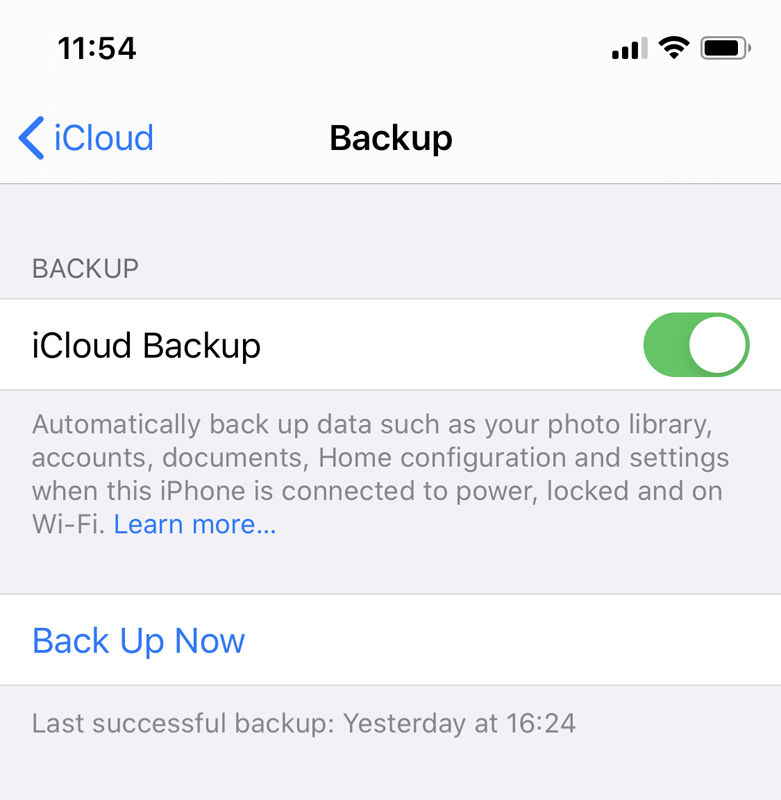
If you want to force a backup because the phone hasn’t backed up recently, tap Back Up Now.
Backing up via iCloud may take longer than via iTunes or the Finder, especially if it’s the first time you’ve done this, so if you’re in a hurry it may not be the best option.
For more information, see our dedicated guide to backing up your iPhone.
Step 2: Turn on your new iPhone and follow the setup wizard
Turn on your new iPhone by pressing and holding (just for a second or two) the on/off button on the top or upper-right of the device. Once the device is on, swipe where it says ‘Slide to Set Up’. Apple will now take you through a number of options.
First you’ll need to choose your language, then your country or region, connect to Wi-Fi, enable Location Services, and then you get the option to Restore from iCloud Backup, Restore from iTunes Backup or Set Up as New iPhone. Since you have a backup, pick the relevant option.
Step 3: Restore from your backup
Now you’re ready to copy the data you backed up on to your new device, depending on which backup method you used (find the relevant one below).
When the restore process is complete, your device will restart.
Restore from iTunes (or Finder)
If you backed up via iTunes, connect your iPhone to the computer that you backed up to. iTunes will ask if you want to restore from backup or set up as new. Select the Restore from this backup option.
While the restore process is taking place, the iTunes progress bar may pause – it may just need more time, so don’t unplug your phone. When the process is complete your new iPhone will start up. Keep the device connected to iTunes to sync your music and other media files.
Again, if you’re running macOS Catalina you will instead use Finder. Look under Locations in the lefthand bar, click your phone. In the General tab, you’ll see the option to Restore iPhone. Click this.
Restore from iCloud
If your old iPhone is backed up to iCloud you don’t even need to plug your iPhone into your computer, although you will want to plug it into a power source. It also needs to be on a Wi-Fi network. In fact, it is possible to set up your new iPhone without ever plugging it in to a computer.
When prompted to set up, choose Restore from iCloud Backup, tap next, and enter your Apple ID and password. Select the backup of your old device and tap Restore. Wait until the device has finished restoring from the backup – the time this takes will depend on how much data is contained in the backup and the speed of your internet connection.
Move from a non-Apple phone to an iPhone
If you’re moving from an Android or Windows smartphone to an iPhone, it should be relatively painless, but transferring data to your new device is easier if you set things up correctly to start with.
Step 1: Back up your old phone
As with the iPhone to iPhone switch in the guide above, if you’re moving from a different type of smartphone to an iPhone you’ll first want to back up the data on your existing phone. The way you do this will be different depending on the type of phone you have, so look below for the guide that’s relevant to you.
Switching from Android to iPhone

Apple has made it much easier to move from Android to iOS with its Move to iOS app, available in the Google Play Store.
- To start, download the Move to iOS app on your Android device and open it.
- Now, while running through the set up options on your new iPhone, look out for the Apps & Data setup screen.

- On your Android device, read the terms and conditions and then tap Agree to continue. Tap Next when you see the Find Your Code screen. Then go back to your iOS device on the Move from Android screen and tap Continue. You should then see a ten-digit code that you need to enter on your Android device.
- You can now select the content on your Android device that you would like to transfer to your new iPhone. Once you’ve picked everything you want, tap Next and leave both phones alone until the loading bar on your iPhone is complete.
- It could take quite a while to complete, so don’t get impatient and click anything before it’s done: you may lose progress and have to start again.
- You can then follow the onscreen instructions to finish setting up your iPhone.
We have more detail about moving from Android to iPhone in a separate article.
Switching from Windows Phone to iPhone
It’s a little more complicated to move from Windows to iPhone because Apple doesn’t offer an app to do it for you.
We have a detailed tutorial about moving from Windows Phone to iPhone.
Switching from BlackBerry to iPhone
There’s not a specific app for switching from BlackBerry either, but we do have a tutorial on how to move from BlackBerry to iPhone.
Activate your iPhone
With your data on the old phone all ready to be transferred to your new iPhone, we’re ready to continue with the setup process.
- Turn on your iPhone by pressing the On/Off switch. A welcome screen greets you, displaying a Slide To Set Up slider that rotates between different languages.
- Pick your language and country, and whether you’d like to enable Location Services. This allows Apple apps (and third-party apps) to access your location via Wi-Fi networks and your GPS (Global Positioning System) location.
- Your iPhone then checks for any Wi-Fi networks in the area that your phone can connect to; if there aren’t any, or if you’d rather use your cellular service, just tap the Next button.
- From here, you can set up your device as a brand-new phone, including setting up a passcode, Face ID or Touch ID, depending on which iPhone you have.
Transfer email, contacts & calendars
If you’re using a Gmail account or other POP or IMAP-based account for mail on your smartphone, it’s already syncing to a central server. You should be able to add that account to your new iPhone with few issues.
Apple’s iOS has automatic setup for those using Microsoft Exchange, Gmail, Yahoo, AOL or Hotmail; you’ll also be able to manually set up a POP or IMAP account for mail, LDAP or CardDAV for contacts, or CalDAV for calendars.
How to import contacts from a really old phone
What if your old phone is really old… If your phone has a nano-SIM card you should be able to transfer contacts.
Copy all your contacts to the nano-SIM in your old phone then, once you’ve set up your new iPhone, you can copy those contacts by swapping out your iPhone’s SIM card with your old nano-SIM and heading to Settings > Mail, Contacts, Calendars > Import SIM Contacts. Once the import has completed, eject your old SIM and put the one that came with the iPhone 5 back in its tray.
If your old phone has a SIM card that doesn’t fit in the new one, but it comes with a USB cable for connecting it to your computer, you may be able to transfer your contacts (and your photos) by exporting them through software.
We have more detailed advice on this process for various non-Apple platforms: How to transfer contacts from Android to iPhone and How to transfer contacts from BlackBerry to iPhone.
Sync music and movies
Use iTunes on your Mac or PC to sync your music, TV shows, movies, and photos from your computer to your new iPhone.
If your smartphone wasn’t an iPhone previously you will need to get the data from your non-Apple device on to your computer and into iTunes. Once your music and movies are in iTunes they will be ready to sync with your new iPhone.
Plug your iPhone into your computer, open iTunes, select your device from the lefthand navigation, and choose the music and movies you wish to sync. If you have a big collection of media and limited space on your device you can create Playlists and set them to sync.
Sync photos to a new iPhone
To sync photos to your iPhone you will need to add them to Photos on your Mac or a Pictures folder on a PC.
To find out more about syncing photos to your iPhone, take a look at the advice in How to use the Photos app on Mac and How to use iCloud Photo Sharing & Photo Library.
Sync non-iOS apps
Unfortunately, you can’t port any Windows or Android apps from your old device to your iPhone; Android apps cannot be installed on iPhones. It is often the case that you will find parallel versions of those apps on Apple’s App Store, though.
Note that if you’ve purchased content through apps – for example, Kindle books – you will be able to download an equivalent app to access the data, in most cases at least.
Keep old SMS and text messages
SMS and MMS logs are not transferrable, but you may be able to rescue them from oblivion. It’s not a simple process, but you may be able to save them on to your computer.
There are a variety of programs available for exporting messages from your smartphones – SMS Backup & Restore for Android is one option.
Set up Face ID
We’ve put this last because it applies only to those lucky enough to have an iPhone X, XS, XS Max, or XR, but you can set this up whenever you like.
iOS will prompt you to set up Face ID during the usual setup process, but if you skipped this, go to Settings > Face ID & Passcode and enter your passcode. Tap ‘Enrol Face’ in the Face ID section.
Now tap ‘Get Started’. When instructed, position your face in the onscreen frame, and move your head around slowly so it can be scanned.
Wait while Face ID scans your face twice. If there are any gaps around the edge of the circle that aren’t green, Face ID is telling you that it needs to scan that area of your face again. When this is all finished, tap Done.

Now get to know iOS
Spend some time getting to know your new phone.
All Apple’s iPad and iPhone models currently ship with iOS 13 and various apps are provided by Apple for free. There are also thousands of apps available on the Apple App Store for you to download. (Here’s how to install apps on an iPhone.)
Here are the 10 best apps for your new iPad or iPhone to get you started, and you can get more advice in our iPhone tips article.
Author: Karen Haslam, Managing Editor

Karen has worked on both sides of the Apple divide, clocking up a number of years at Apple's PR agency prior to joining Macworld more than two decades ago. Karen's career highlights include interviewing Apple's Steve Wozniak and discussing Steve Jobs’ legacy on the BBC. Having edited the U.K. print and online editions of Macworld for many years, more recently her focus has been on SEO and evergreen content as well product recommendations and buying advice on Macworld.com.